
Installation Guide


1-Place the Sport Car Top Carrier on the top of your ve-
hicle with its closed end facing forward.
2-Load your gear inside the carrier, following its aerody-
namic shape. Place items with sharp or pointed edges in
the middle and pack softer items around them (Fig 1).
WARNING: DAMAGE MAY OCCUR TO THE CARRIER
IF EXCESS MATERIAL FLAPS IN THE WIND.
TO ELIMINATE EXCESS MATERIAL, PACK THE
CARRIER FULL. IF UNABLE TO PACK FULL, FILL THE
FRONT CORNERS OF THE CARRIER, SMOOTH THE
TOP, AND PULL THE EXCESS MATERIAL DOWN OVER
THE SIDES. HOLD THE EXCESS MATERIAL SECURELY
IN PLACE WITH THE CARRIER’S STRAPS.
3-Close the ZipRight zipper system (Fig 2), fold the protec-
tive ap down, and secure the Velcro closures.
The Sport 1, Sport 2, and Sport 3 Carriers come with (4)
straps. Attaching (2) straps front to back between the
cross bars or (2) straps side to side between the side rails
will sufciently secure the carrier. Using all (4) straps pro-
vides the most secure method of attachment. The Sport Jr
comes with (2) straps that attach between the cross bars
or the side rails (after you remove the Car Clips). Make
sure your roof rack is anchored to your vehicle and don’t
exceed its weight limit.
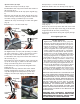
1-Unthread the short strap piece from the center buckle on
the rst strap (Fig 3).
3-Run both strap pieces through the d-rings and over the
top of the carrier (Fig 5). Make sure the center buckle is
facing up and the strap pieces are not twisted.
4-Thread the short strap piece back through the center
buckle and tighten (Fig 6).
METHOD #1: Through The Vehicle
Pack The Carrier
Attach The Carrier - WITH A Roof Rack
Attach The Carrier - WITHOUT A Roof Rack
Sport Car Top Carrier Set Up Guide
The Sport 1, Sport 2, and Sport 3 Carriers will require
(2) double-long straps. The Sport Jr Carrier will use its (2)
standard straps.
The correct attachment of this product is critical and
beyond the control of Rightline Gear. The safe use
and long life of this product depends entirely on
your good judgment and following these directions.
1-Leave the rst strap as originally provided. Unthread
the short strap piece from the center buckle on the second
strap (Fig 7).
3-Run the double-long strap through the vehicle, through
the d-rings, and over the top of the carrier (Fig 9). Make
sure the center buckle is facing up and the strap is not
twisted.
Fig 1
Fig 5
Fig 4
4-Thread the double-long strap’s end through its buckle
and tighten (Fig 10).
Fig 2
5-Repeat steps 1-4 for each strap used.
5-Repeat steps 1-4 for the second double-long strap.
WARNING: DO NOT ATTACH STRAPS DIRECTLY TO
THE D-RINGS; DAMAGE MAY RESULT. THE D-RINGS
FUNCTION AS GUIDES FOR THE STRAPS, NOT AS
ATTACHMENT POINTS FOR THE STRAPS.
2-Attach the short strap piece to your rack by threading
its end through its loop and pulling tight (Fig 4). Secure the
long strap piece to the rack on the opposite side of the
vehicle by the same method.
Sport 1, Sport 2, and Sport 3 Carriers: (4) straps
2-Connect the second strap pieces’ loop-ends to the rst
strap’s loop-ends to create a double-long strap (Fig 8).
Double Long Strap
Loop Ends
Buckle
Buckle
Tri-glides
Fig 3
Fig 6
Long Strap
Piece
Short Strap
Piece
Long Strap
Piece
Short Strap
Piece
D-Rings