200 GPS Navigator User Manual
Welcome Congratulations and thank you for choosing the RightWay 200 GPS Navigator. We hope you enjoy using this exciting product and trust that it will make your driving experience more comfortable, stress-free, and entertaining. This guide will tell you everything you need to know about using your RightWay 200 GPS Navigator. It will explain the basics, share some tips for operation and show you how to customize your Navigator.
TABLE OF CONTENTS TABLE OF CONTENTS....................................................................................................3 GETTING STARTED ........................................................................................................6 BASIC OPERATIONS ......................................................................................................7 RW 200 GPS Navigator Hardware ...................................................................................................
2D Where Am I ..................................................................................................................................................................... 30 2D Next Turn......................................................................................................................................................................... 31 2D Destination ...............................................................................................................................
Skin ........................................................................................................................................................ 63 Changing the Color Scheme ................................................................................................................................................. 63 System ...................................................................................................................................................
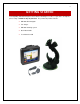
GETTING STARTED Your RightWay 200 GPS Navigator comes with the following accessories. If your box is incomplete, please notify us within 14 days of purchase.
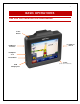
BASIC OPERATIONS RW 200 GPS NAVIGATOR HARDWARE Power Button SD Memory Card Slot Lock/Unlock Switch Headphone Jack Reset Button Stylus (in the corner on the back) USB Charging Port
MOUNTING YOUR RW 200 Your RW 200 GPS Navigator can be easily secured to either the windshield or the dash for optimal viewing while driving. The mounting system consists of the following pieces: Adjustable arm with suction cup Navigator cradle Dash disk with adhesive backing ATTACHING THE MOUNT 1. Select a location for the mount on the windshield or dashboard that does not obstruct the driver‟s view or interfere with the operation of the vehicle. 2.
DETACHING THE MOUNT 1. Pull the locking lever away from the base of the mount. 2. Grasp the pull tab of the suction cup and gently pull away from the windshield or dash to break the suction. Caution! It is illegal in California and Minnesota to attach anything to the windshield. When using navigation aids in a vehicle, it is your sole responsibility to place, secure and use these aids in a manner that will not cause accidents, personal injury, property damage, or in any manner to obstruct your view.
POWER BATTERY STATUS ICON Full battery Drained CHARGING THE BATTERY The RW Navigator comes ready to use with a charged battery. At some point in time, the internal battery will need to be re-charged. This is done through a car charger. 1. Insert the small end of the car charger cable into the charging port of the RW 200. 2. Plug the larger end of the car charging cable into the jack of the cigarette lighter. 3. Battery charging begins. While charging, the indicator light will be red.
PROGRAMS WINDOW OVERVIEW The PROGRAMS WINDOW of the RightWay 200 GPS Navigator contains five programs – navigation, music player, movie player, e-book reader, and photo viewer – as well as settings which can be changed. To start any of these programs, tap on the icon.
NAVIGATION To begin navigation, tap the „Navigation‟ button. A screen will appear with a safety warning. Tap „Accept‟ and the main navigation window will open. TIPS & TRICKS The RW 200 GPS Navigator has many great features. To help you get to know them, we have included a Tips & Tricks at start up. To turn off Tips & Tricks, uncheck the „Show Tips & Tricks‟ box. To see more, use the arrows. To close the window, click on the white X in the red circle.
GPS START UP The RightWay 200 GPS Navigator has an integrated GPS receiver. The first time you use the GPS receiver it may take up to 10 minutes to initialize. After the first time, GPS reception should start within one minute of turning on the device. If the navigation device has been switched off for more than a week, the next initialization can take up to 5 minutes. GPS Signals GPS signals are limited inside buildings, tunnels, and parking lots.
FIRST TRIP SELECTING A DESTINATION The RW Navigator uses GPS satellites to calculate your exact position so you don‟t have to enter your starting point. Simply enter your destination and the Navigator will take you there, providing detailed turn instructions all the way. Tap Menu > Destination > Address. Enter the city/town name of your destination. Select the correct city or area when it appears in the list below. Scroll down to see more address options matching what you have typed.
Quick Destination Entry You can select a destination from the map. Click on Menu > Destination > Next arrow and select Pick on Map. A map of the area around your current location will be displayed. Touch the screen to move around the map and tap your desired destination when you find it.
MORE... There‟s more you can do when entering your destination and setting off. Here are some helpful page references in this Guide: Plan a trip with multiple destinations, waypoints or optimize your trip – pages 1819. Set and save Work and Home addresses for quick and easy route planning – page 26. Create and manage your favorite destinations – page 27. Choose to see an itinerary list of your route, a map of each turn, or a demo of the whole route – page 20.
ON THE MOVE CHANGE THE DRIVING VIEW There are lots of different driving views to choose from. Simply select Menu > Next>Driving Views. Learn more about the different driving views – page 23. MAKE A DETOUR Make a detour from your current itinerary. You can choose an alternate route, or just detour around a section of the route. Select Menu > Detour. Learn about the different detour options – pages 34-35.
IN USE SELECTING MULTIPLE STOPS FOR YOUR TRIP The RW 200 GPS Navigator allows you to plan a trip with multiple destinations. Tap Menu, scroll to the next page and tap Plan or Edit Trip. Tap Add Stop and choose Address. Add the first address in the same way as detailed above; see Selecting A Destination on page 14. Tap Add Stop again to add your second, third, fourth, etc. address. CUSTOMIZING YOUR TRIP When you have entered all your stops you can change the order they appear in.
SETTING WAYPOINTS You can route through a certain point without considering it as a stop. By setting Waypoints you can adjust the route, to calculate a detour via the waypoint. Select Menu > Next> Plan or Edit Trip. Enter the address or place in the same way detailed in Selecting a Destination on page 14. The address will appear on the trip list as a Stop, with a flag icon next to it. Tap on the address you wish to change to a Waypoint. A pop-up menu will appear containing a list of options.
SAVING A TRIP When you have finished entering all your addresses, you can save your trip to access at a later date, rather than start driving right away. Tap Save Trip. Enter a name for the trip you are saving. Tap Save and the trip will be saved to the memory card. LOADING A SAVED TRIP Tap Menu, scroll to the next page and tap Plan or Edit Trip. The last trip you planned will automatically load.
SETTING ROUTING OPTIONS FOR YOUR TRIP Select Routing to change the routing options for your trip. The available settings are: Vehicle type: Choose from Automobile, RV, Motorcycle, Bicycle, Walking or Straight Line. Routing type: Choose whether you want to always choose the route quickest in time or the shortest in distance, avoid expressways or a scenic route. Routing profile: Choose from Default routing or a routing profile previously created and saved.
PREVIEW OPTIONS FOR YOUR TRIP Select Preview to see the preview options for your journey. Route Demo: See a preview of your trip, including instructions. You can choose to speed up the demo with Faster or slow it down by tapping Slower. Tap Close to exit. Turn Maps: Displays a map of each turn of the trip. You can choose to see the Next or Previous turn. Tap Close to exit. Itinerary: Shows each direction in a written list with distance to the turn. Tap Close to exit.
GUIDANCE The RW 200 GPS Navigator will guide you to your destination with clear on-screen and spoken instructions. Whenever you are approaching your next turn, the RW 200 will speak to you to alert you to the upcoming direction change. DRIVING VIEWS You can choose from six different screen display options. To access, tap Menu > Next> Driving Views. In the default mode, your screen will look like the one below. For more details on each view see Setting Display Mode on page 28.
ETAS AND DISTANCES The estimated time of arrival (ETA) and the distance remaining are displayed on the right of the screen, no matter which driving view you have selected. You can choose what useful information is displayed at the bottom of your screen when you are driving, please see Customizing the guidance screen on page 28. NEARBY POINTS OF INTEREST If you‟re running low on gas, looking for a hotel or you want a bite to eat, CoPilot has millions of pre-loaded Points of Interest (POIs) to search.
Widen your search The RightWay 200 GPS Navigator will list the POIs within a ten mile radius of your current GPS position, to increase the radius by another ten miles tap More. POI in the city You can search for a POI within a city, near your current location or along your route by pressing Destination > POI Search. You can search for a particular POI within a category, by name. For more details, see Advanced POI Search on page 33.
PERSONALIZE Enter and save personal destinations, change the map style and color theme, adjust your routing options, and select the voice that guides you to your destination. With the RW 200 you can personalize your device to behave exactly the way you need. SAVING A DESTINATION AS HOME Save your home address so you don‟t have to enter it every time you wish to be directed home. Menu > Destination > Home. Enter your home city/town name.
SAVE YOUR FAVORITE DESTINATIONS You can save other addresses to your Favorites list, so you can access them quickly. Tap Menu > Destination > Favorites. Tap Add New and it will return to the Destination menu. Choose to add the favorite by inputting the address or zip code (tap Address) or by locating it on a map (Pick on Map). When you‟ve successfully added the address or location, it will appear in your Favorites list.
TO CHOOSE A RECENT DESTINATION Select Menu > Destination > Recent provides quick and easy access to the last 50 destinations that you entered. Note: Your recent list will store the last 50 addresses you have entered. When the list is full each new address will replace an older inactive address. TO DELETE THE RECENT LIST Select Menu > Destination > Next> Recent > Clear All TO CHOOSE AN INTERSECTION AS A DESTINATION Select Menu > Destination > Next> Intersection.
PERSONALIZING THE VOICE INSTRUCTIONS You can alter the voice with which the guidance instructions are spoken. For more detail on altering the Language and Speech options see page 39. Tap Menu > Settings > Language and Speech. Select a voice using the up and down arrows next to the Choose a Voice field. Tap Test to hear a sample of the chosen voice. SETTING MAP STYLES Tap Menu > Settings > Map Styles.
DISPLAY SCREEN OPTIONS DRIVER SAFETY We recommend you choose driver safety, which displays a simple turn instruction arrow with concise next turn instructions in large type. In driver safety mode, a map is only displayed as you approach a turn or are traveling below 10 mph. Adjusting the safety view You can alter the settings of the driver safety view. See Adjusting the Safety View on page 38. 3D This mode shows your current position, next turn and surrounding roads using a bird‟s eye view.
2D NEXT TURN Displays your current location and auto zooms into the next turn on a 2D map. 2D DESTINATION This view shows your route from your current position to your destination. ITINERARY This view shows each direction and turn in a written list, including distances.
NIGHT MODE Night mode can be activated on any of the display screen modes. It dims the GPS display to reduce glare and eye strain when driving at night. The RW 200 will automatically switch to night mode based on the time and your location, or you can do it manually from the Driving Views menu. Tap Menu > Next> Driving Views> Next > Night Mode scroll to the nest page and select Night Map. To switch off Night Mode, just select Day Mode.
ADVANCED SELECTING A DESTINATION USING LAT AND LONG If you know the latitude and longitude of your destination you can enter them directly. Tap Menu > Destination scroll to the second screen and tap Coordinates. Choose to set the latitude and longitude in Degrees Minutes Seconds, Decimal Degrees or Decimal Minutes. Enter a latitude and longitude in the appropriate format depending on which one you selected. The RW 200 will take a few moments to find the point.
ADJUSTING THE POI SETTINGS You can choose when to have POIs shown on screen and the distance at which you are alerted to them by adjusting the POI settings. Tap Menu > Settings > Next> POIs. Enable the POIs by checking the box. Disable by un-checking. Choose to Show POIs Always, Never or When Stopped from the drop down menu. In the Report POIs this far ahead field, select a distance between 0.2 and 25 miles.
ENDING A DETOUR If you are on a detour route and would like to return to the original trip tap Menu > Detour > End Detour. OPTIMIZING STOPS The RW 200 has an Optimize Stops function, which will automatically rearrange the stops within a trip to create the most efficient order. When you have programmed a trip with more than 3 stops, tap Optimize. The RW 200 will take a few seconds to reorder your stops for the most efficient route. Your start point and destination will not be altered.
SETTING MAP STYLES Tap Menu > Settings > Map styles. Choose the default setting for the day or night mode from the list, using the arrow buttons. The options are Automatic, Night and Day. If you select Automatic, the RW 200 will automatically switch to night mode when it starts to get dark, based on the current time and location. To change the setting, tap the down arrow below Day/Night Mode, to select between Day and Night, once you have made your selection tap OK.
SAVING A ROUTE PREFERENCE To save a routing profile scroll to the bottom of the page and tap Save as Routing Profile when prompted enter a name for your profile and tap OK. LOADING A SAVED ROUTING PROFILE To load an existing profile tap Load Routing Profile and select one of your previously saved ones or the Default profile. Click OK twice to return to the Settings menu and apply the profile.
ADJUSTING YOUR SAFETY VIEW Tap Menu > Settings > Next> Driver Safety. From here you can alter the settings of the Safety View in the following ways: Display Map Near Turns: Decide whether to show a 2D/3D zoomed map on the approach to each turn or always show the Driver Safety screen. Check the box for Yes to display the map or No not to. When the Turn is Within: If you selected Yes above, choose the distance before the turn you would like the map to be displayed.
ADJUSTING THE GUIDANCE SETTINGS You can adjust the way your RightWay 200 GPS Navigator guides you. Tap Menu > Settings > Guidance. Select at what distances your want the RW 200 to speak to you when approaching a turn. Select what information you wish to be displayed on the customizable part of the screen, the options are Destination, Current Road, Next Crossroad, Next Major Road, Nearest Town, Speed & Distance, Altitude & Heading, Latitude & Longitude.
PLAYING A DEMO The RW 200 contains a demonstration trip to a pre-defined destination. To view the demo: Tap Menu > Next> Next> Play scroll through and select Play Demo. Speed up by tapping Faster or slow down by tapping Slower. Tap Close to exit the demo mode.
MULTI-MEDIA FEATURES In addition to superior GPS navigation, the RightWay 200 GPS Navigator allows users to listen to music, watch movies, read e-books, and view photos stored on a memory card. The following sections will provide information on using the multi-media features available.
MEMORY CARD The music, books, videos, and/or pictures used with these programs need to be stored on a storage or memory card (i.e. SD card). SD cards may be purchased at most stores carrying electronic devices and come in a wide range of capacity. Please follow the directions that come with your card for saving items to an SD card. INSERTING A MEMORY CARD 1. Locate the notched end of the memory card. This is the end to insert into the memory slot. 2.
MUSIC PLAYER The RightWay 200 Navigator allows users to listen to music. It can play MP3, WMA, and PCM files. 1. Copy the desired music files to a memory card. 2. Insert the memory card into the unit. 3. Tap the Music button to open the music menu 4. The MUSIC PLAYER screen will briefly open, then switch to the window showing the NANDFlash and the memory card. Either double click on the memory card or highlight the storage card and tap the checkmark to open the file. 5.
MUSIC PLAYER SCREEN Name of Selection Length of Selection Played Mode of Play Indicator (Shuffle or Loop) Total Length of Selection Action Indicator (Play or Pause) (Play or Pause)
MUSIC PLAYER BUTTONS Previous Song Loop/ Shuffle Mute Pause/Play Next Song Volume Open List * *When you tap the Open List button, three additional buttons appear on the screen.
MOVIE VIEWER The RightWay 340 Navigator allows users to watch movies and videos. It can play MP4, ASF, WMV, AVI, and DIVX files. 1. Copy the movie and/or video file you wish to view to a memory card. 2. Insert the memory card into the unit. 3. Tap the Movie button to open the movie menu. 7. The MOVIE VIEWER screen will briefly open, then switch to the window showing the NANDFlash and the memory card.
MOVIE VIEWER SCREEN Name of Movie Video Progress Minutes of Movie Viewed & Total Length of Movie
MOVIE PLAYER BUTTONS Close Previous Movie Full Screen Mute Pause Increase Volume Next Movie Decrease Volume List Movies* *When you tap the List Movie button, three additional buttons will appear on the screen.
E-BOOK READER The RightWay 200 Navigator allows users to read TXT files on their device. 1. Copy the TXT file for the book you would like to read to a memory card. 2. Insert the memory card into the unit. 3. Tap the E-Book button to open the E-BOOK READER screen. 4. Tap the Add Book button. 5. A window will open showing the NANDFlash and the memory card. Either double click on the memory card or highlight it and tap the checkmark to open the file. 6.
E-BOOK READER SCREEN Title of Book Current Page Number Total Number of Pages E-BOOK READER BUTTONS Close Scroll Up Scroll Down Jump* Add Book *When you tap the Jump button, a new screen will open enabling you to “jump” to any page in the book.
USING THE JUMP BUTTON 1. Tap the Jump button. 2. The PAGE NUMBER WINDOW opens. Use the number buttons to tap in the page number you want to go to, then tap the Enter button. Page Back Space Number Enter 3. The E-BOOK READER screen appears displaying the page corresponding to the number you entered.
PHOTO VIEWER The RightWay 200 can be used to view photos in BMP, JPG, GIF, and PNG formats 1. Copy the photo files for the pictures you would like to view to a memory card. 2. Insert the memory card into the unit. 3. Tap the Photo button to open the PHOTO VIEWER screen. 4. Tap the Add Photo button. 5. A window will open showing the NANDFlash and the memory card. Either double click on the memory card or highlight it and ap the checkmark. 6.
PHOTO VIEWER BUTTONS Close Add Photo Previous Full Screen Photo Next Photo Move Image (when zoomed in) Zoom In Rotate o Image 90 Zoom Out
SETTINGS MENU The RightWay Navigator allows users to make changes to various settings on their device. Each will be described in greater detail on the following pages. Tap the Close button at any time to return to the Programs Window.
NAVIGATION SETUP The Navigation Setup button tells the RightWay 200 Navigator the path and file name of the navigation software. The device is programmed to the proper settings for navigation. TOUCH SCREEN CALIBRATION RE-CALIBRATING THE TOUCH SCREEN 1. Tap Settings, then the emerald T-Scr button. 2. 3. A white screen will appear with a + in the center. Tap the center of the + with either the stylus or your finger. A new + will appear in a corner, again tap in the center of the +. 4.
LANGUAGE The RightWay 200 GPS Navigator can be viewed in 18 different languages, enabling you to chose the language which works best for you. CHANGING THE LANGUAGE USED 1. Tap Settings, then the Language button. 2. The language screen will appear. Use the arrows to scroll up and down to view the list of languages available. Highlight the language you want use, then tap the close button. 3. The screen opens featuring the chosen language.
GPS STATUS The GPS Status button enables you to view information about the GPS, its function and your current location. VIEWING THE GPS STATUS MENU 1. Tap Settings, then the GPS Status button. 2. The GPS Status window opens showing the number and strength of the satellite signals. Tap the T button. 3. The full GPS STATUS MENU screen appears. Tap the button next to the type of information or action you would like.
RESET THE GPS If you are having trouble acquiring a GPS fix, sometimes it is helpful to reset the GPS and have it begin searching for satellites again. Tap the T button next to the words „GPS Reset‟ to reset the GPS. GPS DATA FROM SATELLITE Tap the satellite icon to bring up the GPS DATA screen. This shows the NMEA message being received from the satellites. The GPS receiver then translated this message into usable information. GPS SIGNAL Tap the bar graph icon to view the GPS SIGNAL screen.
LONGITUDE, LATITUDE, ALTITUDE & UTC Tap the grid icon to see your current longitude, latitude and altitude. It also shows the UTC or Universal Time Code. which is another way of saying Greenwich Mean Time. Note: UTC is another way of saying Greenwich Mean Time, which is near London, England. To determine the time where you are, subtract the appropriate number of hours from the UTC.
CHANGING THE BRIGHTNESS OF THE SCREEN 1. Tap the Settings button, then the Backlight button to open the backlight screen. 2. Tap + to make the screen brighter or – to make the screen darker. 3. When the screen is the brightness you want, tap the Close button. Darken Screen Brighten Screen CHANGING THE BACKLIGHT SHUT DOWN TIME 1. Tap the Settings button, then the Backlight button to open the backlight screen. 2. Scroll up and down to find the option that suits your needs best.
VOLUME The volume feature enables you to adjust the volume of the unit and the touch tone. CHANGING THE VOLUME 1. Tap the Settings button, then the Volume button to open the volume screen. 2. Tap + to make the volume louder or – to make the volume softer. 3. When the volume is at your desired level, tap the Close button.
TIME The Time button enables you to modify the date, time, or time zone displayed by your unit. CHANGING THE TIME OR TIME ZONE 1. Tap the Settings button, then the Time button to open the Time & Date screen. 2. Use the up and down arrows to scroll through the date and time options. Use the right and left arrows to scroll through the time zone options. 3. When the screen displays the desired date, time and/or time zone, tap the Close button.
SKIN Skin refers to the background color(s) of the unit. There are two choices for the skin color: black or light green. Light green is the default setting. CHANGING THE COLOR SCHEME 1. Tap the Settings button, then the Skin button to open the Skin screen. 2. Highlight your choice of skin, and then tap the Close button. 3. The screen opens in the selected skin.
SYSTEM The System button enables you to view information specific to your unit, such as the ID number and availability of memory. When you tap the System button, the following screen will appear. Note: Tapping „Initial Setup‟ will cause a factory reset, losing any information or settings you have made.
FREQUENTLY ASKED QUESTIONS Why won’t my unit turn on? Check the power. Does the battery need to be charged? Plug into a power source and then try to turn on the device. Why am I unable to get a GPS signal or fix? The very first time you use the RightWay 200 GPS navigator, it can take up to 10 minutes to initialize the GPS. After the first time, GPS reception should start within 1 minute of turning on the device.
TECHNICAL SPECIFICATIONS* Physical & Performance: Dimensions 3.7” x 3.3” x0.9” Weight 145g Display size 3.5” Display resolution 320 x 240 WQVGA Screen type Anti-glare Touch screen Yes Battery 1050 mAH lithium ion rechargeable Battery life 3 hrs working (avg.) 180 hrs sleeping (avg.
SAFETY & WARRANTY INFORMATION SAFETY INFORMATION Use this navigation system at your own risk. Caution! To prevent accidents, do not operate the navigation system while driving. Caution! Do not look at the display unless it is absolutely safe to do so! Caution! Traffic regulations have priority over any instructions from the navigation system.
LIABILITY RightWay GPS, its dealers, suppliers and distributors disclaim all liability for any use of this product in any way that may cause accidents, damage or that may violate the law. RightWay GPS, its dealers, suppliers and distributors disclaim all liability for any use of this product in delivering medical aid, transporting of medical patients and/or equipment, or transporting medical emergency victims. Do NOT use this product during the time of local, state or national emergencies.
End-User Remedies: If the Software does not conform to the “Limited Warranty” above, ALK‟s entire liability and your sole and exclusive remedy will be, at ALK‟s option, either to (i) correct the error, or (ii) help you work around the error, or (iii) accept a return and issue a refund through your retailer. The Limited Warranty is void if failure of the Software has resulted from your fault, abuse, or misapplication.
Restrictions.
reliability, fitness for a particular purpose, usefulness, use or results to be obtained from this Data, or that the Data or server will be uninterrupted or error-free. Disclaimer of Warranty: ALK AND ITS LICENSORS (INCLUDING THEIR LICENSORS AND SUPPLIERS) DISCLAIM ANY WARRANTIES, EXPRESS OR IMPLIED, OF QUALITY, PERFORMANCE, MERCHANTABILITY, FITNESS FOR A PARTICULAR PURPOSE OR NON-INFRINGEMENT.
DOES NOT EXIST OR WAS CAUSED BY CUSTOMER‟S OR ANY THIRD PERSON‟S MISUSE, NEGLECT, IMPROPER INSTALLATION OR TESTING, 25 UNAUTHORIZED ATTEMPTS TO OPEN, REPAIR, OR MODIFY THE PRODUCT, OR ANY OTHER CAUSE BEYOND THE RANGE OF THE INTENDED USE, OR BY ACCIDENT, FIRE, LIGHTNING, OTHER HAZARDS, OR ACTS OF GOD. THIS WARRANTY DOES NOT COVER PHYSICAL DAMAGE TO THE SURFACE OF THE PRODUCT, INCLUDING CRACKS OR SCRATCHES ON OUTSIDE CASING.
CUSTOMER SERVICE At RightWay we believe that the customer deserves the best possible service and support. We look forward to assisting you in making the most of your RightWay product. On-Line www.RightWayGPS.com E-Mail All e-mails will be answered within 2 business days. Technical Support contact Support@RightWayGPS.com for help trouble shooting, repair requests, ask questions about warranty Customer Service contact Service@RightWayGPS.