355 GPS Navigator User Manual
Table of Contents GENERAL INFORMATION Getting Started ................................................................................................................................................ 5 Customer Service ........................................................................................................................................... 5 Warranty ............................................................................................................................................
TAKE ME HOME BUTTON ............................................................................................ 42 SHOW MAP BUTTON .................................................................................................... 43 Selecting a Destination Using the Map ......................................................................................................... 44 START NAVIGATION BUTTON .....................................................................................
ADDITIONAL PROGRAMS Programs Window ......................................................................................................................................... 91 Removing & Inserting a Memory Card ......................................................................................................... 92 MUSIC PLAYER ............................................................................................................. 93 Music Player Buttons ........................................
Getting Started Thank you for purchasing the RightWay Navigator. We at RightWay are excited and happy to have you as a customer. Please look at the contents of your package and confirm you have received the following items. If you should find something missing please inform us within 14 days of purchase. Package Contents RightWay Navigator DC Charger (Car Charger) AC Charger (Wall Charger) Car Mounting system Quick Start Guide Customer Service For customer service, visit our website at www.
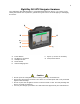
RightWay 355 GPS Navigator Hardware Your RightWay 355 GPS Navigator is a sophisticated electronic device. To ensure a long lasting and trouble free experience, please take great care to avoid dropping or damaging the device. A G E B A G C D C B E A D B A A. B. C. D. E. F E Power Button SD Memory Card Slot Headphone Jack Reset Button USB & Charging Port F. Stylus (in corner on the back) G. Lock/Unlock Switch Caution Do not open the navigation device's casing under any circumstances.
Power Options The RightWay Navigator can be powered using the internal rechargeable battery, DC power (cigarette lighter adapter), or AC power (wall charger). The RightWay can be used for navigation while the unit is recharging. DC Power (Car Charger) 1. Connect the USB plug of the car adapter to the USB port of the device. 2. Plug the car adapter to the jack of the cigarette lighter. 3. Battery charging begins. The operation indicator lights red. AC Power (Wall Charger ) 1. 2. 3.
Powering On & Off Press and hold the power button for three seconds to turn ON the RightWay 355 GPS Navigator. To fully turn the RightWay 355 GPS Navigator off, press and hold the power button. Notice The indicator light is green when the unit is on and the battery is fully charged. While charging, the indicator light will light orange. Lock/Unlock Switch On the right side of the RW 355 Navigator is a Lock/Unlock switch.
Programs Window When you turn on your RightWay Navigator, the following screen appears. Music Player Time Battery Level Movie Player Navigation E-Book Reader Settings Photo Viewer From this screen you may choose to navigate to a destination, listen to music, watch a movie, read an e-book, view photos or adjust the settings simply by tapping your choice.
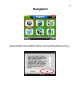
Navigation To begin navigation, tap the „Navigation‟ button. A screen will appear asking if you have read the End User‟s License Agreement. Tap „OK‟ and the main navigation window will open.
The very first time you use the RightWay 355 GPS Navigator, it can take up to 10 minutes to initialize the GPS. After the first time, GPS reception should start within 1 minute of turning on the device. If the navigation device has been switched off for more than a week, the next initialization can take up to 5 minutes.
Main Window The MAIN WINDOW opens when the navigation software starts. You can reach all of the navigation software functions from this window. The following sections will demonstrate how and when to use each function. Returning to the Main Window To return to the Main Window from any other window, tap (the back button).
Status Indicators When the unit is on, in the upper right-hand corner you will find three icons. These symbols provide valuable information about your device.
Power Icon The Power symbol can display the following conditions of the built in battery: The device is powered by an external power source. The battery is charging. The device is powered by its internal battery. Battery is fully charged. The device is powered by its internal battery. Battery charge is sufficient. The device is powered by its internal battery. Battery charge is low.
GPS Icon The GPS symbol can show the following GPS reception status: Acquiring Satellites Data is being received from less than three satellites. Position cannot be calculated. GPS Ready Data is being received from at least three satellites. Position can be calculated. No Symbol The built-in GPS receiver is not operational. Please press the reset button. Contact customer service if the problem persists.
Compass Icon The Compass symbol shows the direction you are currently heading using the following points of the compass: N, NE, E, SE, S, SW, W and NW. NOTE: The direction indicator will not appear until the GPS is ready and a position can be determined.
Menus Many buttons have menus which open when activated. To activate a menu, tap on the button with your finger or stylus. To close a menu without selecting a function, tap on the same button you used to open the menu. Volume Control The volume of the spoken driving instructions can be adjusted during navigation. With the map displayed, tap (volume).
Software Keyboards Three keyboards are available for entering destination information. These keyboards appear on the screen when text entries are necessary. All entries can be made on the software keyboard by using the fingertips or stylus. Alphabetic keyboard The alphabetic keyboard automatically appears when text entries are necessary. Only capital letters can be entered. Tap to display the alphabetic keyboard from another keyboard. Numeric keyboard Tap to display the numeric keyboard.
Special Keys Spacebar. Moves the cursor forward one space. Found on the alphabetic and numeric keyboards. Delete. Removes the previous character & moves the cursor back one space. Found on the alphabetic and numeric keyboards. Opens the numeric keyboard. Opens the alphabetic keyboard. Opens the special character keyboard.
Predictive Text The RW 355 GPS Navigator has a predictive text feature to facilitate speedy address entry. Starting with the first letter or number you enter, the RW 355 is searching its data base for matches and displaying the most likely results in a list. For example, when entering a location, after you type the first letter, the largest city beginning with that letter in the selection area appears. After the second letter is entered, the list shows all map areas corresponding with the letters typed.
The New Destination Button New destinations are destinations that you have not yet navigated to, or those that you have not yet stored. Destinations may be selected by entering an address, selecting a point of interest (POI), or selecting from the quick search function. Tap the New Destinations button to: • Enter an address by city or street. • Search and select POI as a destination. • Search & select POI by direct access.
Enter an Address 1. From the MAIN WINDOW, tap New Destination. A menu will appear with your options for entering your destination. 2. Tap Enter an Address. 3. After selecting a search area, a menu will appear giving you the option to enter an address either Street First or City First. 4. After selecting either Street First or City First, you will be prompted to select a search area. The device will continue to use the designated search area until you specify a different one.
New Destination – Street First Street First can be used to find your destination. It is helpful when the exact city is unknown. For example, you want Grand Avenue but you do not know if it is in Minneapolis or St. Paul. In this case, entering the street first assists in determining the city. 1. In the MAIN WINDOW, tap New Destination, and then tap Enter an Address. 2. Tap Street First to open the ADDRESS WINDOW.
New Destination – City First The City First option is the fastest way to enter an address when all information is known. 1. In the MAIN WINDOW, tap New Destination, then tap Enter an Address. 2. Tap City First to open the ADDRESS WINDOW. 3. Enter the name of the city or the postal code using the alphabetic keyboard. Tap (OK button) when complete. 4. Enter the name of the street. NOTE: If a street name is not entered, a route will be calculated to the city center. 5. Enter the house number.
Points of Interest (POIs) Points of Interest or POIs are useful addresses that are organized according to particular criteria. POIs include airports, restaurants, hotels, gas stations, government offices, banks, hospitals, shopping centers, etc. Icons representing the POIs can be displayed on the map.
Search for POI A search for a specific point of interest may be conducted one of three ways: Nearby Searches for destinations located within a given radius of your current location. This feature is useful for locating destinations such the next gas station or closest hospital. In a City Searches for destinations located within a given city. This feature is useful for locating hotels, restaurants, etc. when navigating in an unfamiliar town.
Search for POI – Nearby 1. In the MAIN WINDOW, tap New Destination, and then tap Search for POI. 2. Tap Nearby. 3. A list of POI categories will appear. Use (Up) and (Down) to scroll through the list. To accept a category from the list, tap on the entry. If a sub-category exists, specify a sub-category by tapping. 4. The Name of the Destination list opens. It contains the nearest POIs in the specified category, sorted by distance. Tap on the name of the desired destination. 5.
Search for POI – In A City 1. In the MAIN WINDOW, tap New Destination, and then tap Search for POI. 2. Tap in a City. 3. Enter the name or the postal code of the destination location. 4. Specify a category from which you would like to select a POI. Use (Up) and (Down) to scroll through the list. To accept a category from the list, tap on the entry. If a sub-category exists, specify a sub-category by tapping. 5. The Name of the Destination list opens.
Search for POI – Nationwide 1. In the MAIN WINDOW, tap New Destination, and then tap Search for POI. 2. Tap Nationwide. 3. The POI OF NATIONAL SIGNIFICANCE WINDOW opens. Tap on the name of the category from which you would like to select. 4. The name of the category list opens. It contains a list of national POIs, sorted by distance. Tap on the name of the desired destination. 5. Tap the Start Navigation button. The map opens in Preview Mode.
Direct Access The Direct Access button allows you to quickly access frequently used POIs such as gas stations and restaurants. The Direct Access button is subdivided into three smaller buttons. The symbols for the POI categories selected for direct access can be seen on these smaller buttons. The default setting for these buttons can be changed to your specifications. (See the following page for instructions.) 1. From the MAIN WINDOW, tap New Destination.
Changing the Direct Access POI Categories 1. In the MAIN WINDOW, tap Options, and then tap Settings. 2. Tap POI. 3. In the Direct Access 1 field, tap (List) and select a POI category. 4. Repeat the above step in the Direct Access 2 and Direct Access 3 fields. 5. When finished, tap Done to save the changes.
The My Destination Button The My Destination button is used to access favorite or frequently used destinations as well as destinations recently entered. Tap the My Destinations button to select a destination from: • A list of favorite destinations you have saved. • A list of destinations to which you have previously navigated.
Favorites Destinations to which you often travel can be saved on the FAVORITES list so you only have to enter the address once. The RightWay 355 GPS Navigator can save up to 300 different destinations on your FAVORITES list. There are two ways to save a destination to FAVORITES: save while entering an address or save after an address has been entered. Saving to Favorites While Entering a Destination 1. Enter a destination, but do not tap the Start Navigation button. 2. Tap Options. A menu will appear.
Saving to Favorites After an Address Has Been Entered 1. From the MAIN WINDOW, tap My Destinations, and then tap Last Destinations. 2. A list of destinations you have previously navigated to will appear. Tap on the destination to add to your FAVORITES LIST. Do not tap the Start Navigation button! 3. Tap Options. A menu will appear. 4. Tap Save as Favorite. 5. Enter the name you would like the destination saved under and indicate whether it is a home address or not.
Selecting a Destination from the Favorites List 1. In the MAIN WINDOW, tap My Destinations, and then tap Favorites. 2. Your FAVORITE LIST will appear. Use (Up) and (Down) to scroll through the list. Tap the name of the destination to which you would like to navigate. 3. Tap the Start Navigation button. The map opens in Preview Mode.
Modifying Your Favorites List Using the Options Button Rename Destination 1. In the MAIN WINDOW, tap My Destinations, and then tap Favorites. 2. Your FAVORITE LIST will appear. Use (Up) and (Down) to scroll through the list. Tap the name of the destination to which you would like to rename. 3. Tap Options button, then tap Rename button. 4. Enter the name you would like the destination saved under and indicate whether it is a home address or not.
Designating a Home Address 1. In the MAIN WINDOW, tap My Destinations, and then tap Favorites. 2. Your FAVORITE LIST will appear. Use (Up) and (Down) to scroll through the list. Tap the name of the destination to which you would like to designate as your home address. 3. Tap Options button, then tap Home Address. 4. The destination will now be saved on the FAVORITES LIST under My Address. NOTE: Only one destination from the FAVORITES LIST can be defined as My Address.
Delete a Favorite Destination 1. In the MAIN WINDOW, tap My Destinations, and then tap Favorites. 2. Your FAVORITE LIST will appear. Use (Up) and (Down) to scroll through the list. Tap the name of the destination to which you would like to delete. 3. Tap Options, and then tap Delete Destination. 4. The screen will say, “Do you really want to delete this destination?” 5. The entry is removed from the FAVORITES LIST. Tap the Yes button.
Add a Favorite to Route 1. In the MAIN WINDOW, tap My Destinations, and then tap Favorites. 2. Your FAVORITE LIST will appear. Use (Up) and (Down) to scroll through the list. Tap the name of the destination to which you would like to add to your route. 3. Tap Options, and then tap Add to Route. 4. The destination will now be added to your route.
Last Destinations The RightWay Navigator saves the last 30 destinations to which you have navigated in the Last Destinations list. You may select a destination from the Last Destinations list or add a destination to your favorites. Selecting a Destination from the Last Destinations List 1. In the MAIN WINDOW, tap My Destinations, and then tap Last Destinations. 2. A list of your LAST DESTINATIONS appears. Use (Up) and (Down) to scroll through the list.
Adding a Favorite from the Last Destinations List 1. In the MAIN WINDOW, tap My Destinations, and then tap Last Destinations. 2. A list of your Last Destinations appears. Use (Up) and (Down) to scroll through the list. Tap the name of the destination you would like to save to favorites. 3. Tap Options. 4. Tap Save as Favorite. 5. Enter the name you would like the destination saved under and indicate whether it is a home address or not.
The Take Me Home Button Tap the Take Me Home button to: Immediately route from your current position to your home address. NOTE: If your home address has not previously been specified on your FAVORITES LIST, when you tap Take Me Home, you will be prompted to enter your home address.
The Show Map Button Tap the Show Map button to: Show your exact location on a map. Select a destination using the map.
Selecting a Destination Using the Map 1. In the MAIN WINDOW, tap the Show Map button. 2. Tap (Destination search). 3. The map opens in Destination Search Mode. Tap on the point to which you wish to navigate. 4. The destination that you have selected appears under the cross hairs. Tap (OK). 5. The DESTINATION ON MAP WINDOW opens. Detailed address information for the selected destination displays in the upper left-hand corner. 5. Tap the Take Me There button. The map opens in Preview Mode.
The Start Navigation Button Tap the Start Navigation button to: View map in Preview Mode Show Turn-by-Turn List of directions View map in Navigation Mode View map in Destination Search Mode
Map in Preview Mode In the Preview Mode, the entire route is visible with a small flag marking the destination. The route and the estimated travel time are also displayed. The map opens in Preview Mode after a destination or route has been entered and the Start Navigation button has been tapped. 1 2 3 4 1 An orange triangle shows your current position.
The Show Turn-by-Turn List Button Tap the Show Turn-by-Turn List button to view detailed directions of the calculated route before starting navigation or at any time during navigation. This opens the TURN-BY-TURN LIST WINDOW which displays all of the driving instructions in table form. Tap (Back) to close the TURN-BY-TURN LIST WINDOW. 2 3 1 4 1 Distance to next junction. 2 Schematic depiction of the next junction where you must turn. 3 Name of the street onto which you must turn.
Map in Navigation Mode Tap Start Navigation to view the map in Navigation Mode. When operating in Navigation Mode, the direction you are traveling is at the top. 1 Sign postings to be followed are displayed here. 2 Posted speed limits (where available) are displayed here. 3 When two maneuvers need to be executed in quick succession, the small arrow field indicates the second maneuver to be executed. 4 The large arrow field shows a schematic depiction of the next maneuver.
8 A triangle in orange shows your current position on the map. The map area displayed continually changes so that your current position is always centered on the map. 9 If you are navigating a route with several stages, the remaining distance, estimated duration of the trip, and the estimated time of arrival for the next interim destination is displayed here. 10 The traffic lanes to be followed to your destination are shown in orange.
To Exit Navigation Mode Tap (Back) to quit navigation. A window prompts you to confirm. To Return to the Main Window Tap (Back) to return to the MAIN WINDOW. If you are currently navigating, you are prompted to confirm your decision to quit navigation.
Map Modifications in Navigation Mode When the map is open in Navigation Mode, tap any point on the map to bring up map modification buttons. 2D/3D Tap this button to change between 2D and 3D map view. The symbol for the mode that is currently set is marked orange. Day/Night Tap this button to changes between "day" and "night" display colors to reduce eye strain. The symbol for the mode that is currently set is marked orange.
Map in Destination Search Mode From either Preview Mode or Navigation Mode, tap (Destination search). In the Destination Search Mode, the map‟s orientation does not change. North is always at the top. A pair of cross hairs can be seen when the map is in Destination Search Mode. Zoom Out Use Zoom Out to display a larger section of the map with fewer details. Zoom In Use Zoom In to display a smaller section of the map in greater detail.
Operating in Destination Search Mode 1. Tap on the point to which you wish to navigate. The destination that you have selected appears under the cross hairs. 2. Tap (OK). 3. Buttons with various functions appear. Take Me There Immediately begins navigation to that location. If you are currently navigating to another destination, it cancels that route and creates a new route to the selected point. Interim Destination Sets the selected point as an interim destination.
To Exit Destination Search Mode Tap (Destination search) to exit the Destination Search Mode and return to the window from which you started this mode. To Return to the Main Window Tap (Back) to return to the MAIN WINDOW.
The Options Button Tap the Options button to: Access the ROUTE PLANNING WINDOW Access the SETTINGS WINDOW Access the GPS STATUS WINDOW. Access the LOGBOOK WINDOW.
Options – Route Planning Tap Route Planning to open the ROUTE PLANNING WINDOW to preplan a route.
General Routing Information Starting Point The starting point of a route is the point at which you want to begin your trip. This does not need to be your current location. For example, if you are planning a route for a vacation, your hotel could be entered as the starting point. NOTE: The starting point is only important if you want to see a planned route on the map and are not at the planned starting point or do not currently have GPS reception.
Creating a Route 1. In the MAIN WINDOW, tap Options button, then tap Route Planning button. 2. The ROUTE PLANNING WINDOW opens. Tap Specify Starting Point button. 3. The STARTING POINT menu opens. Tap the button corresponding to the how you wish you enter your starting point. 4. Enter the starting point. The selected destination appears next to the flow number “0”, indicating that it is the Starting Point of the route.
5. Tap the Add Route Point button. The ROUTE POINT menu opens. Tap the button corresponding to how you wish you enter your destination. 6. Enter the route point, and then tap the Add button. The selected destination appears next to the flow number “1”, indicating that it is the first stage of the route. 7. Repeat steps 5 & 6 for each additional destination that you want to add to the route. 8. Tap Show Route button after all route points have been added.
Changing the Starting Point of a Route 1. In the ROUTE PLANNING WINDOW, tap flow number “0” (the starting point). 2. The STARTING POINT menu opens. Tap the button corresponding to how you wish to enter your new starting point. 3. Enter the new starting point. The selected destination appears next to the flow number “0”, indicating that it is the new Starting Point of the route.
Changing the Order of Route Points 1. In the ROUTE PLANNING WINDOW, tap the route point you want to change. 2. A menu will appear with route management options: Route Point Up Moves the selected route point up one stage. Example: Route Point 2 becomes Route Point 1 Route Point Down Moves the selected route point down one stage. Example: Route Point 2 becomes Route Point 3 3. Tap the button corresponding to the change you would like to make. The route point changes will be made. 4.
Deleting a Route Point 1. In the ROUTE PLANNING WINDOW, tap the route point you want to change. NOTE: The starting point (flow number "0") cannot be moved nor deleted. 2. A menu appears with the following route management options: 3. Tap (delete). 4. A screen will appear asking, “Do you really want to delete this interim destination?” Tap Yes. 5. The route point will be deleted and the flow numbers of the route adjust accordingly.
Saving Routes 1. In the ROUTE PLANNING WINDOW, tap Options. 2. A menu will appear. Tap Save Route. 3. Using the alphabetic keyboard, enter a name for the route. Tap Save. 4. The route is saved to the SAVED ROUTES list under the name you entered. NOTE: Only the start point and route points are saved. The calculated route is not. If you load a route that has been saved, it must be recalculated before navigation can begin.
Using Saved Routes 1. In the ROUTE PLANNING WINDOW, tap Options. 2. A menu will appear. Tap the Saved Routes button. 3. The SAVED ROUTES list will appear. Tap the route you would like to select. 4. Tap the Load Route button. The ROUTE PLANNING WINDOW displays the starting point and the route points of the selected route 5. Tap the Show Route button. The map opens in Preview Mode. NOTE: Only the start point and route points are saved. The calculated route is not.
Show Route Button 1. In the ROUTE PLANNING WINDOW, after either loading a saved route or entering your route points, tap Show Route button. 2. The map opens in Preview Mode. The starting point and the route points are marked by flags. For each stage, the distance and the estimated trip time is given. This information is also displayed for the entire route. 3. After the route is calculated, you can show the route Turn-by-Turn, Start Navigation, or view a simulation of the route.
Simulating Routes 1. In the ROUTE PLANNING WINDOW, after either loading a saved route or entering your route points, tap Show Route button. 2. The map opens in Preview Mode. Tap Options. 3. A menu will appear. Tap Simulation. 4. The route is calculated and a simulation of the route is seen and heard. Ending Simulation Tap (Back) to end a route simulation and return to the ROUTE PLANNING WINDOW. NOTE: GPS signal reception is not required for simulation.
Viewing Route Profile The calculation of a route is based on route options which are found in the Route Profile. 1. In the ROUTE PLANNING WINDOW, after either loading a saved route or entering one route point, tap Show Route button. 2. The map opens in Preview Mode. Tap Options. 3. A menu will appear. Tap Route Profile. 4. The first page of the ROUTE PROFILE WINDOW will appear. There are 2 pages of route profile options. To move between pages tap (previous page) and (next page). 3.
Options Button – Settings Tap Settings to open the SETTINGS WINDOW where you can customize your RightWay Navigator to suit your personal needs and preferences.
The Settings Window In the SETTING WINDOW tap: A. Basic Settings to modify the basic settings. B. Current Map to select different maps. C. POI to designate which POIs are displayed on the map. D. Route Profile to determine route specifications.
A. Basic Settings Tap Basic Settings to customize your RightWay Navigator to your specifications.
Changing Basic Settings Options 1. From the MAIN WINDOW, tap Options, and then tap Basic Settings. 2. The first page of the BASIC SETTINGS WINDOW will appear. There are 6 pages of basic settings. To move between pages tap (previous page) and (next page). 3. For each setting there is a (Help) button. When you tap it, you see a precise explanation of the corresponding setting. 4. Each setting also has either a (toggle) button or a (list) button.
Basic Settings & Their Options Page 1 Setting Category Language Speak Street Names 2D Zoom Factor 3D Map: Show Street Names Options English Spanish French Yes No No Automatic Zoom Smaller Map Section Standard Larger Map Section Yes No Default Setting English Speak street names Standard Yes Page 2 Setting Category 2D Map: Show Street Names 2D Map: Orientation Show Altitude and Speed Display Compass Options Yes No Always North In Direction of Travel Yes – show altitude & speed No – do not show alti
Page 3 Setting Category Show Remaining Distance Show Duration of Journey Show Time of Arrival Info When Crossing Borders Options Yes – show remaining distance to destination and, if applicable, interim destinations No – do not show remaining distance Yes – show remaining travel time to destination and, if applicable, interim destinations No – do not show remaining travel time Yes – show arrival time at destination No – do not show arrival time at destination Yes – display local speed restrictions when
Page 5 Setting Category Menu Animation Distance Units Time Format Coordinate Display Options Yes – menus are animated No – menus pop up Kilometers Miles 24h – military time 12h (am/pm) Yes No Default Setting Yes Miles 12h (am/pm) Yes Page 6 Setting Category Coordinate Format Brightness Day Brightness Night Speed-Dependent Volume Options Decimal coordinates (e.g. 16,5425°) Coordinates in minutes & seconds (e.g. 16°32‟33‟‟‟) Degree of brightness for the display in the “day” mode.
B. Current Map Settings Tap the Current Map button to display information on the map currently being used. The RightWay 355 GPS Navigator comes with one map of the continental United States. If additional maps are available, this is where you can select a different map. To purchase additional maps (if available), visit www.rightwaygps.
POI Settings Tap the POI settings button to select POI categories to be shown on the map and designate POI categories to be used for direct access POI Categories (in alphabetical order) Airport ATM Bank Border Crossing Business Facility Car Dealer Motorcycle Dealer Car Rental Culture Exhibition Gas Station Government Office Health Care Hotel or Motel Marina Parking Post Office Public Phone Public Toilet Railway Station Religion Restaurant School & Education Shopping Center Sports Tourist/Nature
79 Selecting POI Categories Shown on Map 1. From the MAIN WINDOW, tap Options, then tap Settings, then tap POI. 2. The POI SETTINGS WINDOW will appear. Tap Categories Shown. 3. A list of POI categories is shown with a box next to each. Boxes with checkmarks are the categories selected to be shown on the map. Boxes without checkmarks are categories that will not be shown on the map. Check or uncheck boxes by tapping the category. Use (Up) and (Down) to scroll through the list. 4.
80 Selecting Direct Access POIs 1. From the MAIN WINDOW, tap Options, then tap Settings, then tap POI. 2. The POI SETTINGS WINDOW will appear. Tap Direct Access 1. 3. A list of POI categories is shown with a small button next to each category. The orange button indicates the POI selected for direct access. Use (Up) and (Down) to scroll through the list. 3. Tap the category you would like to designate as one of the three quick access buttons.
81 C. Route Profile Settings Tap the Route Profile settings button to specify the type of route and type of roads you wish to travel.
82 Changing Route Profile Options 1. From the MAIN WINDOW, tap Options, and then tap Settings. 2. Tap Route Profile. The first page of the ROUTE PROFILE WINDOW will appear. There are 2 pages of route profile options. To move between pages tap (previous page) and (next page). 3. For each setting there is a (Help) button. When you tap it, you see a precise explanation of the corresponding option. 4. Each setting also has either a (toggle) button or a (list) button.
83 Route Profile Options and Settings Page 1 Category Speed Profile Type of Route Highways Toll Roads Options Type of transportation being used. Important for calculating route & arrival times.
84 Page 2 Category Ferries Calculate the Next Stage Automatically U-turns Options Allow – can be used Avoid – only use if there is no other option Forbid – cannot be used This setting only applies if you are navigating a route with several stages. Determine how, after reaching a certain route point, the next stage should be calculated. Automatically On request Not following a navigation instruction may result in the route being recalculated.
Options – GPS Status GPS Status provides an overview of the data received by the GPS via satellite that the navigation software uses in calculating routes. Tap the GPS Status button to: View GPS data (longitude, latitude, altitude, etc.
82 View GPS Data 1. From the MAIN WINDOW, tap Options, and then tap GPS Status. 2. The GPS SETTINGS WINDOW will appear.
83 Save Current Location 1. From the MAIN WINDOW, tap Options, and then tap GPS Status. 2. The GPS SETTINGS WINDOW will appear. Tap the Save Position button. 3. The SAVE DESTINATION AS... WINDOW opens. Enter the name you would like the destination saved under and indicate whether it is a home address or not. 4. Tap Save. The destination will be added to the Favorites List under the name you entered. Note: The save position icon will not be highlighted if you not currently on a road.
84 No GPS Reception When GPS signal is interrupted, the following message appears: GPS reception is currently not sufficient. Navigation starts automatically as soon as GPS reception is OK again. When this message appears, you have the following options: Wait for reception. When GPS reception is sufficient for determining position, the route will be automatically recalculated and you can begin navigation.
Options – Logbook The RightWay Navigator can be used to record vehicle mileage for expense reports or tax purposes.
82 General Information About the Logbook The logbook is recorded in the Logbook.xls file which can be opened with a Microsoft Excel spreadsheet program. Each recorded trip is added at the bottom of the spreadsheet as a new entry. When first used, the Logbook.xls file is created in the MN6\Logbook directory on the memory card. If you delete or move this file, a new file is created when you next record a trip. Using the Logbook 1. In the MAIN WINDOW, Tap Options, then tap Logbook. 2.
Programs Window In addition to superior GPS navigation, the RightWay 355 GPS Navigator allows users to listen to music, watch movies, read e-books, and view photos.
82 Inserting & Removing a Memory Card (memory card not included) Inserting the Memory Card (SD card) To insert a memory card, gently press the card into the card slot on the side of your RightWay Navigator until it locks in place. Removing the Memory Card (SD card) To remove a memory card, switch the RightWay Navigator off. Press the card down gently until the lock disengages and the card pops up. Be careful when storing your device as the card may eject if pressed.
Music Player The RightWay Navigator allows users to listen to music. Add music files such as .mp3 and .wma to a SD card. Insert the SD card into the RightWay Navigator and open the music menu. 1. After inserting your memory card with the songs you which to listen, tap the Music button. 2. The Music screen will briefly open, then switch to the window showing the NANDFlash and the SD card. Either double click on the storage card, or highlight the storage card then tap the checkmark to open the file. 3.
82 4. The Music Player screen opens, and the song begins to play.
83 Music Player Buttons Exit Music Player Shuffle Previous Song Mute Pause Increase Volume Next Song Decrease Volume List Music* *When you tap the Open List button, three additional buttons appear on the screen.
Movie Viewer The RightWay Navigator allows users to listen to video. Copy video files to an SD Card and insert the SD card into the RightWay Navigator and open the video menu. The RightWay Navigator can play MP4, ASF, WMV, AVI, and DIVX files. 1. After inserting your memory card with the movie you which to view, tap the Movie button. 2. The Movie Viewer screen will briefly open, then switch to the window showing the NANDFlash and the SD card.
82 4. The Movie Viewer screen opens and the movie begin to play.
83 Movie Player Buttons Exit Movie Viewer Previous Movie Full Screen Mute Pause Increase Volume Next Movie Decrease Volume List Movies* *When you tap the List Movie button, three additional buttons will appear on the screen.
E-Book Reader The RightWay Navigator allows users to read text files on their device. Copy text files to an SD Card and insert the SD card into the RightWay Navigator and open the E-Book Reader. 1. After inserting your memory card with the e-book you which to read, tap the E-book button. 2. The E-book reader screen opens. 3. A window will open displaying the E-Book contents of SD card. Either double click the text file you want to listen to, or highlight it and then tap the checkmark to open the file.
82 4. The E-book opens to the E–Book Reader screen.
83 E-Book Reader Buttons Exit E-Book Reader Scroll Up Scroll Down Jump* Add Book *When you tap the Jump button, a new screen will open enabling you to “jump” to any page in the book.
84 Using the Jump Button 1. Tap the Jump button. 2. The PAGE NUMBER WINDOW opens. Use the number buttons to tap in the page number you want to go to, then tap the Enter button. Page Number Back Space Enter 3. The E-Book Reader screen appears displaying the page corresponding to the number you entered.
Photo Viewer NOTE: Image files must be on an SD card and the SD card inserted into the RightWay Navigator to view photos. 1. After inserting your memory card with the photos you which to view, tap the Photo button. 2. The photo viewer screen opens. Tap the Add Photo button. 3. A window will open showing the NANDFlash and the SD card. Either double click the storage card or highlight the storage card then tap the checkmark to open the file.
82 5. A window will open displaying the contents of the SD card. Either double click the image you would like to see, or highlight it and then tap the checkmark. 6. The image will open on the photo viewing screen.
83 Photo Viewer Buttons Exit Photo Viewer Add Photo Full Screen Move Image Previous Photo Next Photo Zoom In (when zoomed in) Rotate Image 90o Zoom Out
84 Settings Menu The RightWay Navigator allows users to make changes to various settings on their device. Each will be described in greater detail on the following pages. Tap the Close button at any time to return to the Programs Window.
85 Navigation Setup The Navigation Setup button tells the RightWay 355 Navigator the path and file name of the navigation software. The device is programmed to the proper settings for navigation.
86 Touch Screen Calibration The Emend Touch Screen button enables you to re-calibrate your touch screen. After tapping the Emend Touch Screen, a white screen will appear with a + in the middle. Tap + with either the stylus or your finger. A new + will appear in a corner, again tap in the center of the +. This repeats in the remaining three corners. When the center of the calibration is complete, the word Settings Window. OK will appear on the screen.
87 Language The RightWay 355 GPS Navigator can be viewed in 18 different languages, enabling you to chose the language which works best for you. 1. To change the language used with the device, tap Settings, then the Language button. 2. The language screen will appear. Use the arrows to scroll up and down to view the list of languages available. Highlight the language you want use, then tap the close button. 3. The screen opens featuring the chosen language.
88 GPS Status The GPS Status button enables you to view information about the GPS, its function and your current location. Using the GPS Status Menu 1. Tap Settings, then the GPS Status button. The GPS Status window opens showing the number and strength of the satellite signals. 2. Tap the T button to bring up the full GPS Status Menu. 3. Tap the button next to the type of information or action you would like.
89 Backlight The backlight feature enables you to adjust the brightness of the screen and designate the length of time to wait before shutting down the back light. Changing the brightness of the screen 1. Tap the Settings button, then the Backlight button to open the backlight screen. 2. Tap + to make the screen brighter or – to make the screen darker. 3. When the screen is the brightness you want, tap the Close button.
Volume The volume feature enables you to adjust the volume of the unit and the touch tone. Changing the Volume 1. Tap the Settings button, then the Volume button to open the volume screen. 2. Tap + to make the volume louder or – to make the volume softer. 3. When the volume is at your desired level, tap the Close button. Close Softer Mute Button Louder Touch Tone Volume Options Changing the Volume of the Touch Tone: 1. Tap the Settings button, then the Volume button to open the volume screen. 2.
82 Time The Time button enables you to modify the date, time, or time zone displayed by your unit.s Changing the Time or Time Zone 1. Tap the Time button to open the time & date screen. 2. Use the up and down arrows to scroll through the options. 3. When the screen displays the desired date, time and time zone, tap the Close button. Time Date Scroll Up Scroll Down Scroll Time Zone Scroll NOTE: The time is displayed in military time.
83 Skin Skin refers to the background color(s) of the unit. There are two choices for the skin color: black or light green. Light green is the default setting. 1. Highlight your choice then tap the Close button. 2. The screen opens in the selected skin.
84 System The System button enables you to view information specific to your unit. When you tap the System button, the following screen will appear. NOTE: Tapping „Initial Setup‟ will cause a factory reset, losing any information or settings you have made.
Mounting System Included in your package, you will find a mounting solution to easily secure your RightWay Navigator to either the windshield or the dash. NOTE: It is illegal in California and Minnesota to attach anything to the windshield. 1. Select a suitable location on the windshield or dashboard for the mount. Clean and dry this area to remove any grease and dirt. 2. If mounting the GPS on the dashboard, remove the protective backing from the dash disc, exposing the adhesive.
82 Caution Secure the cradle in such a way that the driver's visibility is not impaired. Do not attach the cradle within the deployment zone of airbags. When installing the cradle, ensure that it does not represent a risk in the event of an accident. Do not run cables directly next to safety-relevant devices and power supplies. After installation, check all safety-relevant equipment in the car.
Frequently Asked Questions Why won’t my unit turn? The power button must be held down for 3 seconds for the unit to turn on. Typically the problem when a unit will not turn on is that it is locked. Check the lock/unlock switch on the right side of the device. It must be in the unlocked position. If that isn’t the problem, check the power.
82 Technical Data Dimensions 4.2” x 3.3” x .9” Weight approx. 145 g Operating conditions Operating temperature Storage temperature Humidity CPU Samsung -10°C to +45°C -20°C to +70°C 0% to 90%, non-precipitating 2440-400Mhz Operating System Microsoft Windows® CE Net 5.0 CPU Samsung 2410, 200 MHz Display 3.
83 End User’s License Agreements DO NOT OPERATE THIS PRODUCT WHILE DRIVING. PARK THE VEHICLE SAFELY FIRST. RIGHTWAY GPS, ITS DEALERS, SUPPLIERS AND DISTRIBUTORS DISCLAIM ALL LIABILITY FOR ANY USE OF THIS PRODUCT IN A WAY THAT MAY CAUSE ACCIDENTS, DAMAGE OR THAT MAY VIOLATE THE LAW. RIGHTWAY GPS, ITS DEALERS, SUPPLIERS, DISTRIBUTORS DISCLAIM ALL LIABILITY FOR ANY USE OF THIS PRODUCT IN DELIVERING MEDICAL AID, TRANSPORTING OF MEDICAL PATIENTS AND/OR EQUIPMENT, OR TRANSPORTING MEDICAL EMERGENCY VICTIMS.
84 Transplant GPS, Inc Limited Warranty HARDWARE: Transplant GPS, Inc warrants to the original Customer that this product will be free from defects in workmanship and materials, for one year from the date of original purchase from Transplant GPS.
85 WARRANTY DOES NOT COVER PHYSICAL DAMAGE TO THE SURFACE OF THE PRODUCT, INCLUDING CRACKS OR SCRATCHES ON OUTSIDE CASING. THIS WARRANTY DOES NOT APPLY WHEN THE MALFUNCTION RESULTS FROM THE USE OF THIS PRODUCT IN CONJUNCTION WITH ACCESSORIES, OTHER PRODUCTS, OR ANCILLARY OR PERIPHERAL EQUIPMENT AND TRANSPLANT GPS DETERMINES THAT THERE IS NO FAULT WITH THE PRODUCT ITSELF.