
User manual


RIGOL
© 2008 RIGOL Technologies, Inc.
User’s Guide for DG10× 2 Series
3-23
To Measure with the Counter
Use the Counter to measure the signal outputted form CH1.
The operation steps:
1. Use the BNC cable listed in Appendix A to connect the [Output] connector of CH1
to the input terminal of the Counter, press the Output button of CH1.
2. Press Utility Count, enter the measurement mode of the counter. At the same
time, the output of CH2 will turn off automatically.
3. To set the measurement
(1) Auto measure mode
Press Auto, in this mode, the coupling mode is “AC”, the counter automatically
adjusts the trig level and sensitivity until the display is steady.
(2) Manually measure mode
To set the coupling mode
Press Setup AC/DC AC to set the coupling mode to be “AC”.
To set the sensitivity
Press Setup Sensitivity Medium.
To set the trigger level
Press Setup TrigLev, use the direction key and the knob to adjust the trig level
to be “62.0”, that is 0.72V.
To set the high frequency restrain On/Off
Press Setup HFROn/Off, choose “HFROff”.
After all the set was done, the counter will measure the signal according to the current
set. If the reading is unsteady, please repeat the above step until it is steady.
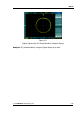
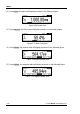
4. To view the result
(1) In default state, the measure result is frequency value, see the following figure.
Figure 3-25 Frequency View