
Data Sheet

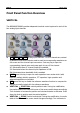


1 Quick Start RIGOL
MSO4000/DS4000 User’s Guide
1-15
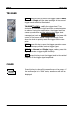
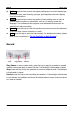
synchronize two or more oscilloscope clocks.
3. Video Output
Through this interface, the oscilloscope can be connected to an external monitor
for clearer waveform display. Note that the display of the oscilloscope is still
operational when connected to an external monitor.
4. LAN
Through this interface, the oscilloscope can be connected to the local area
network for remote control.
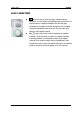
5. USB DEVICE
Through this interface, the oscilloscope can be connected to printer or PC to print
data waveforms or to control the oscilloscope using remote PC software.
6. USB HOST
Through this interface, the oscilloscope can be connected to printer or USB
storage device to print waveform data or store waveform files. GPIB interface
communication can be realized using the USB-GPIB interface converter provided
by RIGOL. Note that there is also a USB HOST interface at the front panel.
7. Lock Hole
Use a security lock (available separately) to lock the oscilloscope to a fixed
location.
8. AC Input/Switch
AC power input terminal. The power supply requirements of this oscilloscope are
100-127 V, 45-440 Hz and 100-240 V, 45-65 Hz. Please connect the oscilloscope
to AC power using the power cord provided with the accessories. Then, turn on
the AC power switch to energize the oscilloscope. Press the power key at the
front panel to start the oscilloscope.