Table of Contents Thank you for your tool purchase. When properly assembled, wired, operated and maintained your RIKON product will give you years of dependable service. Please read and understand the owner’s manual completely. Specifications........................................................................................................... 2 Safety Instructions..................................................................................... 3 - 5, 8, 14 Package Contents ........................
General Safety Guidelines IMPORTANT — REQUIRED READING! Safety is the single most important consideration in the operation of this equipment. The following safety instructions must be adhered to at all times. ! WARNING Failure to read and understand this manual before you unpack, assemble, wire, operate and maintain this machine may result in serious injury to yourself or others. Review and understand all safety procedures and requirements.
General Safety Guidelines aligned parts or guards need to be fixed before operation. Check for alignment or binding of moving parts and any other condition that may effect its proper operation. Always disconnect the machine from the power source before inspecting or repairing it. Do not over-exert yourself. Tools can be heavy. Get assistance to lift and position tools and machinery. Improper lifting and moving beyond your capabilities may cause serious injury.
Safety Guidelines Follow all electrical and wiring codes in your area to prevent shock or electrocution. Accidental Starting: Make sure the switch is in the “OFF” position before plugging in power cord. Magnetic switches or starter switches may start unintentionally if accidentally bumped. Disconnect machine from power source when changing blades (tooling), making adjustments or servicing the machine. Do not expose the meat bandsaw to rain/water or operate in a wet area; an electrical hazard may be created.
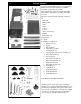
Package Contents 3 5 1 If you suspect freight damage please save all packing materials for inspection and contact your RIKON dealer where you purchased your saw. 9 8 4 The meat bandsaw is heavy. Be careful when lifting and moving the carton prior to assembly. Get help if necessary. 6 7 Unpack the contents and take inventory of what you have. 1. 2. 3. 4. 5. 6. 7. 8. 9. 10. 11. 12.
Identifying Features Blade Tension Knob Top Access Door Blade Guard Post & Upper Guides Sliding Table Case On/Off Switch Motor Guide Locking Knob Blade Tracking Knob Support Fences Sliding Table Grinder Lower Access Door Bottom Base Legs & Feet 7
Electrical Electrical This bandsaw is designed to operate on 110v. It is your responsibility to ensure that the bandsaw is electrically connected in a safe and correct manner. Any electrical work should be performed by a competent electrician and installed in a way that meets all applicable electrical codes and regulations. A dedicated electrical circuit should be used and wiring must be able to carry full voltage ±10% to the bandsaw.
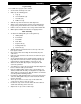
Assembly Leg Assembly To assemble the legs proceed as follows. Set the main saw body on its side. Gather up the following parts: a. Legs (4) b. Hex Head Bolts (16) c. Hex Nuts (16) d. Rubber feet (4) Slide the legs in the bottom slots and align holes. Attach 2 legs using the bolts and hex nuts provided by lining up the leg holes with the holes in the lower saw body. Roll the saw over, attach the other 2 legs and 4 rubber feet. With help lift and tilt the bandsaw to its upright position.
Assembly Fence Assembly There are 2 fences to support the meat and adjust for slice thickness. Gather up the following parts and components a. Rod Holders (2) b. Lock Knobs (2) c. Long Rod (1) d. Short Rod (1) e. Short Fence (1) f. Long Fence (1) g. Hex Head Bolts (4) h. Set Screws (2) Mount the 2 rail holders to the front and left side of the sliding table using the hex bolts provided. Insert the longer rod into the longer fence and attach with the set screw.
Adjustments Blade Changes Over time blades can become dull and need to be changed. To change the blade you need to remove the sliding table, the sliding rail next to the column and the corresponding cover plate underneath. Guide Lock Knob Upper Guide Move the upper guide post up from the sliding table. Unscrew the 4 bolts that hold the table bracket on to sliding table and remove. Remove the 2 cap screws that are used as table stops from the sliding table.
Adjustments Blade Tension & Tracking Tacking Adjustment Lock Knob Tacking Adjustment Knob From time to time it may be necessary to tension and track the bandsaw blade especially after replacement. Make sure the blade is all the way on the wheels and all blade guards are in place. Adjust the upper and lower guides away from the bandsaw blade. If installing a new blade turn the tension knob until there is a little tension on the blade in order for it to track sufficiently.
Adjustments Blade Guide Adjustment Proper guide adjust is important to the proper operation of the bandsaw and will extend the life of the bandsaw blade. In general the guide bearings should be close enough to guide the bandsaw blade to control deflection during the cut but not tight against the blade. Positioning the bearings too close against the blade causes too much friction and can work-harden the blade causing premature blade failure.
Operation Processing Meat ! WARNING Processing meat can be dangerous as meat is usually not uniform in size and can be slippery. The blade can cut fingers and other body parts. Use a push stick for sawing smaller pieces. Always use a stuffer/pusher when using the grinder. Make sure meat is always safely supported during the cut and hands are away from the blade. The meat saw and grinder need to be pre-cleaned before first-time use as it was assembled and packed to prevent corrosion.
Parts Breakdown 16
A WASHER 10 A HEX NUT M10
Warranty Note We make every effort to be accurate with our pricing, specifications, copy, images and other product information and apologize for any errors that may occur. This information, while deemed accurate, is not guaranteed. We reserve the right to make changes to all products including specifications, pricing and availability. POWER TOOLS 5-year Limited WARRANTY RIKON Power Tools, Inc.
10-308 For more information: 16 Progress Rd Billerica, MA 01821 877-884-5167/978-528-5380 techsupport@rikontools.com 10-308M2 www.rikontools.