6” VS Scroll Saw Owner’s Manual Model: 10-600VS Record the serial number and date of purchase in your manual for future reference. Serial number: Date of purchase: For more information: www.rikontools.com or info@rikontools.com For Parts or Questions: Part # 10-600VSM1 techsupport@rikontools.
Operator Safety: Required Reading IMPORTANT! Safety is the single most important consideration in the operation of this equipment. The following instructions must be followed at all times. There are certain applications for which this tool was designed. We strongly recommend that this tool not be modified and/or used for any other application other than that for which it was designed. If you have any questions about its application, do not use the tool until you have contacted us and we have advised you.
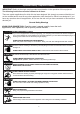
ALWAYS DISCONNECT TOOLS. Disconnect tools before servicing and when changing accessories such as blades, bits, and cutters. ALWAYS AVOID ACCIDENTAL STARTING. Make sure switch is in “OFF” position before plugging in cord. NEVER LEAVE TOOLS RUNNING UNATTENDED. ALWAYS CHECK FOR DAMAGED PARTS. Before initial or continual use of the tool, a guard or other part that is damaged should be checked to assure that it will operate properly and perform its intended function.
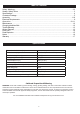
Table of Contents Safety Warnings..................................................................................................................................2-3 Sander Safety Rules ..........................................................................................................................3 Specifications ........................................................................................................................................4 Contents of Package ............................
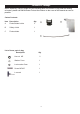
Contents of Package When unpacking, check to make sure the following parts are included. If any parts are missing or broken, please call RIKON Power Tools at the number on the cover of this manual as soon as possible.
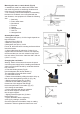
Assembly 8 SCROLL SAW DESIGN FEATURES ( Fig.01) 1. Clamping screw: for removing the saw blade. 2. Blade guard: protects your hands from injury. 3. Work piece holder 4. Shavings blower: keeps the work piece area free from dust. 5. Variable speed switch 6. On/Off power switch 7. Angle scale: Scale shows the tilting angle of table. 8. Adjustable light 9. Optional flexible shaft with drill chuck 10. Setting gauge for saw blades without pin 2 10 1 4 3 7 6 9 INSTALLATION Setting the saw bench (Fig.
Mounting the saw on a work bench (Fig.04) • A workbench made from solid wood is better than one made of plywood, as interfering vibrations and noise are more noticeable with plywood. • The necessary tools and small parts for assembling the saw on a workbench are not supplied with the saw. However, use equipment of at least the following size: 1. Saw body 2. Foam rubber base 3. Work bench 4. Flat seal 5. Washer 6. Hexagonal nut 7. Lock nut 8. Hexagonal bolt Fig.
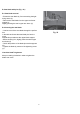
B. Saw-blade with pins (Fig . 08 ) B-1 Saw blade removal • Extract the saw-blade by fi rst unscrewing the tightening screw (2). • Remove the saw-blade from the upper and lower support by slightly pressing the saw’s upper arm down (5). B-2 Inserting the saw-blade • Lead one end of the saw-blade through the perforation in the table and insert the saw-blade pins into the notch. Repeat this procedure at the upper blade support.
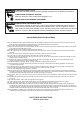
Electrical Requirements The installed electric motor is completely wired ready for operation. The customer’s connection to the power supply system, and any extension cables that may be used, must conform with local regulations. Important remark: The motor is automatically switched off in the event of an overload. The motor can be switched on again after a cooling down period that can vary with environmental temperatures.
General Usage and Maintenance A scroll saw is fundamentally a “curve cutting tool” but which can also carry out straight and angled edge cuts. Familiarize yourself with the following important points prior to commissioning the saw. • The saw does not automatically cut wood. You must feed the wood against the saw blade manually. • The cutting process occurs while the blade is moving. • Feed the wood slowly against the saw blade as the saw blade teeth are small.
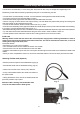
USING VARIABLE SPEED • By turning the variable speed knob, the saw’s speed may be adjusted from a high speed of approximately 1,600 SPM (Strokes Per Minute) to a low speed of approximately 400 SPM. • To increase the strokes per minute, turn the variable speed knob clockwise or to the right. • To decrease the strokes per minute, turn the variable speed knob counterclockwise or to the left. Fig.
Troubleshooting Service on these tools should only be performed by an authorized, qualified technician.
Parts List 13
Parts Explosion 14
Notes 15
Warranty 5-Year Limited Warranty RIKON Power Tools, Inc. (“Seller”) warrants to only the original retail consumer/purchaser of our products that each product be free from defects in materials and workmanship for a period of five (5) years from the date the product was purchased at retail. This warranty may not be transferred. This warranty does not apply to defects due directly or indirectly to misuse, abuse, negligence, accidents, repairs, alterations, lack of maintenance or normal wear and tear.
For more information: 16 Progress Road Billerica, MA 01821 877-884-5167 / 978-528-5380 techsupport@rikontools.com www.rikontools.com Copyright RIKON Power Tools, Inc.