
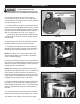
Use And Care Manual
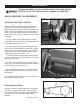


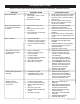

black
black
black
black
blue
blue
white
red
run capacitor
start capacitor
motor
electronic switch
main winding
secondary winding
green
switch
blue
white
white
19
This machine must be grounded.
Replacement of the power supply cable should
only be done by a qualied electrician.
WIRING DIAGRAM
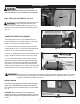
MAINTENANCE
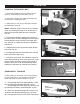
Turn the power switch “OFF” and disconnect the plug from the outlet prior to adjusting or
maintaining the sander. DO NOT attempt to repair or maintain the electrical components of the motor. Take the
sander to a qualied service technician for this type of maintenance.
MAINTENANCE REQUIRED FREQUENCY
1. Check the power cord and plug for any damage. Before each use.
2. Check sanding belts and discs for damage or wear. Before each use.
3. Check all guards and hardware to make sure they are secure. Before each use.
4. Check all moving parts for alignment and binding issues. Before each use.
4. Dress/Clean sanding surfaces for best abrasive action. As needed
5. Replace sanding belts or discs when worn or damaged. As needed.
6. Clean and vacuum dust from the motor housing and other sander parts. As needed.
7. Keep iron tables free of rust. Apply coat of paste wax or silicon spray. As needed.
NOTE: Lubrication of the bearings is not necessary, as they are sealed and pre-lubricated for life. Just replace
a bearing if failure occurs. Do not use compressed air near bearings. Simply wipe the exposed bearing
surfaces with a dry cloth to clean them.
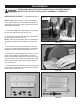
This tool is intended for use on a circuit that has
a 120 volt electrical receptacle.
The illustration on page 5 shows the type
of the 120v, 3-wire electrical plug and
electrical receptacle that has a grounding
conductor that is required.
Service beyond recommended maintenance
on these tools should only be performed by
an authorized, qualied technician.
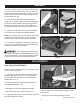
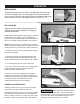
WARNING: If blowing sawdust, wear proper
eye protection to prevent debris from blowing
into eyes.