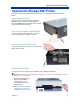
Rimage® 480i PrinterTM User Guide
Corporate Headquarters: Rimage Corporation 7725 Washington Avenue South Minneapolis, MN 55439 USA 800 553 8312 (toll free US) Service: +1 952 946 0004 (International) Fax: +1 952 944 6956 European Headquarters: Rimage Europe GmbH Albert-Einstein-Str. 26 63128 Dietzenbach Germany Tel: +49-(0) 6074-8521-0 Fax: +49-(0) 6074-8521-21 Rimage Corporation reserves the rights to make improvements to the equipment and software described in this document at any time without any prior notice.
Rimage 480i Printer Support information US, Asia/Pacific, Mexico/Latin America Europe Rimage Corporation 7725 Washington Avenue South Minneapolis, MN 55439 USA Attn: Rimage Services Rimage Europe GmbH Albert-Einstein-Str. 26 63128 Dietzenbach Germany Contact Rimage Services: FAX: +49-(0) 6074-8521-21 Email: http://www.rimage.com/support_form.cfm Rimage Europe Technical Website: Tel: +49-(0) 6074-8521-0 http://www.rimage.com/support.
Contents Contents Introduction ...................................................................................... 1 Operating System requirements............................................................................ 1 Media requirements............................................................................................... 1 Ink requirements.................................................................................................... 1 Rimage 480i Printer specifications .............
Introduction Introduction This manual provides the information needed to operate the Rimage 480i Printer, identify the parts, and configure the Rimage 480i printing preferences. To set up and install your Rimage 480i Printer, refer to the Rimage 480i QuickStart Guide. Operating System requirements The Rimage 480i Printer runs only on Windows 2000 Professional and Windows XP Professional and Home editions. It requires one USB port.
Rimage 480i Printer Rimage 480i Printer specifications Print technology Thermal inkjet printing Print resolution Up to 4800 dpi Print driver Microsoft Windows® 2000 Professional Service Pack 4 or XP Professional Service Pack 2 Color spectrum 16.7 million Droplet size 3 pico-liters Pixel density 5.76 million pixels per square inch Media types Standard inkjet printable surface 120 mm CD-R/DVD-R Power 100 – 240 VAC, 1.0 A, 50-60 Hz, auto-ranging Physical size Height – 6.00” (15.
Identify the parts of the Rimage 480i Printer Identify the parts of the Rimage 480i Printer This section describes the Rimage 480i Printer hardware and its features. The Rimage 480i Printer has some major parts that you need to know to operate and maintain the printer. These features are shown in the Front and Side views.
Rimage 480i Printer Printer control panel The Rimage 480i Printer control panel has three buttons and three LEDs to indicate certain conditions. The table below explains each of these buttons. LED: Light-emitting diode. A type of diode that emits light when current passes through it. Image Name Functionality Cancel When you press the Cancel button, it provides limited functionality to cancel printing.
Operate the Rimage 480i Printer Operate the Rimage 480i Printer This chapter provides the information that you need to use and maintain your Rimage 480i Printer. Powering up the printer The printer can be in either the ON state (Power LED on) or the sleeping state (Power LED off). Press the Power button to bring the printer out of the sleep state and into the ON state. Accessing the Power and USB Cables To access the power and USB cables, you must remove the Cable Access Door as shown.
Rimage 480i Printer 2. Lift the ink cartridge latch to the open position. Ink cartridge latch 3. If an ink cartridge is already installed, slide the ink cartridge out of the ink cartridge cradle. 4. Remove a new ink cartridge from its packaging and carefully remove the protective tape that covers the ink nozzles. - Important Do not touch the nozzles or the copper contacts on the ink cartridges. If you touch these parts, clogs, ink failure, and poor electrical connections are likely to occur.
Operate the Rimage 480i Printer Placing a disc on the printer tray To avoid scratching or damaging the recording surface of the disc, it is important to properly place the disc on the printer tray. Use this procedure to properly place the disc on the printer tray. Note: If you select Print from your software application, the printer tray opens automatically. 1. To open the printer tray, press . The printer tray opens. 2.
Rimage 480i Printer Changing the fan filter The fan filter is a consumable item, so you will need to change it after 20 printer cartridges. Use this procedure to change the fan filter. 1. With a small screwdriver, gently pull on the fan grating. The protective grating and fan filter should come off of the fan housing easily. 2. Gently pull the fan filter housing away from the back of the Rimage 480i. 3. Remove the white filter material. 4. Replace the filter with part number 304219-001. 5.
Operate the Rimage 480i Printer Setting up your printing preferences Printing Preferences allows you to set up and run your Rimage 2000i to produce the best possible label on your discs. Through Printing Preferences, you can: # Tip For additional information about these features, access the online help in Printing Preferences.
Rimage 480i Printer # Tip For additional information about these features access the online help in Printing Preferences. Adding, editing, or deleting a watermark This functionality allows you to create a new watermark or edit a currently existing watermark that you can print on your disc. You can also delete a current watermark that you created from this tab. 1. Navigate to Printing Preferences. 2. Select the Effects tab. 3. From the Watermarks drop-down list, select the desired watermark. 4.
Operate the Rimage 480i Printer # Tip For additional information about these features access the online help in Printing Preferences. Adjusting the ink volume used This functionality allows you to adjust the amount of ink that is used. 1. Navigate to Printing Preferences. 2. Select the Basics tab. 3. Select Advanced Features. The Advanced Features window opens. 4. With the Ink Volume and Dry Time sliders, you can increase or decrease the desired ink volume and drying time.
Rimage 480i Printer # Tip For additional information about these features access the online help in Printing Preferences. Changing or enabling masking This functionality allows you to adjust the non-printable area, or mask, settings for standard CD/DVD 120 mm media. This allows you to print a rectangular or square image without the edges overlapping the disc edges. If you print on areas of the disc where the surface is not suitable for printing, the ink can smear or run. 1.
Operate the Rimage 480i Printer 4. Adjust the cartridge alignment. In this example, the +64 line is the straightest. To align this parameter, enter 64 in the Photo to Color Vertical field. a.
Rimage 480i Printer Centering the image on the disc The Rimage 2000i provides two ways to center the image on the disc. You can use the Auto Centering method or the Manual Centering method. This process describes both processes. The Auto Centering method is accurate to within +/- 0.5 mm. You can improve the centering position accuracy with the manual centering adjustment to better than +/- 0.2 mm. For optimal print quality, use this procedure to center the image on the disc. # Tip: For additional 1.
Operate the Rimage 480i Printer # Tip: For additional information about these features, access the online help in Printing Preferences. Cleaning the ink cartridge nozzles This functionality allows you to clean or open the ink cartridge nozzles. The nozzles may become clogged from dried ink causing poor print because one or more nozzles are not spraying the appropriate quantity of ink. 1. Navigate to Printing Preferences.
Rimage 480i Printer Learn More Safety information This manual and the indications on the product allow proper and safe operation. The indication marks below help protect you and other persons from injury, and equipment from damage. n Warning! Ignoring this symbol failing to take or avoid a specific action could result in physical harm to the user or the hardware. p Caution: Ignoring this symbol could result in loss of data or incorrect operation of the hardware.