Rimage AutoPrinter™ User Guide This manual provides the information needed to operate the AutoPrinter and identify the parts. To setup and install your AutoPrinter, refer to the Setup and Installation Guide included with your product.
Corporate Headquarters: Rimage Corporation 7725 Washington Avenue South Minneapolis, MN 55439 USA 800 553 8312 (toll free US) Service: +1 952 946 0004 (International) Fax: +1 952 944 6956 European Headquarters: Rimage Europe GmbH Albert-Einstein-Str.
Support information US, Asia/Pacific, Mexico/Latin America Europe Rimage Corporation 7725 Washington Avenue South Minneapolis, MN 55439 USA Attn: Rimage Services Rimage Europe GmbH Albert-Einstein-Str. 26 63128 Dietzenbach Germany Contact Rimage Services: FAX: +49-(0) 6074-8521-21 Email: http://www.rimage.com/support_form.cfm Rimage Europe Technical Website: Tel: +49-(0) 6074-8521-0 North America: 800-553-8312 Asia/Pacific, Mexico/ Latin America: 952-946-0004 FAX: 952-946-6956 http://www.rimage.
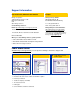
Contents Contents Introduction ...................................................................................... 1 Operating system requirements ............................................................................ 1 Media requirements............................................................................................... 1 Ribbon requirements ............................................................................................. 1 Label design requirements ........................
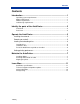
Introduction Introduction This manual provides the information needed to operate the AutoPrinter and identify the parts. To setup and install your AutoPrinter, refer to the Setup and Installation Guide included with your product. Note: The term AutoPrinter applies to both the AutoEverest and the AutoPrism. AutoEverest and AutoPrism will be used only to refer to either AutoPrinter specifically.
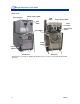
Rimage AutoPrinter™ User Guide Identify the parts of the AutoPrinter Front view Lift Arm Everest Printer Lift Arm Prism Printer Control Panel Control Panel Operator Panel Operator Panel Carousel Carousel AutoEverest 2 AutoPrism 110656_I
Identify the parts of the AutoPrinter Operator panel The operator panel has four indicator lights and an operator button. Operator button Each time you press the operator button, the carousel rotates to the next bin. Operator panel The indicator lights on the operator panel provide the following operational information: Name 110656_I Functionality Carousel Present The carousel present indicator light illuminates when the carousel is absent.
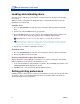
Rimage AutoPrinter™ User Guide Rear view Everest Printer Printer Control Cable USB Cable Printer Control Cable USB Cable Prism Printer Prism Power Switch Serial Cable* Power Switch Power Switch AutoEverest AutoPrism *Serial cable is used only for updating the firmware. Do not connect a serial cable during normal operation.
Operate the AutoPrinter Operate the AutoPrinter Installing the carousel - Important: To prevent errors, the carousel should be installed before operating the software or powering on the AutoPrinter. 1. Slide the carousel into the unit so that the shaft slides in the slot opening of the bearing guide. Bearing Guide Top Support Bearing 2. Lower the carousel with the top support bearing dropping in to the bearing guide. 3. If necessary, rotate the carousel to seat the carousel securely.
Rimage AutoPrinter™ User Guide Loading and unloading discs You can load up to 100 discs per carousel bin. You may load discs in the bins before installing the carousel. When the carousel is installed in the AutoPrinter, discs can be installed one bin at a time by following the procedure below. Load the discs 1. Press the operator button to rotate the carousel and place a bin in position to load blank discs. 2. Remove any completed discs from the carousel bins. 3.
Maintain the AutoPrinter Maintain the AutoPrinter Installing ribbons Before installing ribbons in the printer, stop any operations. To change ribbons in a Prism printer, refer to the PrismPlus Printer User Guide. To change ribbons in an Everest II printer, refer to the Everest II Printer User Guide. Cleaning method and schedule Task Frequency Cleaning the AutoPrinter Once a week. Remove dust from the AutoPrinter and surrounding work area.
Rimage AutoPrinter™ User Guide 4. Align the printer. a. Slowly slide the lift arm down until the disc just touches the print pad. Printer Button b. If the disc is not centered on the print pad, align the Side to Side printer side to side. Alignment Lift Arm Print Pad Holding Pins Front to Back Alignment Screw i. Using the T25 Torx screwdriver, loosen the two side to side alignment screws. ii. Slide the printer, not the printer tray, until the side edges of the disc and printer pad are aligned. iii.
Maintain the AutoPrinter Prism printer To align your Prism printer, use the following instructions. # Required tools: • T25 Torx screwdriver • 5/32” Allen wrench 1. Power on the AutoPrinter. Note: If the Prism power switch is in the on position, power on both the printer and the AutoPrinter by pressing the AutoPrinter power switch. 2. Wait for the unit to complete initialization. 3. Prepare the unit for alignment. a. Manually slide the lift arm to the top of the AutoPrinter. b.
Rimage AutoPrinter™ User Guide Side to Side Alignment Screws b. If the disc is not centered on the print pad, align the printer side to side. i. Using the T25 Torx screwdriver, loosen the two side to side alignment screws. ii. Slide the printer, not the printer tray, until the side edges of the disc and printer pad are aligned. iii. Tighten the two side to side alignment screws. Front to Back Alignment Screw c.
Learn More Learn More AutoPrinter specifications Note: Specifications for the printer are in the printer user guide. Standard System AutoPrinter autoloader, a Rimage Everest or Prism printer, and CD Designer software suite. Software requirements CD Designer or other graphics application Input bin capacity 300 Discs Output capacity 300 Discs Physical size Width: 15.063” (38.4 cm) Height: 22.375” (56.8 cm) Depth: 22.625” (57.5 cm) Weight with Everest printer: 97 lb (44.
Rimage AutoPrinter™ User Guide Technical support and product updates Support for the Rimage AutoPrinter is available through your authorized reseller. - Important! Register your Rimage AutoPrinter online or complete and return the registration card so that Rimage can notify you of upgrades as they become available. Safety information This manual and the indications on the product allow for proper and safe operation.
Learn More Safety testing Product name: AutoPrinter Model: RAS10 Notice for USA Tested to Comply with FCC Standards FOR HOME OR OFFICE USE. NOTE: This equipment has been tested and found to comply with the limits for a Class B digital device, pursuant to Part 15 of the FCC Rules. These limits are designed to provide reasonable protection against harmful interference in a residential installation.