
User guide


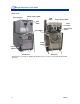


Rimage AutoPrinter™ User Guide
6 110656_I
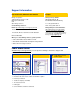
Loading and unloading discs
You can load up to 100 discs per carousel bin. You may load discs in the bins before installing
the carousel.
When the carousel is installed in the AutoPrinter, discs can be installed one bin at a time by
following the procedure below.
Load the discs
1. Press the operator button to rotate the carousel and place a bin in position to load blank
discs.
2. Remove any completed discs from the carousel bins.
3. Place blank discs in bins 1–3 of the carousel. The AutoPrinter will pick discs from the next
bin once the first bin is empty. Bin 4 is only used for outputting completed discs.
- Important! Place the discs into the bins with the recording side facing down.
# Tip: Hold the discs by the outer edge so you do not put fingerprints on either the top or
the bottom surface of the discs. Fingerprints on the top of the disc can affect printing
quality. Rimage recommends wearing lint free gloves.
4. Repeat steps 1–2 until the required bins are filled.
Unload the discs
1. Press the operator button to rotate the c
2. Remove the discs from the desired bin.
arousel and place a bin in position to unload discs.
Reset the AutoPrinter to pick discs from bin 1
After the AutoPrinter starts picking discs from bin 2 or 3, it continues picking discs from that bin
until the AutoPrinter is powered off, or the AutoPrinter is reset.
1. To reset the AutoPrinter to start picking discs from bin 1, lift the carousel up and down so the
carousel present indicator light turns on and off.
2. Add discs to bin 1. The next print job will start picking from bin 1.
Setting printing preferences
Printing preferences allows you to set and run your AutoPrinter to produce the best possible label
on your discs. Refer to your Everest Printer User Guide or PrismPlus Printer User Guide for
specific printing preferences instructions.