
User guide


Rimage AutoPrinter™ User Guide
8 110656_I
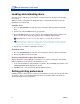
4. Align the printer.
a. Slowly slide the lift arm down
until the disc just touches the
print pad.
b. If the disc is not centered
on the print pad, align the
printer side to side.
Printer
Button
Lift
Arm
Side to Side
Alignment
i. Using the T25 Torx screwdriver,
loosen the two side to side
alignment screws.
ii. Slide the printer, not the printer
tray, until the side edges of the
disc and printer pad are aligned.
iii. Tighten the two side to side
alignment screws.
# Tip: Tighten each screw in
increments to prevent shifting.
Print
Pad
Holding Pins
Front to Back
Alignment Screw
Side to Side
Alignment Screws
c. Using either a T25 Torx driver or a
5/32” Allen wrench, turn the front to
back alignment screw until there is
a 1/16” (1.5mm) gap between the
front edge of the disc and the raised
edge of the disc retainer.
Ga
p
Disc
Retaine
r
5. When the printer is aligned, slide the lift arm to the top of the unit.
6. Press the printer button to close the printer tray.
7. Press the disc release button to release the disc from the gripper.
# Tip: Place your hand under the disc to catch it.