
User Guide


reach both sides.
This device is powered through PoE+, the installer should locate the power source on the building roof or inside the
building.If the purchased PoE+ injector is not waterproof or identified for outdoor usage, please install it indoors.
This device should connect grounding wires to the local grounding terminal. The installer should locate the grounding
terminals on the building roof or inside the building.
Installation
Overview
It’s recommended to use the following installation steps in sequence.
●
●
●
●
●
●
●
●
●
●
●
●
●
Prior to wiring, lay down the Ethernet cable and grounding wires.
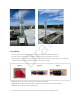
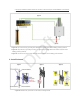
Before you affix the antenna mounting bracket on the mounting pole, install four(4) antennas (two for Sub-GHz, two for
LTE) on the antenna mounting bracket.
Connect one end of the 3-foot cable onto the four(4) antenna connectors.
Affixthe antenna mounting bracket (with the attached antennas and cable) on the highest position of the mounting pole.
Affixthe base unit mounting bracket at the lowest position of the mounting pole, make sure the 3-foot cable can stretch
to the top of the base unit bracket, and the base unit bracket shouldn’t block the lower antenna from any direction (refer
to photos).
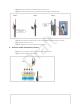
Before installing the base unit on its mounting bracket, remove the grounding connector screw from the bottom of the
base unit.
Connect the grounding wire on the bottom of the base unit and fasten the grounding connector screw.
Install the base unit on its bracket with the attached grounding wire.
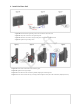
Install the four(4) lighting arrestors on the radio connectors on top of the base unit.
Connect the other end of the 3-foot cable to the lighting arrestors.
Connect the four(4) grounding wires to the four(4) lighting arrestors.
Connect the Ethernet connector (the waterproof cablegland should be done in pre-wire stage) to the base unit port.
Plug in the PoE+ adapter to the building power source to supply power to the base unit.
Draft