
Ethernet users Guide
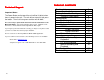
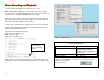


Configuring 5250 Printer Sessions
Once you have configured your 5250 Display Sessions, it is time to define
up to three host printer sessions. This can be handy if you use different
printers for various pre-printed forms.
Enter the name of the printer session (this will be the name that the AS/400
uses for this printer session. You will also enter the IP address of the
AS/400.
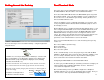
Select Host Print Transform (recommended) to allow the AS/400 to format
your print jobs. If you use Host print transform, you will need to enter the
type of printer in the iSeries Printer box.
NOTE: you must enter the printer type exactly as the AS/400 lists it. For
example, enter *IBM2380 for an IBM 2380 Personal Printer Series II or
enter *HP4 for an HP Laserjet 4 or compatible. See the Help for this screen
to scroll through a listing of AS/400 supported printers.
HINT: you can “Cut and Paste” from this list to avoid mistakes.
Next, you will select which “logical” printer to assign to this printer session.
If you only have access to one printer from here, leave this at Default.
Select Done to save your entries.
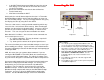
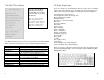
Network Settings
The Unit Network Name must be unique in order for
DNS servers to be able to identify this unit on the
network.
Choose Dynamic IP Address to use DHCP to
automatically set the unit’s network address, netmask,
etc. (recommended).
Choose Static IP Address if you wish to fill in your own
network parameters. If you do so, fill in the appropriate
information under IP Address, Netmask, Gateway and
DNS Server.
If you made any changes to this page, we recommend that you
hit the Network Restart button, in order to make the changes
take effect now.
9
12