ee pT manual carefully and keep it for future reference. Thank you for purchasing this digital instrument. For perfect operation and security,please read the Safety Precautions CAUTION i Dear ask or mess sock] The lightning flash with arrowhead symbol within an equilateral triangle is in Tended to alert the user to the presence of insulated “dangerous voltage” within the product $ enclosure that may be of sufficient magnitude to constitute 2 risk of electric shock to persons.
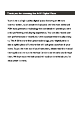
Thank you for choosing the A-20 Digital Piano Your A-20 is a high quality digital piano featuring an 88 note hammer action, touch sensitive keyboard and the most advanced PCM tone generation technology that combined will provide you with a rich performing and playing experience. You can also record your own performances or record your own accompaniment to play along to. The A-20 is more than great technology, your digital piano is also a stylish piece of furniture that will look great anywhere in your home.
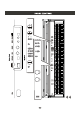
PANEL CONTROL amass renaissances ses ave nan CONNECTOR PANEL I. Speaker Connection 2. USB Midi/USB Audio 3. Midi inf Midi Qut 4. Line In/Line Out 5. DC 12V Input -* 6. Phones Phones 2 7. Pedal 8. Bluetooth PANEL CONTROLS i. Power/Standby tas cos ans ax ses max ank ano ena 2. Adjust The Volume -3. Adjust The Sound 4. Demo Play 5. [SETUP] Button 6. LCD Display YES] VOICE & FUNCTION I. Voice 2. Layer Mode + 3. Split Mode 4. Duet >= 5. Reverb 6. Effects ~~ 7. Metronome 8. Tempo SETUP ave ue. eas say ave ue I.
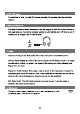
CONNECTOR PANEL The connector jacks are located on the bottom panel of the piano. SPEAKER. nos CONNECTION CROSSTOWN Dts samizdat LINES LINE oop 1. Speaker Connection Connection for the Speaker cable with square interface on the bottom panel of the piano. pe BE USB MIDI: This product allows the transfer of MIDI information over USB to a computer. As complicated this might sound, it's actually pretty straight forward.
5.DC 12V¥ Input Connection for the included DC power adapter.Please use only the provided adapter. Cal Two sets of standard stereo headphones can be plugged in here for private practice or late-night playing. The internal speaker system is automatically shut off when a pair of headphones is plugged into PHONES jacks. a PHONES 2 @ I PHONES 1 Na Connect the plug of the foot pedal unit to the pedal jack on the bottom panel.
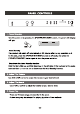
PANEL CONTROLS 0 OQ $8838 Turn the power on by pressing the [POWER/STANDBY] switch, the panel LCD display will fight. BRAND PIANO SRS Auto Standby This product will switch off automatically in 30 minutes after no any operation on it. In this case, press the [POWER/STANDBY] button to off mode, and press the [POWER/STANDBY] button again to turn the power switch on.
a.Use / Press [DEMO] button, Use / buttons to select the song you want to play. The [DEMO] and voice buttons will flash . GRAND PIANO KD ERE IDENTIFIED Ea b.Voice Select Button: Press the [DEMO] button, then press the desired Voice Select button. The [DEMO] and voice buttons will flash . = NOTE ( The Main voice will synchronous change when demo changes . ] Press [DEMO] button again to stop playing. eee DE The LCD will display the appropriate status, function,value, voice or the current mode of operation.
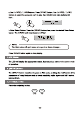
VOICE & FUNCTION Selecting A Voice Your instrument has 14 built-in voices, which include several pianos as well as other instruments. These digitally-sampled musical instrument sounds may be selected one at a time. O we CE soi it So, WARLORD SITS PHENOMS ARSON Waa. GOR Somme 0 To select a voice, press the appropriate Voice Select button on the right side of the front panel. NOTE When [VARIATION/USER] button is unlighted, you can press the appropriate button to select the voice in the first line.
Save User Voice In user mode, press the appropriate voice select button again to save user voice. Press [VARIATION/USER] button again to exit. pl In Layer mode two voices may be played simultaneously, each at selected volumes. To enter Layer mode by either of two methods: a. press [LAYER] button and the indicator is flashing, then press the voice button to select the second voice. Wet tom GENS URGES REIN Cri b.
Lo Split Mode allows the keyboard to be divided into two sections so that different voices may be played with the left and right hands. The volume may be independently adjusted for each voice, the Split Point (the highest note played with the left hand) may be adjusted and the Split Voice may be changed as desired. Enter Split Mode Press the [SPLIT] button. The indicator is flashing. The Split (left hand) voice will be Bass and the Split Point will be G2.
Change the Main (right hand) voice When the Split indicator is lighted,then press the voice select button to select the Main voice. SANDPIPER PREPPING) ROCHA BRIGHT PING EPHESIAN: CHURCH GRAN ORCHARD STAGS UPRIGHTNESS VARIATION GUITAR (COBRAS USER Change the Split Point Press the [SPLIT] button, the indicator will momentarily display off, then hold down the [SPLIT] button and press the appropriate piano key or use [+ / YES] buttons to change the Split Point.
This will be very helpful when the instrument is used by two players at the same time and they will be able to play the same piano sound in the same octave. Press [DUET] button again to exit the DUET mode. The [REVERB] button selects a number of digital reverb effects that you can use for extra depth and expressive power. Press [REVERB] button to turn off or turn on the reverb effect. When REVERB is turned on, press [REVERB] button 2 seconds, use [+ / YES] button to select reverb level.
Fa Metronome is a convenient feature for practice, and it can also provide a solid rhythmic guide when recording. Press [METRONOME] button can turn off or turn on the Metronome effect. When Metronome is turned on,press [METRONOME] button 2 seconds, use [+ / YES] / [/ Buttonhole to select Metronome volume (00-127) . x, Or press [SETUP] button to select Metronome type and volume. Please see page 15. BRAID Go Cr This function allows you to set the tempo by [TEMPO] button.
Press [SETUP] button to enter the function menu. Use [SETUP] button or button to select the function . Press button into the option, use / to set the parameter. The option and the parameters are as the follows: Press [SETUP] button to enter the function menu. Use [SETUP] button or button to select Press into the option,the LCD will display: R.TYPE: HALL sus Then use / to set the parameter (Default: HALL. The LCD will indicate these parameters as shown below: R.TYPE: ROOM R.TYPE: ROOM R.TYPE: ROOM R.
TIERS PAGEANT CIRRI C.IVREILHDRIER Then use / to set the parameter (Default: CHORUS. The LCD will indicate these parameters as shown below: C.TYPE: CHORUS C.TYPE: CHORUS C. TYPE: CHORUS C.TYPE: CHORUS ACOLYTE: FEEDBACK C.TYPE: FLANGE C. TYPE: DELAY C.TYPE: SHORTFALL Press & buttons simultaneously to restore the default value. Press [SETUP] button to enter the function menu. Use [SETUP] button or button to select Press into the option,the LCD will display: R.LEVEL: Then use button to adjust the REVERB level.
GRAND RIBS peo REVERENCES Then use / button to adjust the CHORUS level. Range: 00-127 (Default: 50). Press & buttons simultaneously to restore the default value. Ca Press [SETUP] button to enter the function menu. Use [SETUP] button or button to select [ELECTROTYPE. Press button into the option, the LCD will display: METRO TYPE: 4/4. cS Then use / button to set the parameter: 2/2. 2/4. 3/4, 4/4. 5/4. 8/8. 7/8. 9/8. 12/8 (Default: 4/4). Press & buttons simultaneously to restore the default value.
7. Main Volume Press [SETUP] button to enter the function menu. Use [SETUP] button or button to select [MAINSAIL. Press button into the option, the LCD will display: MAIN VOL: 127. Sey ERA RD-BIRND HEEL EE nT SET fees ids Then use / buttons to adjust the MAIN VOL Range: 00-127 (Default: 127). Press & buttons simultaneously to restore the default value. 8, Split Volume Press [SETUP] button to enter the function menu.Use [SETUP] button or button to select [SPLITTING.
10. USB Disk Song's Volume Press [SETUP] button, use or [SETUP] button to select “USBDISKVOLY” Then use button to adjust the USB Disk Song's Volume. Range: 00-127, Default: 127. Gey LP Press [SETUP] button, use or [SETUP] button to select “SPEEDUP” . Then use button to adjust the USB Speed. Range: 50-200, Default: 100. Press [SETUP] button to enter the function menu. Use [SETUP] button or button to select [RACETRACK.
Lr Press [SETUP] button to enter the function menu. Use [SETUP] button or button to select [TOUCH?]. Press button into the option, the LCD will display: TOUCH: NORMAL. GREBE mere on THE NORMAL SOFT FIX? If you choose TOUCH: FIX?, Press [SETUP] button to enter the option, then use / button to set the parameter: 00~127 (Default: 100). LT Press [SETUP] button to enter the function menu. Use [SETUP] button or button to select [TRANSPOSE?]. Press button into the option, the LCD will display: TRANSPOSE: -0-.