DP-7 Owner s Manual V M irgin usical I nstruments
Digital Piano Precaution Thank you for purchasing this digital instrument.For perfect operation and security,please read the manual carefully and keep it for future reference. Safety Precautions CAUTION RISK OF ELECTRIC SHOCK DO NOT OPEN The lightning flash with arrowhead symbol within an equilateral triangle is in Tended to alert the user to the presence of uninsulated dangerous voltage within the product s enclosure that may be of sufficient magnitude to constitute a risk of electric shock to persons.
Thanks for using our digital piano Your digital piano is a high-quality digital piano with 88 standard touch sensitivity keyboard and combines the most advanced PCM tone generation technology. Your instrument has 8 demo songs and hundreds of learning songs. Real-time record function, and the recording data won't be lost when you turn off the power. In order to obtain maximum performance and enjoyment, please read this manual thoroughly while trying out the various features described.
Contents Control Panel ................................................................................................................. Basic Operation ............................................................................................................ Turn on the Power ..................................................................................................... Adjust the Main Volume ............................................................................................ Demo songs ...
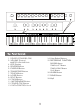
GRAND PIANO DATA CONTROL BRIGHT PIANO ELECTRIC ELECTRIC PIANO 1 PIANO 2 CHURCH ORGAN 13 GUITAR STRINGS BRASS GM VOICE RECORD 14 MASTER VOLUME 2 REVERB CHORUS PLAY 15 TRANSPOSE TOUCH 5 4 TRACK 2/ RIGHT TRACK 1/ LEFT 6 7 LAYER SPLIT TWIN 8 9 10 LEARN DEMO 16 17 METRONOME TEMPO/TAP 11 12 3 MASTER VOLUME REVERB CHORUS TRANSPOSE TOUCH LAYER SPLIT TWIN METRONOME TEMPO/TAP DATA CONTROL GRAND PIANO BRIGHT PIANO ELECTRIC ELECTRIC PIANO 1 PIANO 2 CHURCH ORGAN GUITAR
PEDAL USB TO HOST LINE IN LINE OUT DC 12V PEDAL 19 PHONES 2 23 PHONES 1 Rear Panel Controls 19. PEDAL JACK 20. USB TO HOST JACK 21. LINE OUT JACK 22. DC POWER 23.
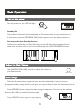
Basic Operation Turn on the power Turn the power on, the LCD will light. STANDBY/ON Standby On This product will switch off automatically in 30 minutes after no any operation on it. In this case, press the [STANDBY/ON] button again to turn the power switch on. Deactivate the Auto Standby function Hold the first white key and first black key on the left side of the keyboard at the same time and then turn on the unit to deactivate the AUTO STANDBY function.
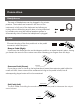
Connection Headphones Two sets of Headphones can be plugged in for private practice. The sockets are located in the front of the instrument in left part of the keyboard and allows you to play without disturbing anyone else or being disturbed by outside noise, and the internal speaker system is automatically shut off when the headphone is plugged. PHONES 2 PHONES 1 Pedal Connect the plug of the foot pedal unit to the pedal connector under the piano.
Line Out The Line out jack can be used to deliver the output of the piano to a keyboard amplifier, stereo sound system, mixing console or tape recorder. LINE OUT Note: To avoid damaging the speakers, please ensure that the volume has set to the minimum level before connecting the power and other devices Stereo System USB MIDI / USB AUDIO Jack This product allows the transfer of MIDI information over USB to a computer. Complicated as it sounds, it's pretty simple.
Voices Your piano has 128 sounds in the internal sound library numbered from 01 to 128, and The available sounds can be played in three different modes: Main voice, Layer voice and Split voice. Select a Voice You can use the voice button on the panel, or use [DATA CONTROL] knob to select voice. Selecting Voice Directly There are 9 voices that can be selected quickly by Pressing one of the 9 voice select buttons and its indicator is lighted.
simultaneously. The number of the dual voice will be displayed on the LCD. Now, you can play two different sounds at the same time. To change the Layer voice by using [DATA CONTROL] knob while the Layer indicator is light. LAYER Adjust Layer Voice Volume Press and hold down the [LAYER] button, then use [DATA CONTROL] to adjust Layer Voice volume. Range: 000-127. LAYER Press the [GRAND PIANO] and [BRIGHT PIANO] buttons simultaneously to restore the default value: 75.
SPLIT Change the Split Point Press and hold down [SPLIT] button, then press the appropriate piano key to select the Split Point. Range:000~087. Default: 034. SPLIT Adjust Spilt Voice Volume Press and hold down the [SPLIT] button, then use [DATA CONTROL] to adjust Layer Voice volume. Range: 000-127. SPLIT Press the [GRAND PIANO] and [BRIGHT PIANO] buttons simultaneously to restore the default value: 127. Exit The Split Mode Press [SPLIT] button again to exit the Layer mode.
Effect Digital Effect This function allows you to perform the overall sound in a realistic style. Reverb The [REVERB] button selects a number of digital reverb effects that you can use for extra depth and expressive power. Press [REVERB] button, use [DATA CONTROL] knob to select reverb type. REVERB Press the [GRAND PIANO] and [BRIGHT PIANO] buttons simultaneously to restore the default value: Room3. The reverb types in the list below can be selected from the reverb display.
Chorus Press [CHORUS] button, use [DATA CONTROL] knob to select chorus type. CHORUS Press the [GRAND PIANO] and [BRIGHT PIANO] buttons simultaneously to restore the default value: Chorus3. The chorus types in the list below can be selected from the reverb display. 1 2 3 4 5 6 7 Chorus1 Chorus2 Chorus3 Chorus4 Feedbak Flanger1 ShDl 8 9 10 11 12 13 S hDlFb Flanger2 Flanger3 Celeste1 Celeste2 Celeste3 Press [CHORUS] button again to turn off the reverb effect.
Press the [TOUCH] button and its indicator is lighted , use [DATA CONTROL] knob to select the touch sensitivity type. Range: Low, Normal, High. Default: Normal. TOUCH When [TOUCH] is off, the indicator is unlighted, means that regardless of how hard you play, the keyboard will transmit a velocity value of 100. Hold [TOUCH] button till Touchfix:100 displayed, then use [DATA CONTROL] knob to set the fixed touch level. Range: 000~127. Default: 100.
Twin Press the [TWIN] button to enter TWIN mode. In this mode, the keyboard will be separated into two playing areas. Right: from C#3 to C7 Left: from A-1 to C3 TWIN This will be very helpful when the instrument is used by two players at the same time (example: Teacher and Student) and they will be able to play the same piano sound in the same octave.
METRONOME Tempo/Tap This function allows you to set the rhythm tempo by tapping tempo on the [TEMPO/TAP] button. Tap on the button 2 times while rhythm is playing, the rhythm tempo are set as your desired speed. If you want to set the tempo before starting rhythm, you have to tap the button 4 times, but only tap 3 times for 3/4 time signature.You also can set the tempo by using [DATA CONTROL] button after tap on the button one time. Range:020~280. Default: 120.
Recording Function Recording function lets you record your performances using up to two independent tracks. The recorded data will not be lost when you turn off the power. Start Recording Hold down the [RECORD] button, and then press [TRACK1/LEFT] (or [TRACK2/ RIGHT]) button to enter record mode, the [RECORD] button and tracks indicator and is flishing, then set the tempo, press the key to start Recording.
RECORD TRACK 1/ LEFT TRACK 2/ RIGHT PLAY Press the [PLAY] button again to stop recording. Clear Recording Hold down the [TRACK1/LEFT] button or [TRACK2/RIGHT] button to clear the recording data.
Learning Function Your instrument has three bank songs to select for learning. The CZERNY bank includes 70 learning songs, the BEYER bank includes 106 learning songs and the School bank includes 124 learning songs Play the Song Press [LEARN] button repeatedly to select three bank and its indicator is lighted. Then use [DATA CONTROL] to select three bank songs. LEARN Press [PLAY] button to play the song, the [LEARN] button indicator is flashing.
Reset 1). Turn off the power. STANDBY/ON 2). Hold down the [METRONOME] and [TEMPO/TAP] buttons button buttons, then turn the power on, it can restore all internal settings to factory set.
Appendix Voice List NO. PROGRAM CHANGE BANK VOICE NAME PROGRAM NO. CHANGE BANK VOICE NAME 20 NO.
Percussion Voice List Note# 25 26 27 28 29 30 31 32 33 34 35 36 37 38 39 40 41 42 43 44 45 46 47 48 49 50 51 52 53 54 55 56 57 58 59 60 61 62 63 64 65 66 67 68 69 70 71 72 73 74 75 76 77 78 79 80 81 82 83 84 85 Note #C D #D E F #F G #G A #A B C #C D #D E F #F G #G A #A B C #C D #D E F #F G #G A #A B C #C D #D E F #F G #G A #A B C #C D #D E F #F G #G A #A B C #C Standard(0) Seq Click H Brush Tap Brush Slap Brush Swirl H Snare Roll Castanet Snare L Sticks Bass Drum L Open Rim Shot Bass Drum L Seq Click H B
MIDI Implementation Chart Function Basic Channel Mode Default Changed Default Messages Altered Note Number Velocity :True voice Note ON Note OFF Affter Key's Pitch Bender Control Change 0,32 1 5 6 7 10 11 64 65 66 67 80,81 91,9.
Troubleshooting Hints When the instrument is turned on or off, a Popping sound is temporarily produced. This is normal and indicates that the instrument is receiving electrical power. When using a mobile phone, noise is produced. Using a mobile phone in close proximity to the instrument may produce interference. To prevent this, turn off the mobile phone or use it further away from the instrument.
Specifications Keyboards: 88 standard-size hammer keys (A-1 C7) with touch response Display: LCD display. Polyphony: 64 notes max Voices: 128 Voice Control: Transpose,Touch Effect: Reverb type (8), Chorus type (13) Keyboard Control: Dual, 3 touch sensitivity and fixed touch select, Split,Chord,Twin Demo: 8 songs Song recording: Real time record (2 tracks) and playback.
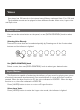
Assembly Instructions GA B D/F C E/F DP-7 Turn the adjustable Pedal Board support until it is in firm contact with the floor. Before moving the piano to a new location, always remember to raise the level of the Pedal Board support so that it is not touching the floor. Once the piano is in place, you can adjust it so it is in firm contact with the floor again.
FCC STATEMENT 1. This device complies with Part 15 of the FCC Rules. Operation is subject to the following two conditions: (1) This device may not cause harmful interference. (2) This device must accept any interference received, including interference that may cause undesired operation. 2. Changes or modifications not expressly approved by the party responsible for compliance could void the user's authority to operate the equipment.
Virgin Musical Instrument Company INC P O Box 2908 La Mesa, CA 91943 PH: 619 244-0006 E-mail: info@virginmusicalinstruments.com Virginmusicalinstrumentscompany.