Precaution Thank you for purchasing this digital instrument. For correct uss, please read the manual carefully and keep It for future reference. Satiety Precautions CAUTION a . far kot violist The lightning flash with arrowhead symbol within an equilateral triangle is intended to alert the user to the presence of UN-insulated "dangerous voltage" Within the product $ enclosure that may be of sufficient magnitude to constitute a risk of electric shock to persons.
Thanks for Using Our Digital Piano Your digital piano is a high-quality digital piano with 88 standard touch sensitivity keyboard and combines the most advanced PCM tone generation technology. This digital piano lets you record your performances and Registration settings to a USB Disk. Each user song lets you record up to sixteen independent tracks. In order to obtain maximum performance and enjoyment, please read this manual thoroughly while trying out the various features described.
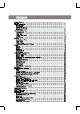
Panel Control Top Panel Ur ods POWER . MASTER VOLUME fared . BRIGHTNESS fared . MULTI DISPLAY . ACCOMPANIMENT CONTROL [ «AC COMP» ] button [TAR/TEMPO] button [METRONOME] button button [CHORD] button [SYNCHRONY] button [INTRO/ENDING] button [START/STOP] button [FILL IN] button [VARIATION] button . KEYBOARD CONTROL [ OCTAVE ] button [ 4KB.VOL» ] button [ «TRANSPOSE 1 button [SPLIT] button [LAYER] button [HARMONY] button [FULL KEY] button [DUO] button . [FUNCTION] button . [ENTER] button .
LI You are no doubt eager to play your piano, but first please make sure you have completed the following basic setup steps: 1} Follow the assembly instructions as outlined on page 69 in the appendix of this manual. 2) Once the piano is securely assembled, connect the plug of the foot pedal unit to the pedal jack on the rear panel. Plug in the included power chord to the bottom of the piano body as illustrated below.
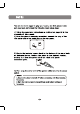
EEE Standby/On Press the [POWER] button to turn on the power and the LCD display will light. POW. S Auto Standby Your piano will switch off automatically in 30 minutes after no any operation on it. In this case, press the [POWER] button again to turn on the power, NOTE When you are playing the Demo song, it will not switch off automatically in 30 minutes after no any operation on it.
Damper Pedal (Right) It performs the same function as the damper pedal on an actual acoustic piano, letting you sustain the sound of the voices even after releasing your fingers from the keys. Ostentation Pedal (Center If you play a note or chord on the keyboard and press the ostentation pedal while the notes are held, those notes will be sustained as long as the pedal is held, but all subsequently played notes will not be sustained. Soft Pedal (Left The Soft Pedal controls the sound volume.
Adjust the Volume Use [MASTER VOLUME] control to adjust the volume to your desired level. = BM enter TIE ASK MASTER VOLUME Adjust the Sound The [TREBLE] fared can be used to adjust the sound of the piano. If the TREBLE fared is pushed to the far left the high frequency of the sound will be decreased, if it is pushed to the right, the high frequency will be increased. Pushing the [BASS] fared to the left will decrease the bass frequency while turning it to the right will increase the bass frequency.
The Connector Box The piano features a connection box which allows you to connect external audio equipment, a computer, other MIDI equipment or headphones. The following describes each option in more detail. Headphones Two sets of standard stereo headphones can be plugged in here for private practice or late-night playing. The internal speaker system is automatically shut off when a pair of headphones is plugged into the 1.Headphone jack.
NOTE ( MIDI QUT Transmits MIDI data to another MIDI device. | Line OUT The piano's stereo RCA line output can be used to deliver the output of the piano to a keyboard amplifier, stereo sound system, mixing console or tape recorder. The piano's internal sound system will remain on unless headphones are plugged in to the 1. Headphone jack. lo ©2885 Using USB-MIDI 1 This product allows the transfer of MIDI information over USB to a computer.
Aux In The Aux In stereo RCA connectors allow you to mix an external sound source (such as a CD player, MP3 player or computer output) with the piano's internal sounds, for playback through the piano’s built-in speakers or headphone outputs. LS OF: | The Aux In signal level can be adjusted using the Input Level knob. TIS QE Blue tooth This piano can support Blue tooth with the Connection of the Blue tooth jack, Reference: Blue tooth.
Your instrument has GM standard voices. XM voices {include 8 percussion kits and 1 set of sound effect) that you can select and play. Selecting a Voice When [VOICE/STYLE] button is unlighted, the voice mode is selected and the current voice number and the name will display on the LCD Display section. Jose Seb GRAND FR. No Use and button or number buttons [0-8] to select the desired voice according to the voice list.
Select Dual Voice Press [LAYER] button, the Dual indicator is flashing, use the number or and button to select the second voice. Setting the Dual Voice Volume Reference: Dual Voice Volume (P14). Press [LAYER] again, the Dual indicator turns off and the Dual mode is no longer active. SLT.
Hold down the [SPLIT] button until the LCD shows "Split Point", then use or to select the split point. Reference: Split Voice Volume (P. 14). Setting the Split Voice Volume Exit the Split Mode Press [SPLIT] again, the Split indicator turns off and the Split mode is no longer active. I Lindbergh fens 120 Brant od Grand Plano Press [GRAND PIANO] button. This convenient function lets you instantly call up the Grand Piano voice.
Adjusting Keyboard Volume Use this function can adjust the Split Voice Volume, Dual Voice Volume and the Main Voice Volume. Split Voice Volume In Split mode, when the Split indicator is flashing, press [KB.VOL ] button can adjust the split voice volume, while the split indicator is lit. «4 KB VOL Bb OG ~ Dual Voice Volume In Dual mode, when the Layer indicator is flashing, press [KB.VOL ] button can adjust the Layer voice volume, while the dual indicator is lit.
This function allows you to perform the overall sound in a realistic style. Reverb The [REVERB] button selects a number of digital reverb effects that you can use for extra depth and expressive power. Press [REVERB] button can turn off or turn on the reverb effect. Press [REVERB] button, use number button or and button to select reverb type, Default type: Hall EH £m adh mi Beelines The reverb types in the list below can be selected from the reverb display.
Chorus Shimmering, broadening effect. Press [CHORUS] button, use and button to select chorus type. The chorus types in the list below can be selected from the chorus display. Chorus | Chorus | Chorus | Chorus4{Feedback Flangeri|ShrtDely | Shrift, — NOTE Press [CHORUS] button repeatedly to turn on or turn off the chorus effect.
No. | Name Description is defined as a curve which will be mid-way between 01 [Normal | the other two. is defined as a curve which makes it easier to play 02 | Hard quietly. The curve generates lower velocities for the same force 03 | Soft |S defined as a curve which makes it easier fop 0 fondly. The curve generates higher velocities for the same force. Press [TOUCH] button repeatedly to select: Touch Fixed , LCD will display: Touchiness.
+4 TRANSPOSE pr Use [TRANSPOSE «4% ] button to transpose up or down as required. The transposition range is from "-12" (down one octave) through "0" (normal pitch) to "12" {up one octave). 3 TRANSPOSED Bligh aniline aN Aide arose Np» Octave Made You can set the main voice octave, the layer voice octave and the split voice octave by pressing [OCTAVE ] bunion.
DUO Mode Press [DUO] button to select DUC mode. In this mode, the keyboard will be separated into two play areas. Press [DUC] button again to exit the DUO mode.
Auto Accompaniment Your instrument has 100 accompaniment styles which can be used to provide Fully-orchestrated Lute Accompaniment. When the Auto Accompaniment function is turned ON, this instrument creates fully-orchestrated rhythm, bass and chord accompaniment based on chords you play with the left hand in the Auto Accompaniment section of the all keys to the left of the Auto Accompaniment split point). The right-hand section of the keyboard is available for normal playing.
Synchrony Start Press the [SYNCHRONY] button, then the accompaniment will start when you play the first chord on the AUTO ACCOMPANIMENT section of the keyboard. CHORD SYNCHRONY INTROVERSION ARISTOPHANES "OTT RY Starting the Accompaniment with an Introduction If you press this button before you start the rhythm, synchrony function will work automatically.
SITARIST FILING VARIATION — GO BEST ASE Glimpse Semi IRE Trans SS ~— Stop a Style An accompaniment progress can be stopped immediately by pressing the [START/STOP] button and also can be stopped with an appropriate ending by pressing the [INTRO/ENDING] button. CONTROVERTING STARVATION FILL IM N, ~7 Adjusting the Accompaniment Volume Press [AC COMP. ] button to enter the accompaniment volume setting mode, LCD displays the value, use number button, button or turn the dial to adjust the volume value.
One Touch Setting This function is actually a convenient feature which automatically selects a suitable voice for you when you select a style. In addition, various panel settings (such as voice, effect, Tempo, etc.) that match the selected style can be recalled with just a single button Press button repeatedly can turn on or turn off One Touch Setting.
Chord Function Turn on this mode, the specified left-hand section of the keyboard becomes the "Auto Accompaniment” section, and chords played in this section are automatically detected and used as a basis for fully automatic accompaniment with the selected style CHORES SYNCHRONY a EO 2 Full Keyboard This feature allows you to play automatic chords in the full length of the keyboard. Press the button and dedicated arrow will indicate it on the display.
Metronome Metronome is a convenient feature for practice, and it can lase provide a solid rhythmic guide when recording. The metronome sound is alternately turned on and turned off by pressing [METRONOME] button. When metronome indicator is unlighted, hold down [METRONOME] button for two seconds until the LCD will display the time signature of the metronome. It can be set by using and button while turning on the metronome function. Time signature: 1/4, 2/4, 3/4, 4/4, 5/4, 6/4, 3/8, 6/8, 7/8, 9/8, 12/8.
MEME TING, MAY | NUNS SAVE TO FSX OTQ © sy Play User Style Press the [VOICE/STYLE] button and its indicator will light. Use and to select "101:UsrRhy01". Press the [START/STOP] button to play the recording.