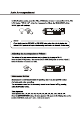
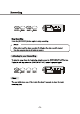
Auto Accompaniment £ ie]: Change Chord Point Hold down the [CHORD] button, then play any of the keys on the keyboard to change the chord point. x 20. Faint CHORD 124 = Synchrony Button Press the [SYNCHRONY] button to enter the Sync Start Waiting mode, then the accompaniment will start as soon as you play the first chord on the Auto Accompaniment section of the keyboard.
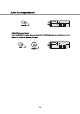
Auto Accompaniment If you press the [SYNCHRONY] bunion and then press the [INTRO/ENDING] button, the accompaniment will start from the introduction as soon as a chord is detected in the Auto Accompaniment section of the keyboard. a] vat re SYNC] DIN Ton Press the [INTRO/ENDING] button again and the style will stop after the ending section is finished. Fill In Button Press the [SYNCHRONY] button and then press the [FILL IN1] or the [FILL IN2] button.
Auto Accompaniment In MAIN pattern mode, press the [FILL IN2] button to insert 1 measure/bar fill-in. The LCD flashes “Fill After the 1 measure/bar fill-in, the VARIATION of the MAIN style will continue. CO = Fill 104% FLL Fill NOTE If you hold down the [Fill IN1] or [Fill IN2] button when the style is playing, the selected FILL pattern will repeat continuously until button is released. (Drum Solo} Adjusting the Accompaniment Volume The volume of the auto accompaniment can be adjusted in the range of 00~31.
Auto Accompaniment oN Adjust Metronome Tempo Press the [TEMPO] button, then use the [DATA CONTROL] knob or use dial or and buttons to increase or decrease the value.
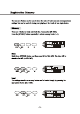
Registration Memory The memory feature can be used to store four sets of voice and auto accompaniment settings that can be recalled during your playing at the touch of one single button. Memory There are 4 banks in total; each bank has 3 memories (M1~M3). Press the [STORE] button repeatedly to select memory bank (1~4) lt 2 Timely So 3 104 Store Hold down [STORE] button and then press M1(or M2~M3). The data will be stored to the M1 (or M2~M3).
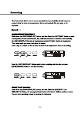
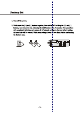
Recording Your instrument allows you to record and playback song including chord sequences created using the Auto Accompaniment feature and melody like you play on the keyboard. Record Accompaniment Track Record Hold down the [RECORD/PLAY] button, and then Press the [AC COMP] button to enter accompaniment track record mode, the [CHORD] function is turned on automatically, the [RECORD/PLAY] button is illuminated, and [AC COMP] Button is illuminated. Then select style you want, and adjust its tempo.
Recording Stop Recording Press the [RECORD] button again to stop recording. NOTE If the other track has data recorded, it will play when the record is started. You also can press the track button to mute if. Listening to your Recording To play the song from the beginning, simply press the [RECORD/PLAY] button. Playback will stop when the [RECORD/PLAY] button is pressed again. Clear You can hold down one of the tracks for about 2 seconds to clear the track recording data.
Factory Set 1. Turn off the power. 2. Hold down the and buttons together, then whilst still holding the and buttons, turn the power on, releasing the held buttons defter 5 seconds. This procedure will completely initialism and restore all of internal settings to factory default setting. All user data will be erased. Write your settings down br save them before performing the factory reset.
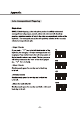
Appendix Auto Accompaniment Fingering Single Mode SINGLE Mode fingering males it simple to produce beautifully orchestrated accompaniment using major, seventh, minor and minor-seventh chords by pressing a minimum number of keys in the Auto Accompaniment section of the keyboard . The accompaniment produced is perfectly matched to the currently selected accompaniment style. . Major Chords Suppressant “C” key in the left-hand section of the c keyboard, for example, a C-major accompaniment will played.
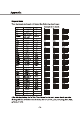
Appendix Fingered Mode Your electronic keyboard will detect the following chord type: Name Display Example for C chords 13-5 181 1Gy56 lof 134517 or 1335-7 M7 MIG] eT TL Emily 1 123-5 <) Mo) 1.23497 CATS) [66% CH(8} [amg] 1-3%5 Can [on] 143-5 Cm [m6] 14.