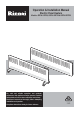
Operation & Installation Manual Electric Panel Heaters Models: GEPH-10DTW, GEPH-15DTW & GEPH-22DTW For safe and reliable operation and optimum performance this appliance must be operated, installed and maintained in accordance with these instructions. Read these instructions thoroughly before attempting installation and operation. Keep these instructions handy for future reference.
BEFORE PROCEEDING WITH THE OPERATION OR INSTALLATION OF YOUR NEW HEATER PLEASE READ THIS MANUAL THOROUGHLY AND GAIN A FULL UNDERSTANDING OF THE REQUIREMENTS, FEATURES AND OPERATION OF YOUR NEW APPLIANCE.
TABLE OF CONTENTS WARRANTY, FEATURES & SPECIFICATIONS ................................................................................5 WARRANTY ..................................................................................................................................................... 5 FEATURES....................................................................................................................................................... 5 SPECIFICATIONS ......................................
This page is intentionally blank Rinnai 4 GEPH_OIM
WARRANTY, FEATURES & SPECIFICATIONS WARRANTY The benefits to the consumer given by this warranty are in addition to all other rights and remedies of the consumer under a law in relation to the goods or services to which the warranty relates. Our goods come with guarantees that cannot be excluded under the Australian Consumer Law. You are entitled to a replacement or refund for a major failure and for compensation for any other loss or damage.
SAFETY & IMPORTANT POINTS UNPACKING THE APPLIANCE If any damage is evident DO NOT INSTALL or OPERATE and contact your supplier for advice. WHAT’S IN THE BOX The package should contain: Heater fitted with flexible cord and plug. A plastic bag containing the Operating and Installation Instructions and wall mounting screws. Two plastic bags containing four castors, two castor brackets, screwdriver and four screws.
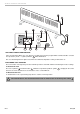
HOW TO OPERATE THE HEATER GENERAL DESIGN LAYOUT 16 12 A 1 15 14 7 6 A 8 9 11 10 B 4 3 5 13 2 A Control panel console B LCD display 1 MAIN POWER Switch 2 POWER `ON´ / `OFF´ button 3 MODE button, temperature/timer setting 4 `UP´ button 5 `DOWN´ button 6 Heater Operation indicator (Red) 7 Delay Off Timer Set indicator (Green) 8 Digital display 9 Degrees Celsius indicator 10 Constant Frost protection indicator 11 Lock indicator 12 Louvre, warm air discharge 13 240 Vo
HOW TO OPERATE THE HEATER A 1 6 8 9 B 4 5 13 A 3 2 MANUAL OPERATION To turn the heater on and set the temperature: Ensure heater is plugged in and the power socket outlet is switched on. 1. Turn the main power switch 1 located on the right hand side of the appliance, to the ‘on’ position. The digital LCD Display B will illuminate briefly and a double beep will be heard. 2. Press the POWER button 2 on the control panel console A once to start heating operation.
HOW TO OPERATE THE HEATER A 1 7 6 B 8 4 5 13 A 3 2 DELAY OFF TIMER OPERATION In addition to MANUAL OPERATION the heater can also be operated using a delay off timer. This allows the user to program the heater to operate for a set time period. 1. Set the desired operating temperature as per steps 1 through 3 “MANUAL OPERATION” on page 8. 2. After setting the desired temperature press the MODE button will now display 00. NOTE 3 twice.
HOW TO OPERATE THE HEATER A 1 B 8 4 5 13 A 11 10 3 2 ANTI-FROST PROTECTION FUNCTION If the set temperature 8 is set to 5 °C then the constant frost protection program will be activated and the constant frost protection (snowflake symbol) indicator 10 will be illuminated. This is useful during winter in alpine areas where the ambient temperature is likely to fall below 5° C.
CARE AND MAINTENANCE CARE OF THE HEATER Due to the ‘natural convection’ operating principle it is normal that some dust and fluff may build up at the air inlet and air outlet louvres over time. This will reduce operating effectiveness and may result in the appliance overheating if left for too long. DO NOT use solvents to clean any parts. To remove dust and clean the appliance: 1. Unplug the electric plug of the heater from the socket outlet before commencing cleaning. 2. Allow to cool down. 3.
INSTALLATION GENERAL This heater is suitable for Do It Yourself installation. It can be either wall mounted (fixed installation) or freestanding by mounting castors in accordance with these instructions. A phillips head screwdriver is included for freestanding installation. For wall installation other tools and hardware may be required, depending on the wall material. WALL INSTALLATION The clearance from the sides, front and top of the heater must be at least 100mm as shown in the diagram below.
INSTALLATION 4. Secure the mounting bracket to the wall with the 4 mounting screws. For masonry walls use the plastic plugs with screws provided. For plaster walls obtain suitable plasterboard fasteners from a building hardware supplier. 5. Re-attach heater to the mounting bracket (reverse method of step 2.) and secure with the locking screw(s). 6. Remove the cable tie from the flexible cord and insert the 2 pin plug of the heater into the power socket outlet.
NOTES Rinnai 14 GEPH_OIM
This page is intentionally blank Rinnai 15 GEPH_OIM
CONTACT INFORMATION Australia Pty. Ltd. Product Sales and Service - National Phone: 1300 555 545* Fax: 1300 555 655* Technical Helpline and Spare Parts National (Mon-Fri 8am - 5.30pm EST) Phone: 1300 555 545* Fax: 1300 300 141* ABN 74 005 138 769 Head Office 100 Atlantic Drive, Keysborough VIC 3173 *Cost of a local call higher from mobile or public phones. E-mail: enquiry@rinnai.com.au P.O. Box 460 Braeside, Victoria 3195 For further information visit: www.rinnai.com.