
Installation Guide


Rinnai I-Series Condensing Boiler Solo Manual 59
IMPORTANT
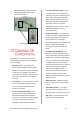
To connect the condensate drain pipe:
1. Apply thread sealant to 1/2 in. NPT
condensate drain port.
2. By hand, thread 1/2 in. NPT ng onto
condensate drain port.
3. Follow the steps in the next secon: “7.9
Condensate Pump Safety Switch Wiring.”
The condensate pump (if installed) should be
wired to deacvate the boiler in the event the
condensate pump fails.
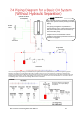
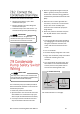
1. Disconnect power from the boiler.
2. Open the boiler cover and locate two white
wires labeled “To Condensate Pump” (the
wires may be located behind the PC Board).
3. Cut crimp connectors o white wires and
strip the insulaon o of the two ends.
Cut o
crimp connectors
To Condensate Pump
Strip insulaon
o both ends
of wire
DO NOT use a wrench to ghten the
condensate drain pipe connecon as this
could cause the connecon to break.
IMPORTANT
The steps in this secon must conform with
local codes and the guidelines established by
the Naonal Electrical Code (NEC).
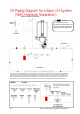
4. Select an appropriate length of wire (18
AWG or greater) and strip the insulaon
o the ends. Follow the wiring guidelines
established by the Naonal Electrical Code
(NEC).
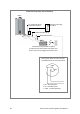
5. With wire nuts or other approved wire
connectors, connect the “To Condensate
Pump” wires to the normally open
contacts on the condensate pump (see
image below).
6. Reconnect power to the boiler and press
the “On/O” buon on the controller.
Test Operaon
1. Test the operaon of the shut o switch
by unplugging the condensate pump and
lling the condensate reservoir with
water unl the oat switch closes the
circuit.
2. Turn on the boiler.
3. The boiler displays diagnosc code “250.”
4. Plug in the condensate pump and conrm
condensate is owing out of the
reservoir.
5. Turn o the boiler by pressing the “On/
O” buon on the controller. Wait ve
seconds, then turn the power back on.
This will clear the diagnosc code.
See visual illustraon on next page.
1/2 in.
NPT
Condensate
Drain