
Operating instructions


Rinnai New Zealand Wireless Installation and Operation: C 03-09
10
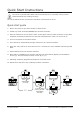
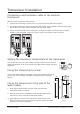
Transceiver Installation
transceiver
1.
3.
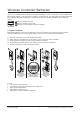
Entry
Controllers
MC
No. 1 No. 2 No. 3
Max Temp. Maimtenance
Temp. Volume
On/Off
Water Heater
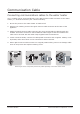
Entry
Controllers
MC
No. 1 No. 2 No. 3
Max Temp. Maimtenance
Temp. Volume
On/Off
Water Heater
Max Temp. Maimtenance
Temp. Volume
water heater
Push adhesive surface to the side of the water heater in the
desired location. Press the transceiver into the side of the water
heater for a couple of seconds.
1.
3.
2.
3.
25
58
157
167
35