
Installation manual


Rinnai Australia 18 Slimfire 252 Operation & Installation Manual
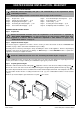
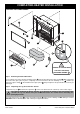
HEATER ENGINE INSTALLATION - MASONRY
MASONRY INSTALLATION OVERVIEW
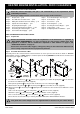
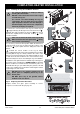
MASONRY INSTALLATION - DETAIL
Step 1. Prepare Site
Step 2. Unpack The Heater Engine
The heater engine is supplied in one carton, check to ensure you have all contents as listed on “BEFORE YOU
START” on page 1 at the start of this manual before proceeding.
Carefully remove carton by removing the straps and lifting the carton off the appliance. Remove all packaging
materials and check all components for damage. If ANY damage is evident DO NOT install or operate this
appliance. Contact your supplier for advice.
Before installing the heater, check it is the correct gas type, (refer to the gas type label on the top body panel of the
heater). Refer to the local gas authority for confirmation of gas type if you are in doubt.
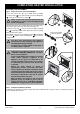
Step 3. Preparing Heater Engine
Attach the adhesive backed foam sealing strip
supplied to rear face of the fascia assembly mounting panel .
Ensure the seal is stuck to the Fascia Assembly mounting panel at approximately 20mm from the top edge .
The foam strip is intended to form a seal between the heater and the fireplace brickwork. If an adequate seal cannot
be formed then another means of sealing must then be used. (e.g. non combustible insulation or heat resistant
silicon).
Remove (do not discard) the gas/electrical access plate
five screws.
Read this manual thoroughly and gain a full understanding of the requirements before
undertaking installation.
Ensure gas supply to heater is turned off for the first stages of this instruction.
Step 1. Prepare Site - p.18
Step 2. Unpack The Heater Engine - p.18
Step 3. Preparing Heater Engine - p.18
Step 4. Positioning the Heater Engine - p.19
Step 5. Connect Electrical Supply - p.19
Step 6. Insert Heater Engine Into Fireplace - p.19
Step 7. Connecting Gas - p.19
Step 8. Leak Testing - p.19
Step 9. Securing The Heater Engine - p.19
Step 10. Completing Heater Installation - p.19
Ensure the intended enclosure meets the requirements of the dimensions as stipulated in
“ENCLOSURE REQUIREMENTS” on page 14 and that gas and electrical supplies have been
prepared in accordance with the dimensions stipulated in “GAS SUPPLY” on page 15 and
“ELECTRICAL SUPPLY” on page 15.
Retain the cardboard carton for use in the “Positioning the Heater Engine” on page 19.
IMPORTANT
IMPORTANT
HINT
A
B
C
D
B
A
C
D