Lever Drive User Manual
PivotTM User Manual The PivotTM from Rio Mobility transforms your wheelchair into a high performance machine with the potential to increase your mobility and physical fitness.
PivotTM User Manual Table of Contents 1. Safety Warnings Table of Contents 2. Wheelchair Requirements TM 3. The Pivot Components TM 4. Pivot Specifications TM 5. Installing Your Pivot TM 6. The Pivot Controls TM 7. Driving the Pivot TM 4 5 6 9 9 14 16 8. The Pivot Out in the World 18 9. Special Adaptations 20 10. Safety and Maintenance Instructions 21 11. Troubleshooting Guide 24 12. Limited Warranty 25 13.
PivotTM User Manual 1. Safety Warnings WARNING DO NOT OPERATE THIS EQUIPMENT WITHOUT FIRST READING AND UNDERSTANDING THIS MANUAL. If you are unable to understand the warnings, cautions, or instructions, contact sales@riomobility. com, your health professional, dealer, or technical personnel before attempting to use this equipment, else injury or damage may result. IT IS RECOMMENDED THAT INITIAL SETUP OF THIS LEVER DRIVE BE PERFORMED BY A QUALIFIED TECHNICIAN, SUCH AS A WHEELCHAIR OR BICYCLE MECHANIC.
PivotTM User Manual 2. Wheelchair Requirements The PivotTM is compatible with almost all wheelchairs without the need for any special adapters or kits. The frame tube diameter must be: Wheelchair Frame Tube Diameter 7/8 inch (22 mm) 1 inch (25.4 mm) 1.2 inch (30.5 mm) 1½ inch (38.1 mm) If your tube diameter is not listed, please contact customer service at sales@riomobility.com Rear Wheel Axle Your wheelchair must have quick release axles with a diameter of ½ inch (12.
PivotTM User Manual 3. The PivotTM Components Your Pivot™ Lever Drive Required tools: 1. 2. 3. 4. 5. Adjustable Wrench Pliers Torque Wrench Tire Pressure Gauge Bicycle Pump Remove the lever drive parts from the box and unpack the components. The contents include: 1. 2. 3. 4. 5. Lever Drive Assembly (left and right sides) 2 Clamps 4 Sets of Shims 3mm and 4mm Hex Wrench 8/10mm Wrench If you are missing any of these items, please contact customer service at sales@riomobility.com www.riomobility.
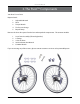
PivotTM User Manual Forward / Neutral / Reverse Toggle Parking Brake Button Brake Handle Upper Lever Tube Gear Shift Lever Lever Length Adjustment Clamp Lower Lever Tube www.riomobility.
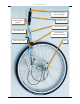
PivotTM User Manual Clamp Adjustment Arm Clamp Adjustment Screws Clamp Width Adjustment Upper Hub Bracket Forward / Reverse Adjustment Pinch Bolt Lower Hub Bracket Serial Number Brake Cable Attachment Nut Brake Adjustment Lock Nut Band Brake Brake Adjustment Barrel Forward / Reverse Adjustment Lock Nut Forward / Reverse Adjustment Barrel www.riomobility.
PivotTM User Manual 4. PivotTM Specifications Patented Multi-Functional Gearbox with the following Gear Ratios: ▫ ▫ ▫ ▫ ▫ Gearbox 1st Gear - 2 : 1 2nd Gear - 1.5 : 1 3rd Gear - 1 : 1 4th Gear - 1 : 1.5 5th Gear - 1 : 2 In forward gear, both pushing and pulling result in propulsion. In reverse, propulsion is a result of pushing only.
PivotTM User Manual Installing the Clamps 1. 2. 3. Remove your quick release wheels Locate the horizontal frame tube under the right and left edges of the wheelchair seat Place the right clamp (the latch facing forward) near the Suggested Clamp Position shown below. If there is interference at this position, move the Clamp towards the front of your chair, but not more than 3 inches (75 mm).
PivotTM User Manual Mounting The Pivot TM 1. Loosen the Lockdown Nut and slide the right lever assembly as far as possible into the axle sleeve just as you would with your original quick-release wheels. 2. Rotate the lever assembly through the normal operating range to determine if it interferes with any part of the wheelchair (i.e., clothes guard, armrest). If there is interference, determine if the part can be modified, replaced, or removed.
PivotTM User Manual Adjusting The Fit 1. 2. 3. 4. 5. Check the tire pressure and inflate as necessary to within the range specified on the side of the tire Engage the Parking Brakes (see p. 15) Transfer to your chair (see p. 17) Place your toggle switches in Neutral and shift into 5th gear (see p.
PivotTM User Manual 6. 7. To shorten or lengthen the Clamp Attachment Arm, engage the Parking Brake, place the Levers in the stowed position and transfer out of your chair Using the 4mm Allen wrench and your adjustable wrench, remove the two screws and nuts from the Clamp Attachment Arm and slide the pieces to either lengthen or shorten. Each screw position moved will result in approximately 1 ½ inches change in the Range of Motion Clamp Adjustment Screws 8.
PivotTM User Manual 6. The PivotTM Controls Check that all components are properly installed and tightened. It is recommended for your first few sessions with the PivotTM to be in an open space with ample turning room and no obstructions. The use of a safety belt is recommended and you must have your anti-tips installed. There are three controls: ▫ Brakes ▫ Forward / Reverse / Neutral Toggle Switch ▫ Gear Shifter Transfer into your chair using the instructions in the next section.
PivotTM User Manual To engage the Parking Brake, firmly apply the brake and push the Parking Brake Pin toward body. To release the brake, firmly apply the brake. The park pin should automatically retract to release the brake. It may be necessary to push the pin to retract it. Set Release Forward / Reverse / Neutral Toggle Switch To shift into Forward, push the toggle switches toward your body. To engage Neutral, move the toggle switches to the upright position (in line with the handle).
PivotTM User Manual Gear Shifter Your PivotTM has 5 gears. Lower gears are for hills and surfaces that require more effort. Higher gears are for flatter, smoother surfaces where higher speeds are possible. To shift your Pivot™, place your Toggle Switches in neutral (with practice, you will be able to shift gears without switching into neutral). Push the Gear Shift in toward your body (“1” in figure). Select your gear (1-5) by raising or lowering the shifter and releasing it (“2” in figure).
PivotTM User Manual Transferring Switch the Forward/Reverse/Neutral Toggles into neutral (previous section). If installed, engage your wheelchair wheel locks. If you do not have wheel locks, engage the Parking Brake as described in the previous section. Place the Levers in the stowed position (all the way back). Transfer into your chair as you normally would. Grasp the handles of the lever and move them forward. 1. 2. 3. 4. 5.
PivotTM User Manual Turning in Place Place one lever in reverse (toggle switch pointed out) and one lever in forward (toggle switch pointed in). Using equal amounts of pressure push and pull your levers. Practice this movement until you are comfortable turning in place. Note: After several training sessions, it is quite common to need your brakes or toggle switches adjusted. When cables are new, they will stretch more rapidly.
PivotTM User Manual Descending an Incline The brakes of the PivotTM require minimal effort and there is no friction on your hand. However the ultimate braking power before the rear wheel slips is no different than your pushrims. Brake with the same caution you would use with your pushrim wheels. Turning Always mind your speed, especially when turning. You should have full control of your wheelchair at all times. Do not exceed the maximum allowable speed recommended by your wheelchair manufacturer.
PivotTM User Manual 9. Special Adaptations Rio Mobility can offer special adaptations tailored to your needs. Some are described below. If you have additional requests, please discuss with your heath care professional and contact customer service at sales@riomobility.com. Lever The lever can be adjusted to be longer by loosening the Lever Length Adjustment Clamp (as seen on p. 7), extending the Upper Lever Tube, and retightening the Lever Adjustment Clamp.
PivotTM User Manual 10. Safety and Maintenance Instructions Safety and Inspection Checklist In addition to the requirements specified in your wheelchair manual, the following inspection schedule is required. Inspection / Maintenace Item Check and Tighten Hardware Brake Adjustment Direction Shifter Adjustment Initially Weekly Lubrication Brake Pad Wear 6 Months Basic Maintenance Guidelines Your PivotTM was designed to require minimal maintenance. Inspect your lever drive frequently.
PivotTM User Manual Brakes & Parking Brake Adjustments It is common for your brakes to need adjustment, especially when your PivotTM is new and the cables are first being used. Adjustment will be needed less often after the initial break in period. When your PivotTM is new, stretch the cable by applying the brake firmly 20 times. Adjust the brake using the following procedure: 1. 2. 3. 4. 5. Rotate the wheels and note if they spin freely.
PivotTM User Manual 1. 2. If the middle of the range is away from you then loosen the Shifter Adjustment Lock Nut and incrementally rotate the Shifter Adjustment Barrel counter clockwise until the middle of the range for neutral is vertical. Make sure the Shifter Adjustment Lock Nut is tightened all the way down.
PivotTM User Manual 11. Troubleshooting Guide The wheels do not spin freely, or your wheelchair tends to turn while coasting on flat ground. The Band Brakes may need to be adjusted (see p. 22). If this does not correct the problem, please contact customer service and sales@riomobility.com. The Direction Shifter does not shift properly into Forward. The Direction Shifter may need to be adjusted (see p. 22). If this does not correct the problem, please contact customer service and sales@riomobility. com.
PivotTM User Manual 12. Limited Warranty Rio Mobility warrants the PivotTM for two (2) years from the date of initial consumer purchase, with an additional five (5) year warranty on the internal components of the hub assembly.
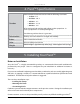
13. Product Registration / Warranty Form Please complete and mail or fax this form to: Rio Mobility 56 Tehama Street San Francisco, CA 94105 (415) 520-0567 (fax) sales@riomobility.com Name : Address : City : State / Province : Zip / Postal Code : Email : Phone Number : Rio Mobility Model # : Serial #, Right Side : Serial #, Left Side : Purchased From : Date of Purchase : sales@riomobility.com (888) 559-6225 (415) 278-9662 Part Number 303 Rev B, 09/2009 © 2009 Daedalus Wings, Inc.