Dragonfly Handcycle TM User Instruction and Maintenance Manual Part Number 25 Rev A, 12/11/2007 (PLEAS E PRINT OUT AT 100% S IZE – NO SCALING)
Dragonfly TM User M anual Dealer: This manual must be given to the user of the handcycle. User: Before using this handcycle, read this manual and save it for future reference; it has installation and maintenance instructions along with warranty information. For more information regarding Rio Mobility products, parts, and services, please contact Rio Mobility, a Daedalus Wings, Inc. company, at www.riomobility.com.
Dragonfly TM User M anual -Table of Contents1. 2. 3. 4. 5. 6. 7. 8. 9. 10. 11. Product Registration/Warranty Form ………………..5 Limited Warranty…………………………………….6 Introduction to Handcycling …………………………8 DragonflyT M Guidelines……………………………...9 What Comes in the Box ……………………………14 Initial Installation Instructions ...……………………16 Routine Attachment and Removal ………………….27 Safety Checklist and Maintenance Instructions…….29 Replacement Parts…………………………………..31 Troubleshooting Guide ……………………………..
Dragonfly TM User M anual -WARNINGDO NOT OPERATE THIS EQUIPMENT WITHOUT FIRST READING AND UNDERSTANDING THIS MANUAL. IF YOU ARE UNABLE TO UNDERSTAND THE WARNINGS, CAUTIONS, AND INSTRUCTIONS, CONTACT CUSTOMER SERVICE AT support@riomobility.com BEFORE ATTEMPTING TO USE THIS EQUIPMENT – OTHERWISE INJURY OR DAMAGE MAY RESULT. IT IS RECOMMENDED THAT INITIAL SETUP OF THIS HANDCYCLE BE PERFORMED BY A QUALIFIED TECHNICIAN, SUCH AS A BICYCLE OR WHEELCHAIR MECHANIC. 4 www.riomobility.
Dragonfly TM User M anual -1.
Dragonfly TM User M anual -2. Limited WarrantyAll handcycle parts (excluding tires and tubes) are warrantied free of defects in material and workmanship for 90 days from date of purchase. The handcycle structural frame is warrantied free of defects in material and workmanship for 1 year from date of purchase. This warranty is only available for the original owner or purchaser and is non-transferable.
Dragonfly TM User M anual -WARNINGThe dragonfly is a recreational product. It is not a medical device nor is it intended as a primary means of mobility. These handcycles are intended for outdoor recreational use on paths and sidewalks. Required operating conditions are on flat, dry, paved surfaces during daylight hours. The use of a flag or tall marker is highly suggested for maximum visibility. Do not operate handcycles from dawn to dusk or in other low visibility conditions.
Dragonfly TM User M anual -3. Introduction to HandcyclingThe Dragonfly TM will transform your wheelchair into a high performance machine, with the potential to make you more mobile and physically fit. Just like many other exercises, handcycling is an aerobic activity, so you should check with your physician before going for your first ride or starting any handcycling on a regular basis. If you’ve never ridden a handcycle before, you may feel soreness and fatigue in places you’ve never felt it before.
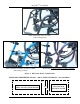
Dragonfly TM User M anual -4. DragonflyT M GuidelinesMinimum Wheelchair Requirements The Dragonfly TM is designed to accommodate most wheelchairs. There are specific requirements that your chair must meet in order to safely attach and use the Dragonfly TM. Please refer to the following table and associated pictures on the next page to determine if your wheelchair meets the necessary specifications.
Dragonfly TM User M anual Frame with Swing-Away Footrests (balls facing inward) Frame with Horizontal Bottom Tube Available (balls facing outward) Frame with No Horizontal Bottom Tube Available (balls facing outward) Figure 1. Wheelchair Frame Configurations RULER MUS T BE PRINTED AT 100% - NO S CALING, RULER IS 6” (152 mm) LONG S T A R T H E R E 10 1” CUT ALONG DASHED LINE, WRAP AROUND CHAIR FRAM E 1 ⅛” 1.2” FRAM E M UST BE STRAIGHT FOR WIDTH OF RULER 1 ¼” www.riomobility.
Dragonfly TM User M anual Proper Fit of Your Handcycle • • • • • You must be able to see over the hand crank and chain guard. When seated in the wheelchair, your center of gravity must be far enough forward of the rear axle so as to make “wheelies” or tipping backward difficult – THIS IS VERY IM PORTANT. When riding the handcycle, your arms should never be straight; ideally elbows should be slightly bent when the pedals are farthest away from you.
Dragonfly TM User M anual • • • • • • • • • • • speeds to avoid damage to your wheelchair and injury to you – your return spring should keep the front wheel straight, freeing up your hands for the pushrims. Be aware of the road surface, especially on inclines or declines. Watch out for water, ice, and oil films. Always mind your speed, especially when turning; you should have full control of your wheelchair at all times.
Dragonfly TM User M anual Weight Distribution Notes • When seated in the wheelchair, your center of gravity must be far enough forward of the rear axle so as to make “wheelies” or tipping backward difficult – THIS IS VERY IM PORTANT. If this is not the case, enough weight will not be on the front tire, and braking and stability will be severely compromised.
Dragonfly TM User M anual -5. What Comes in the BoxThe Dragonfly TM unit will arrive to you 90% assembled. You will need to install the pedals and wings to the handcycle, the 4 clamps to your frame, and the reflectors to the wheel. The following is what you should receive in the box (not shown to scale): Item Description 1 Handcycle users manual (actually, it’s in your hand) 2 Wheel hub user’s manual (for 3 or 7-speed hubs only) 3 Handcycle assembly (wheel, fork, top tube, etc.
Dragonfly TM User M anual On Your End It is expected that you have the following tools for installation and setup of the Dragonfly TM: 1. 2. 3. 4. 5. 6. Adjustable wrench Pliers Torque wrench Tire pressure gauge Bicycle pump Philips head screwdriver (3-speed only) The Parts of Your Handcycle Figure 2 shows a handcycle. All the parts referred to in the instructions are labeled.
Dragonfly TM User M anual -6. Initial Installation InstructionsBefore You Get Started: The Dragonfly TM is engineered to be highly adjustable to the rider and his or her wheelchair. After working through the initial setup and making adjustments as you ride, your handcycle should fit you like a glove. Getting your handcycle just right takes time, but your patience will be rewarded with years of fun and energizing rides.
Dragonfly TM User M anual A. Installing Clamps on Your Wheelchair 1. Remove any plastic covers, such as on the axle nuts, and packing materials. 2. Determine which wheelchair front tube configuration is similar to your wheelchair (Figure 1, page 10). If none are similar, please contact customer service at support@riomobility.com 3.
Dragonfly TM User M anual 4. Thread the left pedal axle into the left crank arm in a counter-clockwise direction. You should be able to screw the axle into the crank arm completely by hand – if you encounter too much resistance or it simply will not start, make sure the axle is properly aligned and the proper pedal is in the correct crank arm. 5. Completely tighten the pedal axles to the crank arms using an adjustable wrench to a tightness of approximately 10 ft-lbs (13.5 N-m).
Dragonfly TM User M anual Figure 5 4. Rotate the top tube so that the crank sprocket and the wheel sprocket are properly aligned, and tighten the top tube clamp bolts to a tightness of 8 ft-lbs. (10.8 N-m). This is approximately a force of 16 lb at 6 inches away from the screw (70 N at 15 cm away from the screw). 5. M ove the shifter up the top tube so that the shifter clamp and brake clamp are a couple of inches apart.
Dragonfly TM User M anual Figure 7 Attach Wings 1. Attach the right wing to the handcycle using the M 6 screw supplied. Insert the screw through the bottom hole of the wing plate and steering plate (Figure 8). M ake sure you position the washers as shown. Tighten the nut down all the way, and then back it off one full turn so that the wing can rotate. Do not install the screw in the top holes. Do the same with the left wing. ` Lock washer Flat washer Figure 8 20 www.riomobility.
Dragonfly TM User M anual Check Tire Pressure 1. Inflate the tire to the pressure range printed on the sidewall. Dragonfly TM tire result in greater traction and a better ride. Lower pressures in the C. Determining the Right Position of the Wheel and Crank 1. Set the parking brake on the handcycle. Refer to instructions on page 17 and Figure 4 on page 18 if you are unsure on how to set the parking brake. 2. Set your wheelchair wheel locks.
Dragonfly TM User M anual 1 ½” clearance Figure 10 6. Release the parking brake. Have your friend lift the front end of the handcycle by the fork. Rotate the crank so that the crank arms are vertical with the pedals low (Figure 10). Reengage the parking brake and set the wheel back down in the same position as before. 7. Sit in your wheelchair in a comfortable position, with your back flat against the backrest.
Dragonfly TM User M anual • • If you still can’t get the crank far enough away, you must remove links from the chain and shorten the handcycle – please refer to Step 10. If the crank is too far away from you and you need the crank closer, you must add links to the chain to lengthen the handcycle – please contact customer service. 10. The handcycle is shipped with two 10-link removable sections of chain already installed.
Dragonfly TM User M anual Jam nut Figure 12 13. Now extend the other bottom-link. Both bottom-links should be the same length. Snap it into place onto the ball clamp. The sleeve should automatically slide into place and cover the coupler, and you should here a click. The whole handcycle should now be able to pivot about the bottom-link couplers AND the wing brackets. D. Adjusting the Wings and Top-Links to Lock Your Handcycle Into Position 1.
Dragonfly TM User M anual 3. Now rotate the top-links back toward you and unscrew the threaded rod until the couplers line up with the balls of the top clamps (Figure 14). You may have to loosen the jam nuts to do this. The couplers should be unscrewed the same amount. Do not unscrew the threaded rod beyond the red zone on the threads.
Dragonfly TM User M anual E. Tightening It All Down and Doing a Final Check 1. M ake sure that all nuts have been tightened, including the wing nuts and screws, top and bottom-link jam nuts, and all clamp screws. Remove the blocks from under the front castors. Your handcycle is now installed, and the front castors should be hanging in the air. 2. With your handcycle installed, the castors should be at least 1” (25 mm), and not more than 2.
Dragonfly TM User M anual -7. Routine Attachment and RemovalAttachment 1. Before attaching your handcycle, ALWA YS ENGAGE YOUR WHEELCHAIR WHEEL LOCKS! 2. Seated in your wheelchair, pull the handcycle toward you with the wheel in front and the wings extending toward your legs. 3. Pull back the coupler sleeve on all four links so that they click into place in the open position. Swing the top-links away from you (toward the wheel). 4.
Dragonfly TM User M anual 5. Again, push the top tube away from your body to relieve the weight from the top-link, and pull back the coupler sleeve of the remaining top-link. 6. Firmly grip the top tube. Once more, gently jiggle the top tube back and forth with one hand and pull the top-link away from the ball clamp – it should release the ball and come free. As soon as it does, all the weight of the wheelchair is held up by your arm holding the top tube. 7.
Dragonfly TM User M anual -8. Safety Checklist and Maintenance InstructionsBasic Maintenance Guidelines Inspect your handcycle frequently. Failure to inspect your handcycle and to make repairs or adjustments, as necessary, can result in injury to you or to others. M ake sure all parts are correctly assembled and adjusted as written in this manual. Immediately replace any damaged, missing, or badly worn parts. M ake sure all fasteners are correctly tightened as written in this manual.
Dragonfly TM User M anual • Before adding air to any tire, make sure the edge of the tire (the bead) is the same distance from the rim, all around the rim, on both sides of the tire. If the tire does not appear to be seated correctly, release air from the inner tube until you can push the bead of the tire in to the rim where necessary. Add air slowly and stop frequently to check the tire seating and the pressure, until you reach the correct inflation pressure.
Dragonfly TM User M anual Wheel Bearings Hold the handcycle so that the wheel is off the ground, and slowly spin the wheel by hand. The bearings are correctly adjusted if: • The wheel spins freely and easily. • There is no side to side movement at the wheel rim when you push it to the side with light force. If this is not the case, you may go to your local bicycle or wheelchair mechanic to get your wheel bearings adjusted.
Dragonfly TM User M anual -10. Troubleshooting GuideHere, we’ll try to address some of the basic problems that can come up during the installation and use of your Dragonfly TM handcycle. Q. I’ve got my handcycle attached, but the front wheel slips when I’m really cranking or going up slight hills…what’s the deal? A. Well, it looks like your front wheel might be too far out front.
Dragonfly TM User M anual -11. Contact InformationQuestions or concerns? Contact us: Email: support@riomobility.com Rio Mobility 56 Tehama Street San Francisco, CA 94105 www.riomobility.