
Troubleshooting guide

Dragonfly
TM
User M anual
www.riomobility.com 25
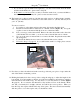
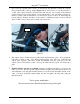
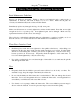
3. Now rotate the top-links back toward you and unscrew the threaded rod until the couplers
line up with the balls of the top clamps (Figure 14). You may have to loosen the jam nuts to
do this. The couplers should be unscrewed the same amount. Do not unscrew the threaded
rod beyond the red zone on the threads. If top-link extends too far, even when screwed in as
much as possible, then the wheel has to be moved away from your shoes by unscrewing the
bottom couplers, but there should be no more than 6” (150mm) between your shoes and the
wheel. If this is not possible, please contact customer service.
Figure 14
4. The coupler sleeves should already be pulled back and latched into place. If not, pull them
back until you hear a click – they should remain latched open. Press one of the ball and
coupler pairs together. The sleeve should automatically slide into place and cover the
coupler, and you should here a click. Line up the other ball and coupler, and click it into
place.
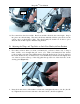
5. Tighten down the jam nut on each link (both the top AND bottom links) to a torque of 10
ft-lbs. (13.5 N-m). For the top-link, tighten the jam nut against the painted nut at the bottom
of the threaded rod by using the included wrench on one nut and an adjustable wrench on the
other. For the bottom-link, simply tighten the jam nut against the wing tube using the
included wrench.
You’re pretty much there…
You just need to do a final check before you go for a spin!
Jam nut