
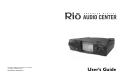
User`s guide


Rio Advanced Digital Audio Center User’s Guide | 5
Please see “Rio Receiver” on page 78 or visit our Web site at
http://www.riohome.com for more information about the Rio Receiver.
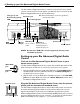
1. Plug one end of the included phone cord into the Phoneline Jack on the
back of the Rio Advanced Digital Audio Center.
2. Plug the other end into the nearest Wall Jack in the room where your Rio
Advanced Digital Audio Center is located.
NOTE: The Pass-Through Jack allows you to plug a phone or other
device requiring access to the Wall Jack into this port to share
the Wall Jack with the Rio Advanced Digital Audio Center.
For more information about setting up your Rio Advanced Digital Audio Center
for Internet and network access, including a list of supported USB Ethernet
adapters, see “Network configuration” on page 63.
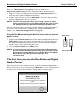
Plug the Rio Advanced Digital Audio Center into the nearest
power source
1. Plug the included Power Cable into the Rio Advanced Digital Audio Center’s
Power Port, and into the nearest electrical outlet in the room where your
Rio Advanced Digital Audio Center is located. Your Rio Advanced Digital
Audio Center is now ready to be powered on.
2. Press the Power Switch to the ON position.
NOTE: It is not necessary to power the Rio Advanced Digital Audio
Center off with the Power Switch every time you finish using it.
Pressing the Standby Button to put the Rio Advanced Digital
Audio Center into Sleep mode is sufficient, and
recommended.
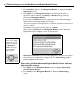
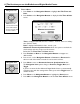
The first time you use the Rio Advanced Digital
Audio Center
After you press the Power Switch and turn on the Rio Advanced Digital Audio
Center the first time, you are greeted by the Welcome... screen, and prompted
to make some decisions about software settings before using the device.
Power Port
Power Switch