
User Manual


WOTS WOT - Instructions
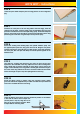
STEP 44
Ensuring a gap-free hinge line and a 1mm gap between the elevator and tip,
hold the elevator halves level using strips of masking tape until the epoxy cures.
STEP 42
Insert two hinges into the rudder and two more in each elevator half, ensuring
they are located mid-way in their slots. Using thin cyano, pour a couple of
drops onto each hinge - above and below - ensuring the glue soaks into the
hinge and the surrounding wood.
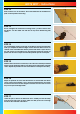
STEP 45
Now add a couple of drops of thin cyano to the top and bottom of each hinge.
Make sure that the glue does not run through the hinge line onto the bottom
of the tail.
STEP 43
Protecting the rear of the tailplane with a strip of masking tape, apply epoxy
to each half of the wire elevator joiner and force it into the corresponding slots
and holes in the elevator halves. Slide the elevators into position ensuring that
the joiner and all four hinges enter their pre-cut slots in the tailplane.
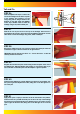
STEP 46
Protecting the rear of the fuselage with a strip of masking tape, mix and apply
a small quantity of epoxy to the tailwheel wire. Force some into the slot and
hole in the rudder then slide the rudder in place making sure that both hinges
are located in their slots in the fin and that the tailwheel wire fits neatly into its
recess in the rudder. Wipe off any excess epoxy.
STEP 47
Ensure that the rudder is aligned to the top of the fin and there is free movement
left and right plus a gap-free hinge line. Now apply a couple of drops of thin
cyano to each side of each hinge taking care not to allow the adhesive to run
through the gap onto the other side of the model.
10