
User's Manual


2
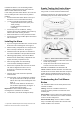
In addition to NFPA 72, use the following location
guidelines to optimize performance and reduce the
chance of false alarms from the alarm:
Locate ceiling-mounted smoke alarms in the center of a
room or hallway at least 4 inches from any walls or
partitions.
• Locate wall-mounted smoke alarms so the top of
the alarm is 4 to 12 inches below the ceiling.
• Locate in a suitable environment as follows:
− Temperature between 40ºF (4.4ºC) and
100ºF (37.8ºC))
− Humidity between 0 and 95% non-
condensing
• Locate away from air conditioners, heating
registers and any other ventilation source that may
interfere with smoke entering the alarm.
• Mount smoke alarms on a firm permanent surface.
• Locate away from large metallic objects when listed
with a transmitter.
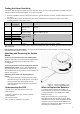
Installing the Alarm
1. If you are using the alarm/base lock, remove the two
knockouts on the mounting base. See Figure 3.
2. Slide the battery compartment cover away from the
alarm to unsnap it and lift it off. See Figure 4.
3. Follow the write mode procedure as described in
the receiver installation of the operational manual.
4. Observing proper polarity, insert two 3V lithium
batteries into the alarm battery compartment and
replace the battery compartment cover.
5. Write message will be sent automatically
10 seconds after installing the batteries.
∗
6. Remove the red plastic dust cover from the alarm.
The alarm is shipped with a dust cover for
protection on construction sites with dusty
environments.
7. Using the two screws and anchors provided,
mount the base
8. Attach the alarm to the mounting base as follows:
− Line up the raised tab on the lip of the alarm
with the slot on lip of the mounting base. See
figure. 4
− Insert the smoke alarm into the base and
turn clockwise approximately 15 degrees. It
should snap firmly into place.
Important: the alarm cannot be attached to the
mounting base if no batteries are installed.
9. Test the alarm (see Smoke Testing the Alarm).
∗
To generate an additional right mode message, disconnect the
batteries for 30 seconds and then reconnect them.
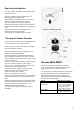
Smoke Testing the Smoke Alarm
Smoke alarms should be tested in place annually
using smoke or canned aerosol simulated smoke.
Follow the instructions on the canned smoke or use
the following steps to test the alarm with smoke:
1. Hold a smoldering punk or cotton wick close to the
smoke entry openings.
2. Gently direct the smoke into the alarm for 20
seconds or until an alarm is indicated.
BE SURE TO PROPERLY EXTINGUISH THE
SMOKE SOURCE AFTER TESTING! The alarm LED
should remain on and the alarm will sound a temporal
rhythm until the Test/Silence button is pressed. The
alarm automatically resets when smoke is no longer
present.
Understanding the Test/Silence
Button
The Test/Silence button on the alarm performs three
functions as follows:
Testing = Press the Test/Silence button for 2
seconds. The alarm performs a sounder test and a
sensitivity test.
Silence alarm = Press to silence the sounder during
an alarm. After a few minutes, the sounder and alarm
resume if smoke is still present.
Silence trouble chirp = Press to silence a trouble
chirp. The trouble chirp resumes after 24 hours if the
trouble condition is not corrected.