Troubleshooting Guide This guide describes the action to take when a paper jam or other problem occurs.
CAUTION After reading this guide, keep it in handy for future reference. The "Safety Precautions" are provided in the supplemental Safety Information. Be sure to read through them prior to use.
About This Troubleshooting Guide Preface Thank you for using the ComColor Series product. This guide describes possible causes for problems that can occur when using this machine and their solutions. Keep this guide handy, such as near the machine, for easy reference. The following five guides are supplied with this machine. ● Basic Guide This guide describes the basic printer, copy, and scanner operations and how to replace consumables. Please start by reading this guide.
Symbols, Notations, and Screenshots Used in This Guide ■ Symbols Used in This Guide Indicates cautions that should be noted for safe use of this machine. Indicates important items that should be noted or are prohibited. Indicates useful information or additional information. ■ Names of Keys and Buttons The names of hard keys on the operation panel and buttons on the touch panel screen or computer window are indicated with square brackets [ ].
Contents About This Troubleshooting Guide ........................................................ 1 Symbols, Notations, and Screenshots Used in This Guide .............................................. 2 Touch Panel Display ................................................................................ 4 Mode Screen ...................................................................................................... 4 Status Area ..........................................................................
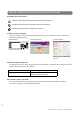
The Touch panel allows functions to be operated, and displays the current status of the machine. The information given here helps you when trouble has occurred. Touch Panel Display Mode Screen You can find out the following information on the mode screen. If the required optional equipment has not been connected to the machine, the corresponding mode button is not displayed. The lock icon is displayed on the mode button Mode buttons with the lock icons indicate that you must login to access those modes.
Status Area The status area at the top of the touch panel displays the [Login] button, printer status button, FORCEJET™ link icon, and the remaining ink indicator. 1 2 3 1 [Login] Displays the user's login status. • When the user has not logged on A key icon and "Login" are displayed in the button. Nothing is displayed next to (in the space to the right of) the button. 4 2 Printer Status Button Displays the current status of the machine: [Idle], [Printing], [Error], [Paused], or [Offline].
Job List Icons The job list on the printer mode screen displays the job name and one of the following icons depending on the type of job.
Chapter 1 Error Messages This chapter describes the reasons why the error lamp flashes on the operation panel and error messages appear on the touch panel and what action to take. 1 Follow the displayed messages to resolve the error. Operation panel error lamp Scanner lamp If an error occurs, the error lamp flashes in red. If a scanner error occurs, the scanner lamp flashes in red.
Examples of Error Messages The following are examples of error messages. Service Calls These error messages are displayed when inspection or repair is required by a service representative. Message Action to Take !!System Error!! Press RESET key. If recovery has failed, call service. A system error occurred. Press the [RESET] key on the operation panel. If the system does not recover, contact your dealer (or authorized service representative).
Consumable Errors These error messages are displayed when it is time to replace consumables or parts that require periodical replacement. Message Open the finisher front door and add staples. Action to Take 1 There are no more staples in the finisher. Add staples. See "Replacing the Staple Cartridge" (p. 3-1) for details. Open the finisher front door and add staples for booklet stapling. Replace the ink cartridge. The ink cartridge is empty. Replace the ink cartridge for the displayed color.
Message Action to Take The drain tank is full. Call service to replace it. The drain tank is full. Contact your dealer (or authorized service representative) and have the drain tank replaced. Wrong-color ink cartridge is installed. Replace the ink cartridge. The color of the installed ink cartridge is not correct. Check the color of the installed ink cartridge at the indicated position and reinstall the ink cartridge.
Message Action to Take Load paper in Feed Tray1 (Feed Tray2/Feed Tray3). Feed Tray1, Feed Tray2, or Feed Tray3 is empty. Load paper. To change the size or type of the paper, change the setting of the feed tray on the operation panel. Load paper in the paper feed tray. The feed tray has been set to [Auto] and paper corresponding to the specified paper size and type for the job is not loaded in the tray set in [Tray selection]. Load the specified type of paper.
Message Action to Take The safety switch on the finisher stacking tray is activated. Check the tray. Something may be obstructing the stacking tray. Make sure that there is nothing placed below or near the tray. This is Non-Riso ink cartridge. Using Non-Riso ink may result in serious damage to the printer. Check your service provider's warranty service agreement if any, as damage caused by Non-Riso supplies could be excluded from coverage.
Chapter 2 Troubleshooting This chapter describes what action to take when a problem occurs. Paper Jam If a paper jam occurs in the machine, finisher, or ADF, printing stops, the error lamp on the operation panel flashes in red, and the paper jam screen appears on the touch panel. Follow the procedure displayed on the touch panel to remove the jammed paper and resume printing. 1 Touch the alphanumeric button indicating the location of the paper jam to display how to remove the jammed paper.
3 Press [Close]. Return to the screen in Step 1. Check that the button indicating the location where the paper was removed has disappeared. When alphabet buttons are displayed on the screen, paper still remains in the indicated locations. Repeat Steps 1 to 3 to remove the jammed paper. Precautions When Removing Jammed Paper • Slowly and carefully remove the jammed paper. Be careful not to leave pieces of paper in the machine.
Frequent Paper Jams If paper jams occur frequently, check the following points again. • • • • The paper on the standard tray or in the feed tray is within the maximum load capacity. The standard tray paper guides are positioned correctly and the paper is loaded properly. The paper that is actually loaded matches [Feed tray] settings. The useable paper is loaded. Wrinkled or curled paper, in particular, can cause paper jams, so do not use this paper.
The paper path differs for simplex and duplex printing up Paper Feed Path to the point of output. Also, the tray used to output printouts may be restricted depending on the functions used. During printing, paper is transferred through the machine as shown below.
When using the multifunction finisher ● When using the booklet / 2-fold function ● When stapling Staple Booklet / 2-fold ● When punching Punch ● When punching and stapling Punch Staple 2-5 ComColor Series Troubleshooting Guide 01
Troubleshooting the Printer Driver and Printer Mode This section describes how to troubleshoot problems related to the printer driver and printer mode. Problem Cannot print from a computer. Possible Cause and Action to Take The printer mode is offline. Check the printer status button on the mode screen of the operation panel. When [Offline] is displayed, change the status to [Online]. ⇒ Printer mode screen X [Functions] X press [Online] The status of the job may be [Waiting].
Problem Cannot specify pages to print. Possible Cause and Action to Take The [Collate] check box has been selected on the [Print] dialog box of the application. Remove the check mark from the [Collate] check box on the [Print] dialog box of the application, and set [Collate] to [Group] on the [Finishing] tab of the printer properties dialog box. Only one copy (page) is printed although multiple copies (pages) are specified. [Print and pause] has been set.
Problem No paper is fed. / Multiple sheets of paper are fed. / The back of a card is turned outward. Possible Cause and Action to Take The angle of the stripper plate is not properly adjusted. Turn the stripper plate angle adjustment dial to adjust the angle of the stripper plate according to conditions. • When no paper is fed: Turn the dial to the left. • When multiple sheets of paper are fed: Turn the dial to the right.
Problem A multiple feeding error occurs although multiple feeding was not performed, or multiple feeding errors occur frequently. Paper is loaded but the error message "Load paper in the paper feed tray." appears. Possible Cause and Action to Take Dark colored paper or paper printed on one side are used. When using paper printed on the back or paper with a dark base color, the machine may incorrectly detect this type of paper as though multiple sheets of paper are being fed.
Problem Printed images are light or faded. Possible Cause and Action to Take The paper type setting (on the machine) and the paper that is actually loaded do not match. Correctly configure the paper type. ⇒ Printer mode screen X [Functions] X [Feed tray] X select the feed tray X [Paper type] The ink heads are clogged. To unclog the ink head, perform head cleaning. ⇒ Printer mode screen X [Functions] X [Head cleaning] X [Normal cleaning] If this does not fix the problem, perform [Strong cleaning].
Troubleshooting the Copy Mode This section describes how to troubleshoot problems related to copy mode. Problem The original loaded in the ADF is not fed properly. Possible Cause and Action to Take A small original is loaded in the ADF. The minimum size of the original that can be loaded in the ADF is 100 mm × 148 mm (3 15/16" × 5 13/16"). If the original is too small, it may not be fed properly from the ADF, causing a paper jam.
Problem Copied data is dark. Possible Cause and Action to Take The original image is dark, or the [Scanning level] setting of the copy has been configured for dark copying. Configure the [Scanning level] setting for copying according to the original. ⇒ Copy mode screen X [Basic] X [Scanning level] The [Paper type] setting has not been correctly configured for the type of paper loaded on the standard tray or in the tray. Correctly configure the paper type.
Problem Part of the original is missing in the copied data. Possible Cause and Action to Take The magnification ratio setting does not match the combination of the original size and paper size. Use the same size paper as the original, or select a magnification ratio that matches the paper size. ⇒ Copy mode screen X [Basic] X [Reproduction size] [Auto reduce] has not been set on the [Booklet] or [Staple/Punch] screen.
Problem Duplex copying cannot be performed for the paper loaded in the standard tray. Possible Cause and Action to Take The feed tray setting for the standard tray is set to [Envelope]. When [Feed ctrl.] is set to [Envelope] on the [Paper type] screen, duplex copying cannot be performed using paper from the standard tray regardless of the type of paper loaded. Configure the settings according to the paper to be used.
Problem The scanned image is dirty. Possible Cause and Action to Take The original cover is not securely closed. Close the original cover of the scanner unit securely to prevent any light from entering. The white roller of the ADF, platen glass, or original pad is dirty. Clean the platen glass. 2 Original pad White roller Platen glass Dust, debris, ink, or correcting fluid adhering to the white roller of the ADF or the platen glass can result in scanned data that is not clean.
Problem The back of the original is visible in the copied data. Possible Cause and Action to Take The image from the back side of the paper or from the next page is visible and therefore scanned because the original is thin. • Configure the [Scanning level] setting for light copying and scan the original again. ⇒ Scanner mode screen X [Basic] X [Scanning level] • Place a black piece of paper on the back side of the original and scan the original again.
Troubleshooting the Finisher This section describes how to troubleshoot problems related to the finisher. Problem The finisher does not operate. Possible Cause and Action to Take Make sure that the power plug has been properly inserted into the electrical outlet. Make sure that the printer and finisher have been securely connected by the cord. 2 Make sure that the main power of the printer is on. Turn the printer off and then on again.
A staple is Caught Inside the Machine 4 If the jammed staple cannot be removed, push the bottom of the staple cartridge in the direction of the arrow to remove the staple. 5 Return the staple cartridge to its original position. If a staple becomes caught inside the machine, use the following procedure to remove the staple. ● Case of the UR1 staple cartridge 1 2 Open the cover.
● Case of the UR2 or UR3 staple cartridge 1 5 Open the cover. Hold the tabs on the left and right of the staple cartridge, and install the staple cartridge to its original position in the stapler unit. 2 - 2 3 4 Pull the stapler unit toward you while pushing the lever to the right and remove the unit. Hold the tabs on the left and right of the staple cartridge, and lift the staple cartridge up and to the left. Push in the staple cartridge until it clicks.
Troubleshooting the IC Card Reader This section describes how to troubleshoot common problems when using the optional IC card reader. Problem Unable to login using the IC card Possible Cause and Action to Take Check whether the IC card is being used with another card in the same case. If the cards interfere with one another, you may not be able to login using the IC card. Make sure that the IC card is correctly placed above the card reader.
Chapter 3 Maintenance Replacing the Staple Cartridge When there are no more staples, printing stops and a message appears on the touch panel. Check the message, and then use the following procedure to replace the staple cartridge. Replacing the UR1 Staple Cartridge 3 The message may appear even if there are staples remaining. You can replace the staple cartridge even if there are staples remaining. The remaining staples can be used.
6 Close the staple cartridge cover. Replacing the UR2 or UR3 Staple Cartridge The message may appear even if there are staples remaining. Replace the staple cartridge even if there are staples remaining. The remaining staples cannot be used. 7 8 1 Open the cover. 2 Pull the staple unit toward you while pushing the lever to the right and remove the unit. 3 Hold the tabs on the left and right of the staple cartridge, and lift the staple cartridge up and to the left.
4 Hold the tabs on the left and right of the new staple cartridge, and install the staple cartridge to its original position in the staple unit. 3 Push in the staple cartridge until it clicks. 5 Return the staple unit to its original position. 6 Close the cover.
Cleaning the Punching Box When the punching box becomes full of punching trash, printing stops and a message appears on the touch panel. Use the following procedure to remove the punching box and dispose of the punching trash. • Be sure to dispose of all punching trash after removing the punching box. If punching trash remains inside the punching box, the punching box may become full of punching trash before the message appears, causing a malfunction.
3 3-5 ComColor Series Troubleshooting Guide 01
Simple Questions The buttons of the operation panel do not work. Is the machine in sleep status? The machine may be configured to automatically enter power saving mode when it has not been operated for a fixed period. Press the [Wake up] key to resume operations. The console cannot be displayed. Is the IP address of the printer entered correctly? Ask your administrator for the IP address, and then enter it correctly. A message indicating that one ink cartridge must be replaced appears.
What is the correct orientation of the original for [Top side up] and [Top side left] in the [Original orientation] setting? When facing the machine… [Top side up] • Load the original in the direction as if you were reading it. [Top side left] • Load the original with the top of the page on the left side. I was logged out without doing anything. The administrator configured [Auto-log out time] for [Login setting]. [Auto-log out time] can be set to between 1 and 60 minutes. Contact your administrator.
Please contact following for supplies and service: Copyright © 2009 RISO KAGAKU CORPORATION