WALK-IN BATHTUB SERIES INSTALLATION AND OPERATION INSTRUCTIONS Ristorre 14525 Monte Vista Avenue Chino, CA 91710 1-844-883-2839 www.ristorre.
Walk-In Bathtub Series English Contents Contents................................................................................................................................................................................................ 2 Product Information............................................................................................................................................................................... 2 Important Safety Instructions........................................
Important Safety Instructions Walk-In Bathtub Series This is a professional grade product. A working knowledge of construction techniques, plumbing and electrical installation according to codes are required for proper installation and user satisfaction. We recommend that a licensed contractor perform the installation of all Ristorre® products. Our warranty does not cover improper installation related problems. READ AND FOLLOW ALL INSTRUCTIONS. SAVE THESE INSTRUCTIONS.
Walk-In Bathtub Series Important Safety Instructions (Continued) CAUTION Keep body and hair a minimum of 6˝ (152mm) away from the suction fitting at all times when the hydromassage system is in operation. Hair longer than shoulder length should be secured close to the head. CAUTION Do not immerse the controls by overfilling the bath. CAUTION To avoid injury, use care when entering and exiting the hydromassage bathtub.
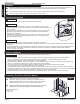
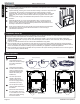
Framing and Support Walk-In Bathtub Series READ ALL INSTALLATION INSTRUCTIONS COMPLETELY. IMPROPER INSTALLATION WILL VOID THE WARRANTY. IMPORTANT Fig. 1 Make sure that walls and floor meet fire safety requirements of local building code and/ or FHA/HUD Minimum Property Standards. Observe all governing codes and ordinances. 1 2 3 Proper installation is your responsibility. Have a qualified technician install this bath. Installation using a ground-fault circuit- interrupter (GFCI) is required.
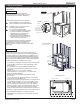
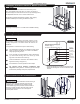
Walk-In Bathtub Series Subfloor English 1 bottom of the bathtub. Identify the drawing in the Technical Specification that corresponds with your bathtub. 2 The bathtub must remain level in order for it to drain properly and must make contact with the leveling feet. 3 Floor must support seventy five pounds (75 lbs) per square foot load. Electrical Connections Fig. 2 DANGER Risk of electric shock. Connect only to a circuit protected by a GFCI.
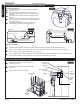
Walk-In Bathtub Series Installation Procedures 5433/3137 Models (Continued) Fig. 4 NOTES Place the tub in the alcove with the front skirt firmly on the floor. The bathtub must be set level. To check, use a level on top of the ledges on both ends of tub and on top of dam (Figure 4). All plumbing hardware (drain/waste overflow, water supply) must be installed prior to setting the bathtub in place. IMPORTANT Tile flange unit is required in a 3-wall alcove installation setting.
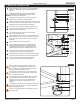
Walk-In Bathtub Series English Optional Extension Kit Installation 5433 (Continued) DWO Tie Wrap Fig. 8 Top View Clip Fig. 7 Front Panel Installation Use cable ties to attach the front extension panel to the 1 frame of the unit. Route the cable tie around the frame and through the 2 pre-drilled angle bar (Figure 6 page 7). Repeat in four (4) locations. Insert the tip of the cable tie into the receiving end of the 3 cable tie.
Walk-In Bathtub Series 3-Wall Alcove Installation 6030 1 Install the drain/overflow according to the manufacturer’s instructions. Refer also to the Technical Specification Manual. Fig. 11A Watertight installation of the drain is the installer’s responsibility. Drain leakage is excluded from the Ristorre warranty of this product. 2 Install the faucet at this time. It is recommended that the faucet be installed by a qualified plumber.
English Final Steps Walk-In Bathtub Series 1 Finishing of other trades should be done in conformance with applicable codes and generally accepted building practices. 2 Inspect all fittings, plumbing, and control lines after inserting to insure the components are not damaged, disconnected, or contacting the finish surface substrate or support members. Note: Tubs are factory pre-drilled for deck mounted tub fittings.
Walk-In Bathtub Series Faucetry Installation Fig. 14 Install the faucetry and drain/waste overflow trim (DWO) at this time (please see installation instructions that came packaged with these items).
English Controls Walk-In Bathtub Series NOTE For Combination models, Whirlpool On/Off, Pure Air, Light and Air Control control operations are applicable. For Whirlpool models, only Whirlpool On/Off Air Control operations are applicable. Fig. 16 Combination Models Whirlpool Models Controlling Whirlpool Direction and Flow Direction (Figure 17A) To change the direction of the water flow, swivel the jet nozzle to the desired angle. Fig. 17B Fig.
Operations Combination Operation: Walk-In Bathtub Series Pump/Motor Operation: To turn the Pump/Motor ON, press the Pump/Motor button once. To turn the Pump/Motor OFF, press the Pump/Motor button again (Figure 21). Fig. 19 Blower Operation: To turn the Blower ON, press the Blower button once. To turn the Blower OFF, press the Blower button again (Figure 20). Fig. 20 Fig. 21 Fig.
Walk-In Bathtub Series Aromatherapy Use Fig. 25 English To use the aromatherapy feature: Housing Receptacle Aromatherapy Cartridge Protective Cover Aromatherapy Capsules VITAROMA Remove the protective cover from the housing receptacle (located on the deck of the bathtub). An aromatherapy cartridge comes pre-installed in the unit. Aromatherapy Capsules Container Remove the aromatherapy cartridge from the aromatherapy capsules container.
Adjustable Skirt Height Option 5433 Walk-In Bathtub Series These instructions are intended for use when the factory-standard height of the unit must be raised. This is to allow for proper drainage of rough-in plumbing located away from the unit. 1 3 4 5 6 Remove the skirt access panel and set aside to gain access to the leveling feet. Your unit is factory preset to a height of 37.0 inches. You must raise all leveling feet by 2.
English Shower Information Walk-In Bathtub Series Because of the Ristorre® Walk-In Bathtub’s unique design, a rigid shower door cannot readily be installed. If a shower is desired, we recommend using the hand-held shower supplied with the unit in conjunction with a shower curtain, as this will allow the user to control the direction of the spray. Proper installation of a shower is the responsibility of the installer.
Walk-In Bathtub Series W a IT Reference Diagrams Combination Models (3137/5230/5433/6030) Fig.
Authorized Service If you need a referral for a service company near you, or need assistance with operation or maintenance-related questions, please call our Service Support Department at 1-844-883-2839. Visit our website at http://www.ristorre.com/ for products, services, and an online copy of these Installation and Operation Instructions. When requesting service or technical assistance please have available both the model and serial number of your unit.
Limited Warranty on Ristorre® Branded Baths WARRANTY COVERAGE Ristorre (the “Company”) offers the following limited warranty to the original purchaser ("User") of a Ristorre® model 6030/5230/5433/3137 Walk-In Bath. Please read this entire Limited Warranty, as exclusions and conditions apply. The Company will repair or replace, at its sole option, the Bath or any of its covered equipment in accordance with the following terms and conditions.
RETURN OF WARRANTY REGISTRATION To register your product, complete the registration card below and mail it to Ristorre at the address provided. Please return your product registration within 30 days of delivery. RESPONSIBILITIES OF OTHERS Inspecting the unit prior to installation is the responsibility of the installer or building contractor who acts on behalf of the User. They are responsible for ensuring the unit is free of defect or damage.
14525 Monte Vista Avenue Chino, California 91710 Ristorre English
English Español WARRANTY REGISTRATION CARD Walk-In Bathtub Series To complete your registration fill out and mail this card to the address printed on the other side within thirty (30) days from date of purchase in order for this warranty to become effective.