
User's Manual
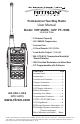


Getting To Know Your PT-150M Series Radio
1. Carefully align threaded end of the antenna with
the mating connector located on the radio.
2. Carefully rotate the antenna clockwise until fully
threaded into the mating connector.
ON/Increase Volume – rotate clockwise
OFF/Decrease Volume – rotate counter clockwise
Push and hold
to transmit; release
to receive signal.
Battery Information
• Fully charge the battery before use to keep the optimum
capacity and for safe operation.
• The battery is designed for the PT Series charger only. Please
do not charge the battery with any other brand charger.
• Turn the radio off before charging.
• Do not disassemble.
• If the battery terminal is contacted with any metals or conductive
substances, it may do harm to the body or battery.
• Battery Type: Rechargeable Lithium-Ion
• Battery Life: Duty cycle: 5% transmit, 5% receive,
90% standby = more than 12 hours
BC-PT Charger Information
Specication
• Input voltage: 12VDC, 1A
• Output voltage: 8.4VDC, 850mA
• Charge time: 2
1
/2 hours
Operating instruction
• Plug the AC power cord of the
charger into a wall outlet.
• Turn the transceiver off.
• Insert the battery pack into the
charger with or without the
transceiver attached.
Color Status of Charger LED
Steady RED.........Battery Charging
Steady GREEN....Battery Charging Complete
Steady AMBER....Trickle Charge, Replace Battery
Blinking AMBER...Abnormal Temperature
Blinking RED........Replace Battery
3.
4.
Display Indicators
5.
7.
8.
Select the desired channel
or Scroll Menu function.
-
is
(Upper)
Monitor (PFB)
(Lower)
Turns on backlight
for display and
buttons. (PFB)
Can be programmed for
specic functions. (PFB)
PFB denotes Programmable Function Button
P1, P2, P3 are PFB’s
(see page 5.)
PTT Button
*
*All channels will display an “L”. All MURS channels are set to 2 watts.