
Owner`s manual


qtm9322b.pm5
For assistance, call RITRON at 800-USA-1-USA (800-872-1872) or visit us at www.ritron.com
FIG.
-
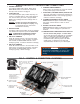
8: QUICK ASSIST
INSTALLATION
QUICK ASSIST INSTALLATION
WHEN YOU ARE FINISHED PROGRAMMING:
1.
Hang up and disconnect
the telephone from the
internal jack on the Quick Assist.
2.
Test the operation
of the Quick Assist before
putting it into service by activating both switches:
first press the Customer Service push-button on the
front of the unit, then press the Reset push-button
on the bottom of the unit. Listen to the messages
received on your radio.
3.
Replace the cover
and (4) cover screws. Snug
down, but
do not overtighten the screws
;
excessive force can break the plastic enclosure
material.
NOTE: See page 1 for installation of the Cover
Gasket.
4.
Attach the antenna and seal the connection:
a. Insert, rotate and lock the antenna to the Quick
Assist antenna jack.
b. Orient the antenna in a vertical position.
c. Seal the antenna connection to hold the antenna in
vertical position, to protect antenna fittings, and to
maintain water-resistance of the Quick Assist in
wet or outdoor environments.
NOTICE:
If the unit is to be used outdoors, the
antenna connection
must be sealed
with waterproof, self-fusing tape.
Use: Grainger Pt. # 2A459,
McMaster-Carr Pt. # 7643A34, or
Radio Shack Pt. # 278-1645
Wrap the connection with sealant tape
and press it securely in place. (Refer
to sealant instructions.)
5.
To install the Optional Message Placard,
align it with the center of its hole over the front push-
button; also align the mushroom head fastener strips
on the back of the panel with those on the front of the
RQT cover. Press firmly to interlock the strips
together, snapping the panel into position.
6.
Test for sufficient broadcast range
when
choosing the
location for the Quick Assist unit. For
maximum range and coverage, install it as high from
ground level as possible. Be aware that metal or wires
near the antenna can block or absorb radio transmis-
sions. If the installation is outdoors, choose a well-
shaded location.
NOTE: A n o p t ional high gain antenna is avail-
able from Ritron; call 800-USA-1-USA for
information.
7.
Position the unit
as shown in FIG.
-
8, and secure it
in place with screws through the enclosure flanges.
Do not overtighten
these screws, as you might
break the plastic flanges.
IMPORTANT: Contact a qualified technician or
electrician if you are not certain
your installation will work properly
and safely.
Antenna
(Adjust to vertical
position.)
Reset button
(on unit bottom)
Customer-
accessible
push-button
8
Optional Message Placard
Pt. No. 14280010 installed
on RQT-PB.
CAUTION
The antenna connection
MUST BE SEALED if the
Quick Assist is to be
used outdoors.
See Step 4 at right.
Overlap sealing tape to include the antenna
connection and the top of the RF enclosure
BEFORE SEALING
AFTER SEALING