
Owner's manual
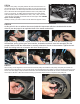


STEP 20
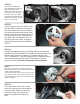
Installing the outer belt guard together with its
stylish derby cover is next. (Prior to installing the
outer guard, install the oil filter if purchased sep-
arately). Position the guard up against the stand-
offs making sure that the shifter shaft support is
aligned with the hole and then check to make
certain all mounting holes properly line-up and
that the guard sits squarely up against the stand-
offs.
STEP 21
Coat the threads of the mounting bolts with
2 drops of Blue threadlock and tighten the
bolts with your Allen driver. Continue the
mating process by fastening all 4 bolts until
they have seated within the countersunk
holes in the outer guard.
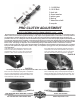
STEP 18
At this time, adjust the Pro-Clutch ac-
cording to specifications. Re-check
until you are satisfied (see last page
for adjustment specs).
Finally, bend the lock tabs over against
a flat on the nuts. This will prevent the
nuts from coming loose.
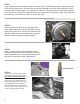
STEP 17
There are 3 mounting bolts used to attach
the nose cover. Coat each with 2 drops of
Blue threadlock and torque until secure.
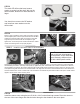
STEP 19
Assemble the 4 stand-offs to the motor plate. These pieces will act
as the support for the outer guard. Begin by thread¬ing in each
stud into each stand-off using 3 drops of Red loctite.Thread them
into the stand-offs until they bottom (should be left with 3/4” ex-
posed). Now apply 3 drops of Red thread locker on the exposed
stud and thread each stand-off into a counterbored & threaded
hole on the motor plate. Tighten until they bottom-out on the plate.