
Quick Install Guide


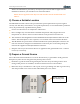
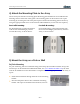
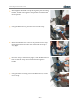

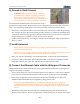
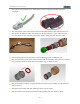
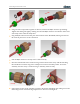
Table Of Contents
- 1) You Need the Following Items
- 2) Choose a Suitable Location
- 3) Prepare a Ground Source
- 4) Attach the Mounting Plate to the Array
- 5) Mount the Array on a Pole or Wall
- 6) Ground to Earth Ground
- 7) Install Antennas
- 8) Connect the Ethernet Cable with the Waterproof Connector
- 9) Connect the Antenna
- 10) Zero-Touch Provisioning and Ongoing Management
- Dimensions
- Notices, Warnings, & Compliance Statements

XR-2425H Quick Installation Guide
- 8 -
Snug all of the components together as shown, but leave the RJ45 connector protruding.
Tighten the sealing nut lightly, making sure that the RJ45 connector is rotated so that it will
seat easily in the connector body later.
Plug the RJ45 connector into the port on the bottom of the XR-2425H, making sure that its
tab clicks in place for a secure connection.
Seat the RJ45 connector correctly in the connector body.
Note the slotted track in the connector ring on the bottom of the Array and the matching
tabs inside the connector ring in the waterproof connector assembly, below. Screw the
assembly onto the Array’s connector ring so that they mate securely.
Snug all the sections of the assembly together a final time and tighten the sealing nut on the
end to 5kg but not more than 8kg torque force to insure a water tight fit.