
Quick Install Guide


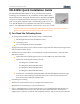
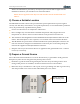
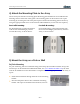
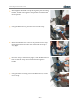

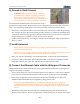
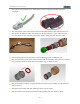
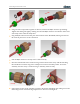
Table Of Contents
- 1) You Need the Following Items
- 2) Choose a Suitable Location
- 3) Prepare a Ground Source
- 4) Attach the Mounting Plate to the Array
- 5) Mount the Array on a Pole or Wall
- 6) Ground to Earth Ground
- 7) Install Antennas
- 8) Connect the Ethernet Cable with the Waterproof Connector
- 9) Connect the Antenna
- 10) Zero-Touch Provisioning and Ongoing Management
- Dimensions
- Notices, Warnings, & Compliance Statements

XR-2425H Quick Installation Guide
- 6 -
6) Ground to Earth Ground
WARNING: This equipment must be externally
grounded using a customer-supplied ground wire
before power is applied. Contact the appropriate
electrical inspection authority or an electrician if you
are uncertain that suitable grounding is available.
The mechanical installation must ensure that the Array is
grounded to earth ground to dissipate static electric charge that may develop due to wind. In
Step 3, you secured a grounding wire to the Array (see Step 3 if this has not been done).
After Step 3 is complete and the Array is mounted to the wall or pole, attach the grounding
wire from the Array to the electrical earth ground point that you located or installed in Step
3. The photo shows an earth ground connection where the Array is mounted on a pole and
the grounding wire is attached to a stake driven into the ground.
Continue the installation by mounting the antenna and attaching the cables as described in
Steps 7, 8, and 9.
7) Install Antennas
NOTE: See the Warnings and Notices regarding external antennas in the Warning &
Notices section of this guide.
NOTE: Be sure to configure the Array’s IAPs to the proper bands (2.4 GHz and 5.0 GHz).
Each must match the band of the antenna to which it is connected.
Have your antennas installed by a professional installer as directed by the manufacturer.
Use Xirrus cables, part number ANT-CAB-195-10-MM. Note that some antennas include
integrated cables as part of the unit, and these do not need separate cables.
8) Connect the Ethernet Cable with the Waterproof Connector
All XR-2425H Arrays are powered directly via a Gigabit Ethernet connection. See the figure in
Step 9 for the names of all ports.
Power: These Arrays are only powered through the GIG1 POE port. Only Xirrus-supplied
power injectors or 802.3at PoE-compliant switches may be used to power the XR-2425H.
Data: Data is supplied to the GIG1 POE port via the same cable that powers the Array.
Additional data bandwidth may be supplied by using GIG2 as well.
NOTE: It is VERY IMPORTANT to assemble the waterproof connector properly,
following the directions below. Failure to do so may expose the Array to the elements,
and may result in an intermittent connection causing the Array to connect at very low
speeds!
The Ethernet cable must be terminated with a simple RJ45 plug with the tab exposed, as
shown on the left below. Do not use a plug with a tab protector boot, as shown on the right.