
User Manual


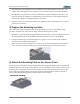
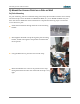
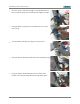
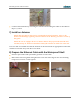
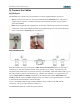

Table Of Contents
- 1) You Need the Following Items
- 2) Choose a Suitable Location
- 3) Prepare the Mounting Location
- 4) Attach the Mounting Plate to the Access Point
- 5) Mount the Access Point on a Pole or Wall
- 6) Ground to Earth Ground
- 7) Install an Antenna
- 8) Prepare the Ethernet Cable with the Waterproof Shell
- 9) Connect the Cables
- 10) Log In to the Access Point
- 11) Configure the Access Point
- 12) Secure Low Level Access to the Access Point
- Drawings
- Customer Support
- Notices, Warnings, & Compliance Statements
- 未命名

XR520H Quick Installation Guide
Once the strap is satisfactorily tight, rotate the Band-It tool
back so that the strap cannot slide back through the buckle.
Using the built in cutting tool on the Band-It tool, cut the
excess strap.
Your installation should now appear as shown here.
Using a hammer, bend back and flatten the remaining strap.
Using a hammer, bend and flatten the two tabs on the
buckle, so that they hold the flattened strap end in place.
- 4 -