
User Manual


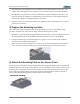
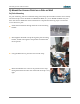
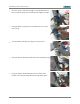
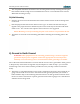
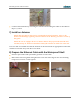
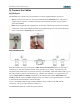

Table Of Contents
- 1) You Need the Following Items
- 2) Choose a Suitable Location
- 3) Prepare the Mounting Location
- 4) Attach the Mounting Plate to the Access Point
- 5) Mount the Access Point on a Pole or Wall
- 6) Ground to Earth Ground
- 7) Install an Antenna
- 8) Prepare the Ethernet Cable with the Waterproof Shell
- 9) Connect the Cables
- 10) Log In to the Access Point
- 11) Configure the Access Point
- 12) Secure Low Level Access to the Access Point
- Drawings
- Customer Support
- Notices, Warnings, & Compliance Statements
- 未命名

XR520H Quick Installation Guide
Continue the installation by mounting the antenna and attaching the cables as described in
Steps 7, 8, and 9.
7) Install an Antenna
NOTE: Use only Xirrus-approved or recommended external antennas. Also see the
Notices and Warnings regarding external antennas in the Warning & Notices section of
this guide.
NOTE: Be sure to configure the Access Point’s IAPs to the proper bands (2.4 GHz and
5.0 GHz) in Step 11. Each must match the band of the antenna to which it is connected.
Low loss cable is available such that the antenna can be mounted in an appropriate location that
could be several feet away from the Access Point.
8) Prepare the Ethernet Cable with the Waterproof Shell
Place the split washer and split rubber grommet over the cable.
Slide all the sections together and tighten the nut on the end to 5kg but not more than 8kg
torque force to insure a water tight fit.
- 6 -