Argentine Barbecue Grill Owner’s Manual Assembly and Operating Instructions Model # CG2093901-RG Tools required for assembly: (Not Included) Pliers, Philips & Flathead Screwdrivers, Adjustable Wrench. Keep this manual for future reference Should you encounter any problem, CALL US FIRST. Do not return product to the store. WE CAN HELP. Please contact Customer Service at customerservice@rankam.com or at 1-888-837-1380, Mon to Fri, 8:00 a.m. – 5:00 p.m. Pacific Standard Time.
WARNING ! ! l Only use this grill on a hard, level, non-combustible, stable surface (concrete, ground, etc.) capable of supporting the weight of the grill. Never use on wooden or other surfaces that could burn. l DO NOT use grill without charcoal ash tray in place. DO NOT attempt to remove charcoal ash tray while coals are hot. l When grill is in use, keep clearance of 60” (152.
! WARNING ! l When grilling, grease from meat may drip into the charcoal and cause a grease fire. If this should happen, do not use water to extinguish grease fires. l We advise that a fire extinguisher be on hand. Refer to your local authority to determine proper size and type of fire extinguisher. l Keep hands, face and body a safe distance away. Flash flare ups may occur when air comes into contact with fire or hot coals. l Never place more than 15.8 pounds (7.2 kg) on side shelf.
ASSEMBLY INSTRUCTIONS THANK YOU FOR PURCHASING THIS ARGENTINE BARBECUE GRILL Read all safety warnings & assembly instructions carefully before assembling or operating your grill. For missing parts, please call customer service at customerservice@rankam.com or at 888-837-1380 (U.S. only), Mon to Fri, 8:00 a.m. – 5:00 p.m. Pacific Standard Time. (Proof of purchase will be required.) Inspect contents of the box to ensure all parts are included and undamaged. We recommend two people for assembly of this grill.
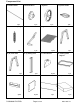
Component List 1. Rotation Shaft 2. Ratchet Wheel 1 pc 5. Check Lever Spring 1 pc 6. Check Lever 4. Flywheel Handle 1 pc 7. V-groove Grate 1 pc 9. (R ) Lifter Rack 3. Flywheel 1 pc 10. (L) Sliding Pillar 1 pc 8. (L) Lifter Rack 2 pcs 11. Lifter Bracket 1 pc 12. Cooking Grate Support 1 pc 13. Grease Collector 2 pcs CG2093901-RG ENG 1 pc 14. Side Guard 2 pcs 15. Back Guard 2 pcs Page 5 of 24 1 pc 16. (R ) Side Table 1 pc 1 pc 20131018 V.
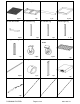
17. Charcoal Grate 18. Grill Body Chassis 2 pcs 21. Ash Pan Handle 1 pc 22. Left Front Leg 2 pcs 25. Right Front Leg 19. Front Panel Guard 1 pc 23. Left Rear Leg 1 pc 26. Swivel Caster 20. Ash Pan 2 pcs 24. Rear Right Leg 1 pc 27. Swivel Caster with 1 pc 28. Bottom Rack Brake 1 pc 29. Chain 2 pcs 30. Stop Collar 2 pcs 2 pcs 31. (R ) Sliding Pillar 1 pc 1 pc 1 pc 32. (L) Side Table 1 pc 33. Security Pin 1 pc CG2093901-RG ENG Page 6 of 24 20131018 V.
STOP! DO NOT RETURN TO RETAILER For assembly assistance, missing or damaged parts, please contact customer service at, customerservice@rankam.com or 1-888-837-1380 Mon to Fri, 8:00 a.m. – 5:00 p.m. Pacific Standard Time.
J Bolt (M6X15 SS) 2 pcs K Step Screw B 1 pc L Check Lever Collar 1 pc M Cap Nut 1 pc N R Pin 1 pc CG2093901-RG ENG Page 8 of 24 20131018 V.
Assembly Procedures Step 1. Assemble the Left Front Leg (22) and Right Front Leg (25) to the Grill Body Chassis (18) using M6X12 Bolt (A) as indicated below. Hand Tighten only Assembly of legs on the front side of the grill Step 2. Assemble the Left Rear Leg (23) and Right Rear Leg (24) to the Grill Body Chassis (18) using M6X12 Bolt (A) as illustrated below. Hand Tighten only Assembly of legs on the rear side of the grill CG2093901-RG ENG Page 9 of 24 20131018 V.
Step 3. Turn upside down the chassis (18); assemble the Bottom Rack (28) with the 4 legs using M6X12 Bolt (A). Hand Tighten only 18 Step 4. Assemble the Swivel Caster with Brake (27) to Left Front Leg (22) and Left Rear Leg (23), also Swivel Caster (26) to Right Front Leg (25) and Right Rear Leg (24) using M6X12 Bolt (A) and M6 Flange Nut (E). Tighten with tools CG2093901-RG ENG Page 10 of 24 20131018 V.
Step 5. Install the Front Panel Guard (19) to the Left Front Leg (22) and Right Front Leg (25) using M6X12 Bolt (A) and M6 Flange Nut (E). Hand Tighten only 25 22 Step 6. Assemble (L) Lifter Rack (8) and (R ) Lifter Rack (9) on the upper end of the legs and fix with M6x50 Bolt (C ) and M6 Flange Nut (E ). Also affix the joints with M6X12 Bolt (A). Hand Tighten only CG2093901-RG ENG Page 11 of 24 20131018 V.
Step7. Install (L) Sliding Pillar (10) and (R ) Sliding Pillar (31) using M6X12 SS Bolt (D) as shown. NOTE: Now tighten all screws in Steps 1 through Step 7. Tighten with tools Step 8. Install the two Side Guards (14) to the upper part of the legs using M6X12 SS Bolt (D) as shown. Hand Tighten only CG2093901-RG ENG Page 12 of 24 20131018 V.
Step 9. Install the Back Guard (15) to the upper part of the legs using M6X12 SS Bolt (D) as shown. Hand Tighten only Step 10. Install the (L) Side Table (32) and (R ) Side Table (16) using M6X12 Bolt (A). Tighten with tools CG2093901-RG ENG Page 13 of 24 20131018 V.
Step 11. Insert Rotation Shaft (1) through the hole on (R ) Lifter Rack (9), put in the Stop Collar (30) with a M6X12 Bolt (D) and screw in loosely, then pass through the hole on (L) Lifter Rack (8). Put on Insulation Washer (H) and M16 Lock Nut (G) at the rear end of the shaft (1) loosely. Assemble Ratchet Wheel (2) with a M16X12 Bolt (A) and the Flywheel using M6X25 SS Bolt (B) accordingly.
Step 12. Assemble Lifter Bracket (11) on both sides of Cooking Grate Support (12) using M6X12 SS Bolt (D) and M6 SS Flange Nut (F). Install the Step Screw A (I) on Cooking Grate Support (12) using M6 Flange Nut (E) and tighten all as shown. Tighten with tools Step 13. Assemble Chains (29) to Rotation Shaft (1) using M6X25 SS Bolt (B) with M6 SS Flange Nut (F) and connect the lower end of the chain to the Lifter Brackets (11) using M6 SS Flange Nut (F) and M6X15 SS Bolt (D).
Step 14. Assemble the Ash Pans (20) with Ash Pan Handles (21) using M6X12 Bolt (A). Tighten with tools Step 15. Put the Ash Pans (20) and Charcoal Grates (17) into the Grill Body Chassis (18) carefully. CG2093901-RG ENG Page 16 of 24 20131018 V.
Step 16. Put in the V-groove Grate (7). Make sure the upper inverted V-bar of the V-groove Grate (7) is correctly mounted on the Cooking Grate Support (12) as show by illustration A, while the lower inverted V-bar of the V-groove Grate (7) is tightly bounded by the lower frame of the Cooking Grate Support (12) as shown by illustration B below. A B A B Step 17. Hook on the Grease Collectors (13). CG2093901-RG ENG Page 17 of 24 20131018 V.
Step 18. Adjust the Stop Collar (30) and Ratchet Wheel (2) to ensure NO HORIZONTAL movement on the Rotation Shaft (1) arises and tighten both the screws accordingly. Make sure the Security Pin (33) always fully pass through the (R ) Lifter Rack when insert which helps preventing any accidentally falling of the cooking grates in case of bumping on the Check Lever (6) unexpectedly. 2 Tighten with tools 30 1 6 33 Step 19.
WARNING ! ! DO NOT use grill without charcoal ash tray in place. DO NOT attempt to remove charcoal ash tray while tray contains hot coals. Place the grill outdoors on a hard, level, non-combustible surface away from roof overhang or any combustible material. Never use on wooden or other surfaces that could burn. Place the grill away from open windows or doors to prevent smoke from entering your house. In windy weather, place the grill in an outdoor area that is protected from the wind.
! WARNING ! Read all safety warnings and instructions carefully before operating your grill. Step 3 Crumple up 8-10 single newspaper pages and make 1st layer of them on the charcoal tray. Put charcoal briquettes / fire wood on top of 1st layer to create another layers, repeat this step to form a pyramid shape. Light the paper, allow for the charcoal briquettes / fire wood to completely ignite. Spread out charcoal / fire wood over the charcoal tray by using long cooking tongs or long metal tube.
ARGENTINE GRILLING INSTRUCTIONS Before lighting a fire, check to ensure that lifting system and ratchet locking device of cooking grate are functioning properly, that collar fittings and flywheel are firmly anchored to the rotation shaft and those assemblies of the fire-grate, ash pan, cooking grate and basting pan have been completed as in assembling upfront. Raise the cooking grates by turning the flywheel front to back. The grates will be locked at any desired height.
Adding Charcoal/Wood During Cooking Additional charcoal and/or wood may be required to maintain or increase cooking temperature. Step 1 Stand back and adjust the flywheel (3) with care. DO NOT touch the grates by hand Step 2 Stand back a safe distance and use long cooking tongs to lightly brush aside ashes on hot coals. Use cooking tongs to add charcoal and/or wood to charcoal grates, being careful not to stir-up ashes and sparks.
Proper Care & Maintenance l l l l l l To protect your grill from excessive rust, the unit must be properly cleaned and covered at all times when not in use. Wash cooking grates and basting pans with hot, soapy water, rinse well and dry. Clean inside and outside of grill by wiping off with a damp cloth. If rust appears on the exterior surface of your grill, clean and buff the affected area with steel wool or fine grit emery cloth. Touch-up with a good quality high-temperature resistant paint.
IF CUSTOMER SERVICE BECOME NECESSARY: 1. 2. 3. The Original Purchaser is responsible for shipping and handling charges of the returned item(s) and replacement parts, if any. All parts to be replaced will need to be shipped before replacement items will be sent. Follow the Customer Service Representative’s instructions exactly. If a return is necessary, it must be packed carefully and shipped prepaid. Should you encounter any problem, CALL US FIRST. Do not return product to the store. WE CAN HELP.