
Installation Instructions


Check for parts online at www.HuntRiversEdge.com or call 800-450-EDGE (3343) M-F 8-5
9
Operator's Manual
LOCKDOWN 21 1-MAN Ladder Stand
Turn Counter
Clockwise to
Tension Seat
37
9
31
10
6
7
35
31
3
35
24
12
34
25
12
11
Open
Tube
Mount
42
FIGURE 5
FIGURE 6
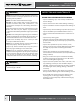
8. Attach the top of the right armrest (9) and the top of the left
armrest (10) to the rear seat supports (6,7) using two 5/16-18 x
3-1/4 IN bolts (31), 5/16 IN washers (37) and 5/16 IN locknuts (35).
Make sure that the seat posts are pointing inwards. SEE FIGURE 5.
NOTE: If the TearTu
™
backrest has slid over the holes, you may
need to loosen the hardware of the backrest spreader to slide the
backrest upwards. The washer between the armrest and the seat
support should not rest on the mesh, slide mesh up until washer
contacts only metal.
9. Attach the bottom of the right armrest (9) and the bottom of the
left armrest (10) to the rear platform (3) using two 5/16-18 x 3-1/4
IN bolts (31) and 5/16 IN locknuts (35). SEE FIGURE 5.
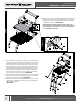
10. Screw the M6 x 70 MM Allen bolt (24) into the opposite end of the
front seat tensioner (12) until snug. SEE FIGURE 6A.
11. Slide the front seat tensioner (12) through the open tube mount
on the lower front edge of the seat assembly (11) such that the
Allen bolt end of the front seat tensioner bumps up against the
closed end of the other tube mount. Make sure the bolt holes line
up in the open tube mount. SEE FIGURE 6.
12. Secure front seat tensioner (12) to the open tube mount of the
seat assembly (11) using one 1/4-20 x 1-1/4 IN bolt (25) and ange
locknut (34). Push a 22 MM square end plug (42) into the outside
of the open tube mount. SEE FIGURE 6.
13. Using the 4 MM Allen wrench provided, rotate the Allen bolt
counter clockwise, through the cap hole, to create tension in the
TearTu
™
mesh seat (11). Do not over tension the seat because it
could cause the seat tensioner (12) to bow and the Allen bolt to
strip. SEE FIGURE 6.
FIGURE 6A