Operator's Manual One-Man Ladder Stands RElax™ Wide Model RE631 Pack-n-stack™ Model RE622 Includes ModelS: JUMBO JACK™ Model RE628 RE622, Pack-n-Stack™ Ladder RE627, Oasis™ Ladder RE628, Jumbo Jack™ Ladder RE630, Relax™ RE631, Relax™ Wide Get parts online at www.huntriversedge.com OMRELD001 Revised 01/27/12 © 2012 RETI All Rights Reserved.
Operator's Manual Rivers Edge® One-Man Ladder Stands Rivers Edge® Treestands are engineered with you the hunter in mind. We appreciate your purchase of one of our world class treestands. Follow these few simple instructions and your stand will provide you many years of trouble-free pleasure. Instructions should be kept in a safe place and reviewed at least annually.
Operator's Manual Rivers Edge® One-Man Ladder Stands Warnings warning DO NOT USE THIS PRODUCT UNTIL YOU HAVE WATCHED THE INCLUDED treestand safety DVD, UNDERSTAND IT AND PRACTICED THE TECHNIQUES FOR SAFE HUNTING DISCUSSED IN THIS DVD. YOU MUST ALWAYS USE THE PROVIDED FULL BODY HARNESS (FALL ARREST SYSTEM) THAT MEETS TMA STANDARDS WHILE USING THIS PRODUCT. SINGLE SAFETY BELTS AND CHEST HARNESSES ARE NO LONGER ALLOWED AND SHOULD NEVER BE USED.
Operator's Manual Rivers Edge® One-Man Ladder Stands Always… INSPECTION AND MAINTENANCE SCHEDULE • Be physically fit, mentally alert, and well rested before using this product. For All Rivers Edge® Products • Read, understand and follow all warnings and instructions before use and save for future reference. • Inspect all webbing, rope, cord, and strap assemblies for wear or damage.
Operator's Manual Rivers Edge® One-Man Ladder Stands ASSEMBLY INSTRUCTIONS (RE622) Tools needed – two 7/16" wrenches IMPORTANT ASSEMBLY TIP: DO NOT TIGHTEN NUT& BOLT COMBINATIONS COMPLETELY UNTIL ALL PARTS ARE ASSEMBLED TOGETHER! FINGER TIGHTEN PLUS ONE TURN OF A WRENCH ONLY! THIS WILL TEMPORARILY HOLD THE LOCK NUT ON THE BOLT WHILE HELPING ALIGNMENT OF ALL PARTS! AFTER ALL PARTS ARE ASSEMBLED TOGETHER, ALL NUT AND BOLT COMBINATIONS MUST BE COMPLETELY TIGHTENED. 1.
Operator's Manual Rivers Edge® One-Man Ladder Stands 6. With all sections assembled together on ground, secure all sections together using (8) provided spring lock pins. Handle of spring lock pin must be put to the outside of ladder side rails. SEE FIGURE 3. 7. a. Attach the stabilizer bar extension tube (1ML23) to the third ladder section mounting bracket using (1) provided spring lock pin. SEE FIGURE 4. b.
Operator's Manual Rivers Edge® One-Man Ladder Stands RE622 Backpacking Strap Attachment Instructions 1. Stack metal components of the ladder as shown in Figure 1A and 1B. 2. Lay stabilizer with extension tube along side of stacked ladder. Wrap the provided ladder ratchet strap around the stacked frame. Hook the two “S”-hooks together and ratchet tight. This will securely hold all ladder components together. 3. Attach backpacking straps (48067) on packed ladder. Fold strap in half.
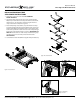
Operator's Manual Rivers Edge® One-Man Ladder Stands FINISHED PACK-N-STACK™ LADDER top section ratchet strap fourth section third section 15' tie-off ropes 9' stabilizer bar rope stabilizer bar extension tube second section spring lock pins bottom section 8 Check for parts online at www.huntriversedge.
Operator's Manual Rivers Edge® One-Man Ladder Stands ladder PARTS (Re622) 3 12 NO EXTENSIONS AVAILABLE FOR THIS MODEL.
Operator's Manual Rivers Edge® One-Man Ladder Stands ASSEMBLY INSTRUCTIONS (RE627) Tools needed – two 7/16” wrenches, one 9/16" wrench IMPORTANT ASSEMBLY TIP: Do not tighten any nut and bolt combinations completely until all parts are assembled together! Finger tighten plus one turn of a wrench only! This will temporarily hold the lock nut on the bolt while helping alignment of all parts! After all parts are assembled together, all nut & bolt combinations must be completely tightened. 1.
Operator's Manual Rivers Edge® One-Man Ladder Stands 6. Attach the tree blade (410056) to the ladder side rails using (4) provided 1/4-20 x 2-1/4” bolts, locknuts and steel washers. SEE FIGURE 4. steel washers 7. Attach footrest (410061) to ladder side rails using (2) provided 1/4-20 x 2-3/4” bolts, locknuts, steel washers and nylon spacers. SEE FIGURE 5. locknuts 8. a. Position the pre-assembled mesh seat/fabric rail mounts (360018) upside down on a sturdy, hard surface.
Operator's Manual Rivers Edge® One-Man Ladder Stands 9. Remove the locknuts from the (2) 1/4-20 x 2-1/4” bolts that were previously attached to the rear of the seat assembly. Continue by attaching the seat assembly to the ladder side rails using (2) provided 1/4-20 x 2-1/4” bolts, locknuts and nylon washers. SEE FIGURE 7. Make sure all (4) angle brackets are fully cradling fabric rails.
Operator's Manual Rivers Edge® One-Man Ladder Stands 14. Thread the non-locking 3/8-16 nut onto the threaded end of spacer rod all the way to the bottom of threads and slide 3/8” lock washer on. Insert the threaded end of spacer rod through either backrest mount tube far enough to be able to insert the opposite end of spacer rod (end with welded-on washer) into opposite backrest mount tube. Thread 3/8-16 nut back against mount tube. Using a 9/16” wrench, tighten nut until mesh backrest becomes taut.
Operator's Manual Rivers Edge® One-Man Ladder Stands Finished Oasis™ Ladder 19. a. Attach the stabilizer bar extension tube (1ML23) to the second ladder section mounting bracket using (1) provided spring lock pin. SEE FIGURE 14. b. Slide the stabilizer bar (L17) into the extension tube and attach the two pieces together using (1) provided spring lock pin. Spring lock pin must go through both the extension tube and stabilizer bar at appropriate hole to achieve desired distance from tree.
1 15 28 37 29 26 Operator's Manual20 19 Rivers Edge® One-Man Ladder Stands 14 36 28 21 RE627 Parts Explosion 22 33 33 28 37 14 29 26 27 36 19 23 20 27 28 28 7 10 33 26 30 8 21 24 25 5 35 27 32 27 24 27 32 26 15 10 25 30 3 1 9 12 28 30 13 26 30 8 4 27 18 11 28 6 7 25 5 1 9 12 30 26 4 34 18 17 2 31 16 34 17 2 Check for parts online at www.huntriversedge.
Operator's Manual Rivers Edge® One-Man Ladder Stands RE627 Parts List KEY # NO EXTENSIONS AVAILABLE FOR THIS MODEL. NEVER MODIFY OR EXCEED ORIGINAL STATED USE HEIGHT! KEY # 16 PART # DESCRIPTION 6Q 1 10347 SPACER NYLON 1/4 X 1 X 1/2 2 2 1ML23 TUBE, STABILIZER, SUPPORT 1 3 1ML40 BRACE, SUPPORT FLAT, TIMBER LADDERS 2 4 410024 BRACE SUPPORT 35.69" 2 5 410034 STEP LADDER 17" 6 410050 7 PART # DESCRIPTION QTY.
Operator's Manual Rivers Edge® One-Man Ladder Stands ASSEMBLY INSTRUCTIONS (RE628) Tools needed – two 7/16” wrenches, one 9/16" wrench IMPORTANT ASSEMBLY TIP: Do not tighten any nut and bolt combinations completely until all parts are assembled together! Finger tighten plus one turn of a wrench only! This will temporarily hold the lock nut on the bolt while helping alignment of all parts! After all parts are assembled together, all nut & bolt combinations must be completely tightened. 1.
Operator's Manual Rivers Edge® One-Man Ladder Stands 6. Attach the tree blade (410090) to the ladder side rails using (4) provided 1/4-20 x 2-1/4” bolts, locknuts and steel washers. SEE FIGURE 4. steel washers 7. Attach footrest (410092) to ladder side rails using (2) provided 1/4-20 x 2-3/4” bolts, locknuts, steel washers and nylon spacers. SEE FIGURE 5. locknuts 8. a. Position the pre-assembled mesh seat/fabric rail mounts (360019) upside down on a sturdy, hard surface.
Operator's Manual Rivers Edge® One-Man Ladder Stands 9. Remove the locknuts from the (2) 1/4-20 x 2-1/4” bolts that were previously attached to the rear of the seat assembly. Continue by attaching the seat assembly to the ladder side rails using (2) provided 1/4-20 x 2-1/4” bolts, locknuts and nylon washers. SEE FIGURE 7. Make sure all (4) angle brackets are fully cradling fabric rails. 10.
Operator's Manual Rivers Edge® One-Man Ladder Stands 15. Sections are assembled on the ground in the following order; bottom section (410066 3-step ladder); second section (410068 3-step ladder with stabilizer bar mount); third section (410069 3-step ladder w/ mounting holes); top section (assembled top platform section). SEE FINISHED 17’ JUMBO JACK LADDER. 16. With all sections assembled together on ground, secure all sections together using (6) provided spring lock pins.
Operator's Manual Rivers Edge® One-Man Ladder Stands Finished Jumbo Jack™ Ladder 19. a. Attach the stabilizer bar extension tube (1ML23) to the second ladder section mounting bracket using (1) provided spring lock pin. SEE FIGURE 14. b. Slide the stabilizer bar (L17) into the extension tube and attach the two pieces together using (1) provided spring lock pin. Spring lock pin must go through both the extension tube and stabilizer bar at appropriate hole to achieve desired distance from tree.
31 37 1 9 36 22 Operator's Manual 23 Rivers Edge® One-Man Ladder Stands 27 RE628 Parts Explosion 19 21 26 33 18 33 32 27 30 17 20 37 28 29 27 26 28 14 9 13 36 27 19 26 25 23 22 18 5 28 6 24 33 35 32 3 8 17 7 26 28 25 27 30 30 4 30 27 28 15 16 12 1 25 5 6 30 7 26 34 11 4 2 31 12 10 34 11 22 2 Check for parts online at www.huntriversedge.
Operator's Manual Rivers Edge® One-Man Ladder Stands RE628 Parts List NO EXTENSIONS AVAILABLE FOR THIS MODEL. NEVER MODIFY OR EXCEED ORIGINAL STATED USE HEIGHT! KEY # PART # DESCRIPTION KEY # PART # 25 48153B BOLT 1/4-20 X 2 HHCS GR5 BLK ZN DESCRIPTION QTY. 6 26 48240B BOLT 1/4-20 X 1-1/2 HHCS GR5 BLK ZN 16 27 48261B WASHER FLAT 1/4" BLACK 32 QTY.
Operator's Manual Rivers Edge® One-Man Ladder Stands ASSEMBLY INSTRUCTIONS (RE630) Tools needed – two 7/16” wrenches, Phillips screw driver IMPORTANT ASSEMBLY TIP: Do not tighten any nut and bolt combinations completely until all parts are assembled together! Finger tighten plus one turn of a wrench only! This will temporarily hold the lock nut on the bolt while helping alignment of all parts! After all parts are assembled together, all nut & bolt combinations must be completely tightened. 1.
Operator's Manual Rivers Edge® One-Man Ladder Stands 5. Attach the round tube, double flat braces (10343) to the upper ladder support tubes using (4) provided 1/4-20 x 1-1/2” bolts and locknuts. SEE FIGURE 4. One double flat brace should be positioned on each side of the upper ladder support tubes for clearance purposes. double flat braces 1/4-20 x 1-1/2" bolts locknuts 1/4-20 x 1-1/2" bolts 6.
Operator's Manual Rivers Edge® One-Man Ladder Stands Finished Relax™ Ladder 10. Attach the (2) provided 9” camo foam pads to the main side rails (armrests) by wrapping around tubing and attaching Velcro together. ratchet strap 11. a. Attach the stabilizer bar extension tube (1ML23) to the second ladder section mounting bracket using (1) provided spring lock pin. SEE FIGURE 7. b.
Operator's Manual Rivers Edge® One-Man Ladder Stands RE630 Parts Explosion 5 17 7 16 6 20 15 3 17 1 15 15 16 14 4 14 11 16 17 8 13 19 17 10 2 18 16 9 18 8 12 Check for parts online at www.huntriversedge.
Operator's Manual Rivers Edge® One-Man Ladder Stands RE630 Parts List NO EXTENSIONS AVAILABLE FOR THIS MODEL. NEVER MODIFY OR EXCEED ORIGINAL STATED USE HEIGHT! Maximum Height - 16' 1" to armrests Maximum Field Rating - 300 lbs. Tree Diameter Range - 12" to 20" KEY # PART # DESCRIPTION QTY. 1 10336 TUBE BRACE UPPER LADDER SUPPORT 2 2 10338 RAIL SIDE FLARED LADDER 40.48 IN 2 3 10340 WELDMENT PLATFORM 18 1/4 IN X 12 IN 1 4 10343 BRACE DOUBLE FLAT 21.
Operator's Manual Rivers Edge® One-Man Ladder Stands ASSEMBLY INSTRUCTIONS (RE631) Tools needed – two 7/16” wrenches, Phillips screw driver IMPORTANT ASSEMBLY TIP: Do not tighten any nut and bolt combinations completely until all parts are assembled together! Finger tighten plus one turn of a wrench only! This will temporarily hold the lock nut on the bolt while helping alignment of all parts! After all parts are assembled together, all nut and bolt combinations must be completely tightened. 1.
Operator's Manual Rivers Edge® One-Man Ladder Stands 5. Attach the round tube, double flat braces (10377) to the upper ladder support tubes using (4) provided 1/4-20 x 1-1/2” bolts and locknuts. SEE FIGURE 4. One double flat brace should be positioned on each side of the upper ladder support tubes for clearance purposes. 1/4-20 x 1-3/4" bolts shooting rail posts 6. Attach the bolt-on step (410034) to the front side of flared rails using (2) provided 1/4-20 x 2-1/4” bolts, locknuts and steel washers.
Operator's Manual Rivers Edge® One-Man Ladder Stands 10. Sections are assembled on the ground in the following order; bottom section (410044 base extension); second section (10468 3-step ladder); third section (10470 3-step ladder w/ stabilizer bar mount); fourth section (10468 3-step ladder); top section (assembled top platform section). SEE FINISHED RELAX WIDE LADDER. 11. With all sections assembled together on ground, secure all sections together using (8) provided spring lock pins.
Operator's Manual Rivers Edge® One-Man Ladder Stands Finished Relax™ Wide Ladder ratchet strap top section 15' tie-off ropes fourth section 9' stabilizer bar rope stabilizer bar spring lock pins third section stabilizer bar extension tube second section bottom section 32 Check for parts online at www.huntriversedge.
Operator's Manual Rivers Edge® One-Man Ladder Stands RE631 Parts explosion 5 17 18 21 24 15 8 9 3 2 19 20 21 4 1 19 19 20 17 7 17 13 20 21 16 10 20 6 22 23 12 11 22 10 14 Check for parts online at www.huntriversedge.
Operator's Manual Rivers Edge® One-Man Ladder Stands RE631 Parts List NO EXTENSIONS AVAILABLE FOR THIS MODEL. NEVER MODIFY OR EXCEED ORIGINAL STATED USE HEIGHT! Maximum Height - 16' 8" to shooting rail Maximum Field Rating - 300 lbs. Tree Diameter Range - 12" to 20" KEY # PART # DESCRIPTION QTY.
Operator's Manual Rivers Edge® One-Man Ladder Stands SETUP AND USE INSTRUCTIONS (for all Ladders included in This Manual) During installation and removal of ladder treestands, you must always and properly use the included Full Body Harness (Fall Arrest System). Refer to the Full Body Harness instructions included with this product for proper use. 1. With assembled product lying on the ground in assembled position, position one person at bottom end of ladder lying on the ground.
Operator's Manual Rivers Edge® One-Man Ladder Stands 3. With two people securely holding the ladder, use the three point contact climbing method to slowly climb the ladder and carefully keep a constant hand grip on the ladder at all times. Always lean forward, toward tree, to keep top section tree blades against the tree. Be certain ladder bottom is firmly seated on dry, level ground. Attach your harness tether to the tree before securing the platform to the tree and stepping onto platform.
Operator's Manual Rivers Edge® One-Man Ladder Stands BOLT IDENTIFICATION CHART Not all bolt sizes shown are included with all treestands. Bolts shown are for size reference only. Extra hardware may be included in the parts bag.
Operator's Manual Rivers Edge® One-Man Ladder Stands NOTES _______________________________________________________________________________________________________ _______________________________________________________________________________________________________ _______________________________________________________________________________________________________ _______________________________________________________________________________________________________ ____________________________________
Operator's Manual Rivers Edge® One-Man Ladder Stands NOTES _______________________________________________________________________________________________________ _______________________________________________________________________________________________________ _______________________________________________________________________________________________________ _______________________________________________________________________________________________________ ____________________________________
Rivers Edge® Treestands, Inc. 1160 Eighth Avenue, PO Box 755 Cumberland, WI 54829 800-450-EDGE (3343) | Fax 715-822-2124 Email: info@huntriversedge.com *All weights, specifications and features are approximate and are subject to change without notice. Due to continuous product improvements, product images may not be exact. Warning labels in some product images may have been removed for photography purposes only. Props shown in photos not included. Some assembly may be required.