
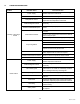
Troubleshooting guide


26
34-52 07/13
13 INITIAL STARTUP
13.1 Initial Startup Requirements
Installation should be complete prior to performing initial startup; and the startup must be complete prior to placing
the boiler into service. Starting the boiler without proper piping, combustion air, venting or electrical systems can
be dangerous and may void the product warranty. The following startup instructions should be followed precisely
in order to achieve safe and efficient operation to assure trouble-free service life.
WARNING: Start-up must be performed by a qualified technician. The Start-up Forms is included with each
product and must be furnished to the manufacture to register the warranty. Copies are available at
www.riversidehydronics.com. Failure to comply can cause property damage, personal injury and
exposure to hazardous materials or loss of life.
WARNING: Turn off all power to the boiler when servicing or accessing the blower drive. The blower drive
still has power when appliance switch is off. Failure to turn off all power to the boiler can cause personal
injury, property damage or loss of life.
13.2 Tools and Instrumentation Required
Stack Temperature Gauge
Stack Draft Gauge
Electronic Combustion Analyzer
Manometer for checking gas pressure (2 minimum)
AC/DC Multi-meter (with 20,000 OHM/Volt rating)
Amp Meter
Normal Hand Tools
13.3 Resources
Product Installation & Maintenance Manuals
Start-up Report with instructions
Local, State, & Federal Codes
Toll Free 24-Hour Technical Support: 1-800-433-5654
13.4 On Site Considerations
Electrical Supply in accordance with Nameplate Rating
Uncontaminated Combustion Air
Adequate Fuel Supply
Treated Water Supply (Boilers)
Consistent Draft
13.5 Startup Procedure
1 Carefully study the burner start-up information included in this manual.
2 Fill system tank with water. Some water appliances may be equipped with an optional air vent. If venting
through the safety valve when filling the appliance, insure gags or fixtures are removed from the safety valve
prior to start-up. Open the safety valve to allow air in the tank to escape.
3 Be sure all connections into the tank are tight, as leaks at tank fittings will damage the insulation.
4 CAUTION: Conduct the following gas train leakage test before start-up, at annual intervals and prior to
investigating the cause of any reported occurrences of delayed ignition.
a. Using an appropriate bubble detection solution, thoroughly coat all gas train pipe connections. If any
bubbles are detected, the leaking connection must be tightened, recoated, and rechecked to assure
stoppage of the leak.
b. Attach a manometer to measure the gas pressure at the manual gas shutoff valve located just upstream
of the gas train. Adjust gas train inlet pressure to the specified value (e.g. 14" W.C.), and tightly close the
gas train manual shutoff valve closest to the burner.