Mastermind GT User’s Manual RJM Music Technology, Inc.
Mastermind GT User’s Manual Version 1.4.1 1/21/2014 RJM Music Technology, Inc. 2525 Pioneer Ave. Suite 1 Vista, CA 92081 +1-760-597-9450 email: support@rjmmusic.com web: www.rjmmusic.
Copyright © 2012-2014 RJM Music Technology, Inc. All Rights Reserved RG-16, Amp Gizmo, Effect Gizmo, Rack Gizmo, Switch Gizmo, Mastermind, Mastermind GT and the RJM logo are trademarks of RJM Music Technology, Inc. All other trademarks are the property of their respective holders.
Table of Contents Table of Contents .............................................................................................................................................................................. v Introduction ........................................................................................................................................................................................ 1 Front Panel ...............................................................................
Setup Mode Reference ................................................................................................................................................................... 32 Button Selection ....................................................................................................................................................................................................32 Text Entry (Mastermind GT/10 and Mastermind GT/16)..................................................
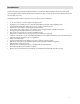
Introduction Thank you for purchasing the Mastermind GT MIDI foot controller! The Mastermind GT is the most technologically advanced MIDI controller available and has been designed to be able to control the most complex MIDI systems, but is also incredibly easy to use.
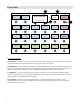
Front Panel 2 1 Loop 1 Loop 2 IA 000: Preset 000 Hold both to enter setup Mode Page IA Store 3 4 Loop 3 Loop 4 Loop 5 Loop 6 Loop 7 Bank Up Loop 8 Function 1 Function 2 Function 3 Function 4 Bank Down Preset 000 Preset 001 Preset 002 Preset 003 Preset 004 Preset 005 Front Panel Controls 1. Main Display – This is the main status display that shows the current preset and/or song name, preset number and other status information.
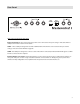
Rear Panel Rear Panel Connections (left side) Expression Pedals 1-4 – Up to four expression pedals can be connected to these ports using ¼” TRS cables. Refer to the Expression Pedals section for more details. USB A – This is a USB port designed for use with a USB flash drive. A flash drive can be used to back up or transfer settings, and is also used for firmware upgrades. USB B – This USB port is designed to connect to a PC or Mac.
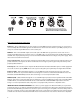
rnal Switches 3/4 Remote In MIDI Out Accessory Power Out 9VDC 100mA total mind GT Power Input Remote In MIDI Out 12VDC 2A Note: only phantom power this controller using approved devices! Please refer to the user’s manual. Rear Panel Connections (right side) Remote In – This is a MIDI input port. It can be used for receiving MIDI patch data, program changes or can be used to connect multiple Mastermind GTs together and allow them to control each other.
Basic Operation Right out of the box, the Mastermind GT is configured like a standard MIDI controller. The preset buttons are green and instant access buttons are blue. Buttons with other functions are indicated by color and text label. The Mastermind GT is configured to control a single Rack Gizmo (our flagship audio loop switcher / function switcher), and to send program change messages on MIDI channel 1.
Mastermind GT/22 default button configuration Loop 1 Loop 2 IA 000: Clean Mode Page IA Store Hold both for setup Loop 3 Loop 4 Loop 5 Loop 6 Loop 7 Bank Up Loop 8 Function 1 Function Function 3 Function 4 Bank Down Clean Blues Crunch Hi Gainer Smooth Lead Shred Fest 2 Presets and Banks The green buttons are preset selection buttons. These are typically used to send program change messages to effects processors and to turn on or off multiple loops on audio switchers.
By default, the Instant Access buttons are set up to control a Rack Gizmo, but they can be programmed to control pretty much any MIDI device, even more than one device at a time. Please refer to the Editing Buttons section for information on how this is done. Button Pages The Page / IA Store button allows you to switch between multiple pages of buttons.
Initial Setup - Adding a Device The first thing you’ll probably need to do with the Mastermind GT is to add a device. This informs the GT about what it’s connected to and what it needs to do to control that device. The Mastermind GT has an internal database of information about popular MIDI devices, so often times you might only need to select the device from a list and the Mastermind GT will do the rest of the setup for you.
Once a device slot is selected, you are taken to the Device Edit screen. Select the Type button in the upper left hand corner to set the type of this device. Edit Device 1 Type ??? Done Done Select You will be presented with a list of device manufacturers. Select your manufacturer from the list, then select the model of the device in the next list that is presented.
The Device Edit screen shows you the options available for your device: Type Rack Gizmo Name Rack Gizmo Edit Device 1 Rack Gizmo Done Next Page Done MIDI Ch 1 Assign Buttons Set Default Buttons Set Default Pedals Port MIDI Out Preset Offst 0 Max PC # 127 Bank Type MSB Max Bank # 2 Init PCs - None - Init PCs All 0 Init PCs Sequential CC On Prst Send PC SndRdunPC IgnorePCIn IgnoreCCIn Delete Off On Off Off Off Device (Please note that the screens will look different based on whi
Start Preset 1 End Preset 384 Get Preset Names Select an option Done Done Dest Preset 1 Start Start Preset and End Preset indicate the numbers of the starting and ending preset on your effect processor that will have their names copied. Dest Preset indicates the first of the presets on the Mastermind GT that will be renamed. Once you press the Start button, the Mastermind GT will query your device starting at the preset indicated by Start Preset.
Editing Buttons The basic device setup in the previous section is typically enough you get you started using a new device. However, you’ll probably want to change the button arrangement of the controller to your liking. On the Mastermind GT, any button can be set to perform any function, so be sure to take advantage of this ability! Swap Buttons The simplest way to rearrange buttons is to use the Swap Buttons function. This function simply swaps the location of two buttons.
Type Rack Gizmo Edit Device 1 Name Rack Gizmo Rack Gizmo Done Next Page Port MIDI Out Preset Offst 0 Done Next Page Done MIDI Ch 1 Assign Buttons Set Default Buttons Set Default Pedals Select You will be shown a list of parameters that are available on the device.
The Assign Buttons menu is designed to be a quick way to set up your buttons. To do more detailed editing, you can use the Edit Button menu, which is described next. Low Level Editing If you need more control over your buttons, you can edit the Actions assigned to each button. Button Actions are a list of things a button does when it’s pressed. This could be sending a MIDI message or changing a parameter or mode on the Mastermind GT itself. You can define up to 10 actions for each button.
You can continue this process, adding multiple Actions to a button. When a button has more than one Action defined, it will perform all of the Actions in the list, in order from left to right, top to bottom. So, if you wanted to, you could have a single button enable an effect on one processor, turn on several effect loops on a loop switcher, play a note on a synthesizer and start a sequencer! The various Action types and their parameters are described in more detail in the Action Edit section.
Editing Presets Each of the Mastermind GT’s 384 presets can send different MIDI Program Change messages to each of the connected devices, making it a quick way to switch from one sound to another. By default, the Mastermind GT sends consecutive program change numbers to each device. Selecting preset 1 sends program change 0 to each device, selecting preset 2 sends program change 1 to each device, preset 3 sends program change 2, etc.
Pressing any of the active device buttons brings you to the PC Edit menu: No Program Edit PC Message Effect Gizmo Preset 7: Shred Done Done - Program 7 + - Bank 0 + You can press the Program or Bank buttons to edit the program (PC) and bank numbers, or press the + or - buttons to adjust the numbers up or down. Pressing No Program will prevent the Mastermind GT from sending a program change to the device when loading this preset. Press the Done button when the numbers are set correctly.
Song and Setlist Mode For live performances, your Mastermind GT presets can be arranged into Songs and Setlists. Using this feature allows you to group presets by song and makes it easy to rearrange those songs for each performance. A Song is a group of presets – up to 16 of them – that are selected for use in a particular song. Each preset is typically chosen for the sounds needed in different parts of a song: intro, verse, chorus, bridge, solo, etc.
Free Gravy Bird Train Select a Song Done Next Page Done Owner of a High Tap Dance Slovakian Song Song Looney Heart Wattage Blues Rhapsody 7 8 The songs are displayed in purple to differentiate them from setlists (which are displayed in white) and presets (which are displayed in green). Select a song from the list, using the Next Page button if needed to get to other pages of songs. There are 252 songs available for you to edit.
Standard Short Set Set Select a Setlist Done Next Page Setlist 7 Setlist 8 Done Setlist 3 Setlist 4 Setlist 5 Setlist 6 Select one of the lists and the Setlist Edit menu will be displayed: Name 3:Owner of a Short Set Looney Heart Edit Setlist 2 Done Short Set Next Page Cancel 5:Tap Dance 6:Slovakian 2:Gravy 1:Free Blues Rhapsody Train Bird - NONE - - NONE - Just like you add presets to a song, you also add songs to a setlist by pressing one of the song buttons, then selecti
Expression Pedals The Mastermind GT has four ports that allow you to connect external expression pedals. An expression pedal can be used with MIDI-capable effects processors to provide real time control of different parameters: volume level, echo rate, etc. The Mastermind GT translates the position of the pedal to MIDI Continuous Controller messages and sends them out the MIDI Out port. The effects processor receives these messages and alters the effects accordingly.
Name Switch Grp Pedal 1 None Edit Exp Pedal 1 Done (Global) Next Page Done Calibrate Device 2 None Device CC Number Min Val Max Val Assign Mega FX 7 0 127 Pedal CC CC Num. 2 7 Min Val 2 0 Max Val 2 127 Assign Pedal CC 2 Set Switch Position Switch Actions The first time you connect a particular expression pedal to the Mastermind GT, you will first want to calibrate it.
To set this up, you first need to select which parameter you wish to control. If you’re using the expression pedal to control a wah effect, you would want to have the expression pedal switch control the effect processor’s “Wah” or “Wah On/Off” parameter.
The last step is to choose at what point in the pedal’s travel the switch happens. Move the pedal to that spot (typically not quite all the way down or not quite all the way up), then press Set Switch Position. The pedal position will be remembered and the selected function will switch on and off as you move the pedal up and down. Expression Pedal Grouping Having four expression pedals in front of you can make for a large pedalboard. To help alleviate this, we’ve added expression pedal grouping.
External Switches The Mastermind GT supports up to four external switches. These can be used to add switches to remote locations, to add different types of switches for specialized functions like tap tempo, or simply to increase the number of available switches. There are two external switch jacks on the rear of the Mastermind GT labeled “Switch 1/2” and “Switch 3/4". Each jack can take a single switch or a double switch with a TRS (tip-ring-sleeve) plug.
Remote Mode You can connect multiple Mastermind GTs together and have them operate in unison. Selecting a preset or pressing an Instant Access button on any controller will cause the other controllers to switch similarly. This is a great feature for both stage and studio - you can have multiple controllers at different locations on the stage, have an additional controller operated off-stage by a tech, or have controllers in both the studio and the control room.
External MIDI Control The Mastermind GT can also be controlled by an external MIDI device such as a computer, sequencer or other type of MIDI controller. To enable this feature, set the MIDI Rx Ch parameter in the MIDI Settings Menu to the desired MIDI channel. Any bank or Program Change messages received through the Remote In or USB B ports on this channel will cause a preset change on the Mastermind GT.
Other Special Features Global Preset The global preset, if enabled, is an additional preset that can be accessed from any other preset simply by pressing the currently selected preset button again. This is typically used to set up a preset that is your “standard” or “go-to” guitar sound that’s always accessible, no matter what bank of presets you’re currently using. To enable the global preset, enter Setup Mode and press the Preset 2nd (preset 2nd press) option. Set it to “Global”.
Loading and Saving Settings to a USB Flash Drive The Mastermind GT allows you to load and save settings to a USB flash drive. You can use this feature to back up settings, transfer settings from one Mastermind GT to another GT, or to transfer settings to or from a computer. The drive is plugged into the USB A port on the rear panel. Loading and saving are done from the System Menu. To get there, hold both soft buttons under the display. When the setup menu appears, select System Functions.
Connecting to a Computer In addition to the USB flash drive support, the Mastermind GT’s USB B port allows you to connect your controller to a PC or Mac with a USB port. The Mastermind GT is a class-compliant USB MIDI device, which means it doesn’t need additional driver software. The Mastermind GT will appear as another MIDI device in your system, and will work with any MIDI-enabled programs you’re using.
Upgrading Firmware The Mastermind GT is designed to be easily upgraded by the user. Firmware updates will be periodically made available on the RJM Music website. These updates will add support for more devices and add other new features. The firmware upgrade process is simple: first, download the upgrade file from the RJM Music website using your PC or Mac. Copy the downloaded file to a USB flash drive. All RJM firmware files end in the extension “.
Setup Mode Reference Setup mode allows you to configure all aspects of the Mastermind GT, from the MIDI messages it sends to the way information is displayed on the screens. To enter setup mode, press and hold the two soft buttons located under the main display. After about 2 seconds, the display will change, indicating you’re in setup mode. In Setup Mode, the footswitch buttons switch from their normal functions to become a menu for selecting setup options.
Loop 1 Loop 2 Button Select IA Viewing button page 1 Next Page Mode Page IA Store Done Loop 3 Loop 4 Loop 5 Loop 6 Loop 7 Bank Up Loop 8 Function 1 Function 2 Function 3 Function 4 Bank Down Preset 000 Preset 001 Preset 002 Preset 003 Preset 004 Preset 005 Text Entry (Mastermind GT/10 and Mastermind GT/16) When editing names and other text, the Mastermind GT/10 and Mastermind GT/16 display the following menu: CAPS Clear Edit Button Name Shred Fest Done Done <- Delete Cursor
Number Entry (Mastermind GT/10 and Mastermind GT/16) When editing numbers, the Mastermind GT/10 and Mastermind GT/16 display the following menu: Edit CC Number 64 Done Done -100 +100 -10 +10 -1 +1 You can adjust the number using the minus / plus value buttons in the bottom row. Press Done when you’ve finished editing the number. The number will be saved and you’ll be returned to the previous menu.
The letters are placed in groups of two or three. Pressing a letter button will select the first (leftmost) letter, and pressing the button again quickly will move to the next letter. For example, pressing the OPQ button once will place an “O” on the screen. Pressing it again quickly will change the “O” to a “P”. Pressing it a third time will change the “P” to a “Q”. If you press another letter or wait about 1.5 seconds, the letter will be accepted and you will move to the next letter position.
Main Menu The first menu you see upon entering Setup Mode allows you to configure some system options as well as access submenus to edit devices, buttons and presets. Current Pg. – Sets the currently visible button page. This is useful if you accidentally find yourself on a page that doesn’t have a Page Select button defined. Set List – Pressing this button allows you to select which setlist is active, and enables Song and Setlist Mode. When set to “All Songs”, all 252 songs will be used as your setlist.
Pdl Group – This button selects the grouping of expression pedals. Pedal grouping allows you to switch your expression pedal to control different parameters. You can have expression pedal 1 send the messages assigned to pedal 2, 3 or 4 with the press of a button. The default value is None, which indicates no grouping. Other possible values are [1 2] 3 4, [1 2 3] 4, [1 2 3 4], [1 2] [3 4]. Please refer to the Expression Pedal Grouping section for more details.
Edit Device Menu Type – Sets the type of device that is in this slot. The menu first prompts you for the device manufacturer, then the device model. If your device is not listed here, you can use the Generic setting, which will allow you to manually configure parameters. Name – Allows you to edit the name shown for this device. MIDI Ch – Sets the MIDI channel for this device. This number needs to be the same as the channel that is set on the device itself.
Init PCs All 0 – Initializes all presets for this device. Selecting this option will initialize all presets on the Mastermind GT to send program change number 0 to this device. Init PCs Sequential – Initializes all presets for this device. Selecting this option will initialize all presets on the Mastermind GT to send a sequential program change number to the device. Preset #0 will send program change #0, preset #1 will send program change #1, etc. This is the default setting for a new device.
Type – Selects the type of this button.
Upd On Prst (Update on preset change) – When set to “Off”, this button only changes state when it receives a MIDI message from the device it is associated with, or when the button is pressed. When set to “On”, the button can also change state when a new preset is selected. Typically, this is always turned on, but with certain devices like the Axe-Fx it should be turned off. Tempo – When set to “On”, this button is marked as a tap tempo button. These buttons flash with the currently set tempo.
The last of the three buttons is not active when editing a Note action. System System actions are further defined by the Function parameter. The possible settings for Function, and their parameters are as follows: Page The Page function makes the Mastermind GT switch to a particular button page when this button is tapped. Page # - Selects the page number that should become visible when this button is pressed. Tuner The Tuner function turns on the tuner display when this button is selected.
switch is activated. See “Set Switch Position” below for more information on the pedal switch feature. Also see the Edit Buttons section for more information on button groups. Calibrate – Enters pedal calibration. You are asked to move the pedal all the way up and all the way down. This insures that the pedal will work optimally with the Mastermind GT. Press the Done soft button when you are finished. This parameter is only available when editing the global pedal parameters from the Main Menu.
corresponding to that preset. This parameter defaults to “None”, which means that the Mastermind GT will not respond to incoming bank or program change messages. Bank=Song – This setting affects what MIDI bank and Program Change messages do in Song and Setlist mode. Please refer to the External MIDI Control section for more details. MIDI Bidir – Turns bidirectional MIDI support on or off for the 7-pin DIN MIDI ports.
Specifications Dimensions Weight Power GT/10: 19.4 (W) x 8.1 (D) x 3.25 (H) inches / 49.3 x 20.6 x 8.3 cm GT/16: 19.4 (W) x 11.1 (D) x 3.25 (H) inches / 49.3 x 28.2 x 8.3 cm GT/22: 19.4 (W) x 14.1 (D) x 3.25 (H) inches / 49.3 x 35.8 x 8.3 cm GT/10: 6 lbs / 2.7 kg GT/16: 8 lbs / 3.6 kg GT/22: 10 lbs / 4.5 kg GT/10: 12V DC @ 700mA GT/16: 12V DC @ 1000mA GT/22: 12V DC @ 1500mA 5.5mm OD, 2.1mm ID x 9.
The “+” pins correspond to pin 4 and the “-“ pins correspond to pin 5 on a standard MIDI connector. The recommended mating connectors are Neutrik part number NC6MXX for the XLR Remote in and NC6FXX for the XLR MIDI Out.
Mastermind GT MIDI Implementation Chart MIDI Implementation Chart v 2.0 (Page 1 of 3) Manufacturer: RJM Music Technology, Inc. Model: Mastermind GT Version: 3 Date: January 21, 2014 Transmit/Export Recognize/Import Remarks 1.
MIDI Implementation Chart v 2.0 (Page 2 of 3) Manufacturer: RJM Music Technology, Inc.
MIDI Implementation Chart v 2.0 (Page 3 of 3) Manufacturer: RJM Music Technology, Inc.