DriverConnect Application User Manual Software Version 3.
Table of Contents: How Do I…? How Do I… About DriverConnect ................................................. 5 Terminology .............................................................................. 6 Set Up DriverConnect ................................................ 7 Get Started with a New Account .................................................. 7 Connect a New Account to an ELD 50 ......................................... 10 Connect a New Account to a DC 200 ...................................
Table of Contents: How Do I…? View a Log .............................................................................. 40 Edit a Log................................................................................ 41 Certify a Log............................................................................ 43 Accept or Reject an Edited Log .................................................. 44 Send a Log ..............................................................................
Table of Contents: How Do I…? Use Workflows ......................................................................... 77 Change My Settings................................................. 80 Change My Rule Set and Exemptions .......................................... 81 Change My Trip Information ...................................................... 86 View My Account Information .................................................... 87 Manage Subscription Levels...........................................
About This Guide About DriverConnect DriverConnect is an integrated platform that consists of the DriverConnect app installed on an Android™based device (a tablet or a smartphone), a cloudbased web portal, and a Rand McNally ELD. The ELD automatically gathers data as you drive, and sends the data to your Android™ device or tablet over Bluetooth®. DriverConnect uses an internet connection (cellular or Wi-Fi™) from your Android™ device to store that data in a cloud-based online account.
About This Guide Terminology These terms are used throughout this guide: ELD is short for Electronic Logging Device. An ELD connects directly to your truck and send information over Bluetooth® to your Android™ device or tablet. Your ELD refers to the specific Rand McNally ELD installed in your vehicle, such as the ELD 50 or DC 200. Your Android™ Device means the Android™-based smartphone or tablet on which you have installed and use the DriverConnect app. HOS means your Hours of Service.
Set My Duty Status Set Up DriverConnect To set up the DriverConnect app for the first time, you need to either create a new account, or log in with an existing Driver ID. Get Started with a New Account Use these instructions if you: Have a Rand McNally ELD 50 in your vehicle and powered on. Do not have a Driver ID or a Company ID assigned to you by your organization. (If you do, see page 14 to log in.) Have Bluetooth® enabled on your Android™ device (to link with your ELD).
Set My Duty Status Enter Your Company and Account Details 1. When you open DriverConnect for the first time, tap SIGN UP. 2. Read the setup information and tap CONTINUE. 3. Enter your Company DOT Number in the Company DOT# field and tap NEXT. If the Company DOT number is found in our system, it means that your company has already set up a DriverConnect account. Please contact the DOT administrator in your fleet, or a Rand McNally customer service representative at 1-877-446-4863.
Set My Duty Status 4. Enter your company’s information and tap NEXT. 5. Enter your personal information, and select the checkbox to agree to the terms and conditions. Tap CREATE ACCOUNT. The Welcome page displays, showing your Company Code and Driver ID. You will need these to log in next time. These are also sent to the email that you have entered. You’ll also use this email address and password to log into the DriverConnect portal. 6. Tap CONTINUE. Next, connect your account with your ELD 50.
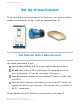
Set My Duty Status Connect a New Account to an ELD 50 After creating your new account, you need to complete three tasks to connect it to your ELD 50: Pair Your Android™ device to the ELD 50 Confirm your 30-day free trial Complete Setup You need to finish all of these steps in order. Pair Your Android™ Device to the ELD 50 1. On the First things first screen, tap CONTINUE. 2. Tap SETUP DEVICE to connect your Android™ device with your ELD.
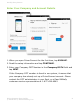
Set My Duty Status 3. Tap the serial number of the ELD 50 you are going to use. If you don’t see it listed, make sure it is powered on, and tap Scan Again. If you still don’t see it listed, view the Troubleshooting section on page 90. Your Android™ device will now connect to the ELD via BlueTooth®, connect to the DriverConnect cloud service, and register the ELD to your company. 4. Once connected, your Android™ device will display “Connected to:” followed by the ELD serial number. Tap Continue.
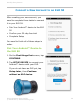
Set My Duty Status Confirm Free Trial The ELD 50 includes a complimentary 30-day free trial of the Core plan. See page 88 for information on the different plan types. 5. Tap START 30 DAY FREE TRIAL to continue. To purchase a subscription plan, visit the DriverConnect portal at https://driverconnect.randmcnally.com. Complete Setup 6. On the Configuration screen, select a rule set and time zone, enter your tractor and trailer number, and select a fuel type to use for this tractor.
Set My Duty Status Connect a New Account to a DC 200 To connect a new account to a DC 200, you need to call a Rand McNally support agent at: 1-877-446-4863 The agent will assist you in setting up the DC 200. If you have a DC 200 and have already been assigned a Company Code, a Driver ID, and a Password see Get Started with an Existing Driver ID on page 14. DC 200 DriverConnect User Guide © 2016-2017, Rand McNally, Inc.
Set My Duty Status Connect a New Account to a DC 200 S To connect a new account to a DC 200 S tap on signup button on DriverConnect app and register a fleet as shown in page 9. Then search for the DC 200 S and pair with it as shown in page 11. This will register the DC 200 S serial number to the fleet. You can confirm the free trial and complete the setup as shown in page 12 or buy a subscription plan from the DriverConnect portal.
Set My Duty Status Get Started with an Existing Driver ID Use these instructions if you already have a Company Code, Driver ID, and Password. You will also need your ELD’s serial number. To set up your account, your Android™ device needs to have: Bluetooth® enabled (to link with your ELD) An active WiFi™ or cellular internet connection (to validate the ELD is registered to your account) Log In 1. When you open DriverConnect for the first time, tap LOGIN. 2.
Set My Duty Status Connect Your Android™ Device to Your ELD 3. Tap SETUP DEVICE to connect your Android™ device with your ELD. If you do not have an ELD yet, tap Setup Later, then Continue without an ELD. 4. Tap the serial number of the ELD you are going to use. Your Android™ device will now connect to the ELD via BlueTooth®, connect to the DriverConnect cloud service, and validate that the ELD is registered to your company. DriverConnect User Guide © 2016-2017, Rand McNally, Inc.
Set My Duty Status 5. Once connected, your Android™ device will display “Connected to:” followed by the ELD serial number. Tap CONTINUE. Complete Setup 6. On the Configuration screen, select a rule set and time zone, enter your tractor and trailer number, and select a fuel type to use for this tractor. 7. (Optional) Enter your driver’s license information in the Driver’s License Info section. 8. Tap DONE, LET’S GET STARTED to complete the setup and view your Dashboard.
Set My Duty Status Connect to a New ELD Sometimes, you may need to connect your Android™ device with a different ELD. This is common if you drive different trucks in the same fleet, and switch from one to another. 1. Make sure that Bluetooth® is enabled on your Android™ device, the ELD is powered on, and you are in range. 2. Login first on your Android™ device, and then tap Connect to a device (on the Dashboard). 3. Tap CONNECT. 4. Select the new ELD from the list. 5.
Set My Duty Status Retrieve a Forgotten Password/Company ID If you forget your password or your company code and you cannot log in from the Login screen, follow these steps. You will need access to the email address linked with your account. 1. Tap Forgot Password? Or Forgot Company ID? On the Login screen. 2. Enter your email address, and tap SEND. 3. Once the confirmation page displays, follow the directions in the email you receive. 4. Tap CONTINUE to close the confirmation page and log in.
Set My Duty Status Update Device Firmware Sometimes, your ELD will need to be updated after you download a new version of the DriverConnect app. This process happens automatically when the app reconnects with the ELD. IMPORTANT: Do NOT disconnect power from either the Android™ device OR the ELD or turn off Bluetooth® during this time. Once the update is complete, you can continue using the app normally. DriverConnect User Guide © 2016-2017, Rand McNally, Inc.
Set My Duty Status Get Around the DriverConnect App Use the Dashboard 1. Main Menu Tap to access the main functions of DriverConnect. See page 25. 2. Alerts Tap to view driving alerts. Page 60. 3. Connection Status Shows connection status of Android™ device and ELD. 4. Timers Show the time left in your work and break cycles. 5. Log / DVIR Shows a log graph and current DVIR summary, with links for editing. Page 39. 6. Rule Sets Show your current rule set and exemptions. Page 81. 7.
Set My Duty Status Dashboard Details Events The Events icon in the upper right corner of the Dashboard displays a notification when you have an alert or a driving event. Events include hard braking, speeding, and idle time. See Page 60. Connection Status The status on the left shows if your Android™ device has a Bluetooth® connection to your ELD.
Set My Duty Status More Dashboard Details Timers Tap the WORK TIMERS and BREAK TIMERS links, or swipe left and right, to switch between views. Work Timers show how much drive time and work time you have left for today, and for the rest of your drive cycle. The graphs automatically update based on your rule set (page 81). Break Timers show how much time you have left on your break, in your splits, and until your restarts. DriverConnect User Guide © 2016-2017, Rand McNally, Inc.
Set My Duty Status More Dashboard Details Log / DVIR Tap the LOGBOOK and DVIR links, or swipe left and right, to switch between tabs. The LOGBOOK tab displays a summary graph of your HOS. The DVIR tab shows a summary of your most recent DVIR. Tap the Details link on either tab to view details. A red exclamation mark (!) next to one of these categories means there is a logbook violation. DriverConnect User Guide © 2016-2017, Rand McNally, Inc.
Set My Duty Status More Dashboard Details Rule Sets This section shows your current rule set and exemptions. Tap to display a detailed view. See page 81 for details on changing your rule set and exemptions. Status Buttons Tap to change your duty status. See Page 27, Set My Duty Status. Your current status displays in color. Inactive statuses are grayed out. DriverConnect User Guide © 2016-2017, Rand McNally, Inc.
Set My Duty Status Use the Main Menu Dashboard: Tap to return to the Dashboard. See page 20. Inspection Mode: Create reports and send them to a LEO. Page 62. DVIR: Create and send DVIRs. Page 53. Logbook: View, edit, certify, and send your logs. See page 39. Fuel Purchase: Log a fuel purchase. Page 48. Gauges: View real-time driving gauges. Page 33. Messaging: Send and receive messages, forms, and workflows. A red icon shows if you have new messages. Page 68. Settings: Change your settings. Page 80.
Set My Duty Status Change Views The DriverConnect app supports both portrait and landscape views. The view changes automatically when you rotate your Android™ device. You may need to enable Screen Rotation in your device’s settings first. 1. Dashboard in Portrait view 2. Dashboard in Landscape view Note: Most screens in this guide are in Portrait view. DriverConnect User Guide © 2016-2017, Rand McNally, Inc.
Set My Duty Status Download Buffered Data If your ELD becomes disconnected from your Android™ device at any time, the ELD will continue collecting driving information. When the ELD reestablishes a connection with your Android™ device, an Uploading Data messages displays. During this, the DriverConnect app is downloading buffered data recorded in the ELD while the connection was lost. After the download is complete, DriverConnect syncs the data and updates your driving logs automatically.
Set My Duty Status Set My Status DriverConnect tracks your status to the minute for accurate reporting of four statuses: Off Duty (OFF) Sleeper Berth (SB) Driving (D) On Duty (ON) Your current status displays in color. When you start driving, you status automatically changes to Driving (D) when you are connected to an ELD. If you use DriverConnect without a connected ELD, then you must Tap D to manually enter Driving status. See page 32 for more information.
Set My Duty Status Go On Duty To go On Duty, you must choose a Rule Set, and list a tractor number, at a minimum. You can also set a trailer number, a Bill of Lading (BOL), and complete a DVIR. A green check ( ) shows completed steps. 1. From the Dashboard, tap the ON icon in the bottom duty status bar. 2. Verify your rule set. Tap Rule Set to make changes. 3. Select a new rule set, and any exemptions/exceptions that apply. See page 81 for more information on rule sets and exemptions. 4.
Set My Duty Status 5. Verify your Tractor number. Tap Trip Info to make changes. 6. Tap to enter a new Trip Name, Tractor Number, a Trailer Number (optional), and one or more BOLs (optional). You can enter up to 5 Bills of Lading per trip. 7. Tap SAVE, then the back arrow to return to the Change Status screen. 8. Tap DVIR. 9. Complete the DVIR (see Page 53), and tap the back arrow. 10. Tap Change to go On Duty. When you are On Duty, the ON icon turns blue on the Dashboard.
Set My Duty Status Notes on Trip Info The Trip Info page allows you to manually enter a Trip name, Tractor Number, and Trailer Number, as well as up to 5 Bills of Lading (BOLs). Generally, the Tractor Number, Trailer Number, and BOL are assigned by dispatch. You can define your own Trip Name When you change your trip name, DriverConnect makes a new trip entry. All of your mileage and status changes will be stored under that trip name, until you change it and go to On Duty using a different trip name.
Set My Duty Status Log Driving Time When you start driving, you automatically enter Driving (D) status when connected to an ELD. Since DriverConnect uses minute-byminute data for the most accurate drive time logs, your status switches between Driving and On Duty automatically. When the truck first reaches a set threshold speed after going On Duty, your status automatically changes to Driving (D). Once you stop for 3 seconds, you can change your status from Driving to any other status.
Set My Duty Status View Vehicle Gauges DriverConnect provides several gauges that provide real-time information about your vehicle. Gauges measure speed, fuel economy, temperatures, pressure, and more. To view gauges: 1. In the Main Menu, tap Gauges. 2. Your remaining driving time displays by the steering wheel icon. 3. Swipe to the right or the left to alternate between the two available screens. DriverConnect User Guide © 2016-2017, Rand McNally, Inc.
Set My Duty Status Log Sleeper Berth Time To log time in the Sleeper Berth, you must stop the truck and enter Sleeper Berth (SB) status. 1. Tap the SB status icon in the bottom duty status bar. 2. Enter a location and a note, if necessary. 3. Tap Change. Your available drive and work time is automatically calculated when you enter SB status, based on the Rule Set you are using. DriverConnect User Guide © 2016-2017, Rand McNally, Inc.
Set My Duty Status Go Off Duty When you are finished with your day, or are taking a break, you can manually change your duty status to Off Duty. DriverConnect does not automatically change to Off Duty status. 1. From the Dashboard, tap the OFF icon in the bottom duty status bar. 2. Tap DVIR, and complete the post trip report. See Page 53 for instructions. You cannot edit the Rule Set, Trip Info, or DVIR information when you change to Off Duty status. 3.
Set My Duty Status Complete a Yard Move Use Yard Move mode when you will be driving the truck inside your company’s lot or a warehouse yard. 1. From the Dashboard, tap the ON icon in the bottom duty status bar. 2. On the Change Status screen, tap the Yard Move slider to ON (it switches from gray to blue). 3. Enter a location and a note, if necessary. 4. Tap Change. When on a Yard move, your logbook displays your On Duty time in a dotted line with the letters YM (see below).
Set My Duty Status To stay On Duty and to exit Yard Move mode: 1. Tap ON again. 2. On the Change Status screen, de-select Yard Move. 3. Update notes. 4. Tap CHANGE. Completing a yard move counts as On Duty time, but does not count toward your driving time. Your fleet manager may set limits on using yard moves. DriverConnect User Guide © 2016-2017, Rand McNally, Inc.
Set My Duty Status Use the Truck for Personal Conveyance Use Personal Conveyance, or “Line 5,” mode when you will be driving your truck off duty for personal reasons. 1. From the Dashboard, tap the OFF icon in the bottom duty status bar. 2. Complete a Post Trip DVIR if you are going from On Duty to Off Duty and will be driving the truck immediately. See Page 53. 3. On the Change Status screen, tap the Personal Conveyance slider to ON (it switches from gray to blue). 4.
Manage My Logbook Manage My Logbook DriverConnect automatically maintains 14 days of logs for the hours you are On Duty, Driving, in the Sleeper Berth, and Off Duty. Driving time is logged automatically as you drive. Time for other statuses must be entered manually. See page 27. Your logs can be viewed, edited, certified, and sent from the Logbook. To access the Logbook: 1. Tap the Main Menu. 2. Tap Logbook. On the Logbook screen: Links display to certify your logs (page 43) and send your logs (page 46).
Manage My Logbook View a Log 1. Scroll through the Logbook to find the log you want to view. 2. Tap the date to show the log graph. 3. Tap the graph to view the Log Detail screen. The Log Detail screen displays: The Day and Date at the top. A summary of your HOS, displayed in both hours per category and in a graph. A summary count, and list, of any violations. Details of each status change, including status, times, location, and notes. A plus sign icon, used to add your HOS (see page 41).
Manage My Logbook Edit a Log You can edit a log that has not yet been certified from the Log Detail screen. To access the Log Detail screen, see page 40. Once you are in the Log Detail screen, you can make your edits. Logbook edits work by adding new duty status entries for a time frame you define. These new entries overwrite and replace your existing entries. Only On Duty, Off Duty, and Sleeper Berth time can be edited. You cannot edit (add new or overwrite existing) driving time. To edit a log: 1.
Manage My Logbook 2. Define a time frame for your new entry. You can do this in two ways: Tap and hold the sliders to drag the beginning and ending times to create a new time frame; or Tap the Time fields, and edit the entries directly in the clock. 3. If you tap the time fields to enter a time manually, then tap SELECT TIME to confirm the time frame and return to the New Duty Status screen. 4. Tap a status icon for the new time frame. 5. Enter a location and a note, if needed. 6. Tap SAVE.
Manage My Logbook Certify a Log 1. From the Logbook, tap Certify Logs. 2. Check the log(s) you want to certify. You have to start with the oldest log. As you select it, the nextoldest log becomes available, and so on, until the previous day. 3. Tap CERTIFY. 4. Type your name to sign the log, and tap SUBMIT. You must have an active internet connection to certify a log. Also, once you certify a log, you can’t edit it. Your fleet manager can edit it on the portal.
Manage My Logbook Accept or Reject an Edited Log Your Fleet Manager has the ability to edit your logs from the DriverConnect portal, if necessary, and then send the edited log back for you to accept or reject. Only uncertified logs can be edited on the portal. Only On Duty, Off Duty, and Sleeper Berth time can be edited. Your Fleet Manager cannot edit (add new or overwrite existing) driving time.
Manage My Logbook 3. On the Logbook Detail screen, the Edited tab shows the proposed changes, and the Original tab shows your original entries. HOS entries that were added or modified display with an orange tab to the left of the entry. 4. Review the changes that were made to the log. Tap ACCEPT to accept the changes, or REJECT to reject them. 5. On the Accept/Reject Log Edits screen, type a reason or a comment for accepting/rejecting the logs edits, and tap Accept or Reject.
Manage My Logbook Send a Log You can send your logs to your fleet manager as an email attachment. See the example on page 66. For this function to work, your Android™ device needs to have a working email client set up, and an active internet connection. 1. From the Logbook, tap Send Logs. 2. Check the log(s) you want to send in the Send Logs screen. You have to start with the oldest log. As you select it, the next-oldest log becomes available to select, and so on. 3. Tap SEND. 4.
Manage My Logbook 5. In the Send mail… pop-up, tap the app you use to send email (for example, Gmail). The system will now to process and attach the logs to an email. Please allow up to a few minutes for this to complete. 6. In your email program, double-check that: The recipient email address is correct The reports file (called HOS.pdf) is attached. You can see an example on the next page. The Driver and Company in the subject line are correct 7. Type a message, if needed. 8. Send the email.
Manage My Logbook See an Example of a Sent (Emailed) Log DriverConnect User Guide © 2016-2017, Rand McNally, Inc.
Manage Fuel Purchases Manage Fuel Purchases DriverConnect lets you manage your fuel purchases. You can add, view, edit, and delete purchases from the Fuel Purchase screen. To access the Fuel Purchase screen, tap Fuel Purchase from the Main Menu. On this screen, you can select a Fuel Purchase by tapping on a check box. You can also check the Select All checkbox to select all purchases. This checkbox changes to Select None when everything is selected. DriverConnect User Guide © 2016-2017, Rand McNally, Inc.
Manage Fuel Purchases Add a Fuel Purchase 1. Tap the on the Fuel Purchase screen to add a new purchase. 2. Enter all of the information on the form. Some information may be pre-populated. You need to scroll down to see the entire page. 3. Tap Upload to add a picture of the receipt. 4. Choose a picture from these options: Take Picture to take a new picture of your receipt. Choose From Gallery to select a picture you have already taken. 5. Tap SAVE to save the purchase record.
Manage Fuel Purchases View and Edit a Fuel Purchase To view a purchase: From the Fuel Purchase page, tap an existing fuel purchase. The record of the purchase displays on the Add Receipt page. To edit a purchase: 1. Tap in any field to make changes. 2. To upload a new receipt image, tap Change. You need to scroll down to see the entire page. 3. Tap SAVE to save your changes. DriverConnect User Guide © 2016-2017, Rand McNally, Inc.
Manage Fuel Purchases Delete a Fuel Purchase 1. Select the checkbox by one or more purchases you want to delete. Tap Select All to select all fuel purchases. 2. Tap DELETE. The selected record is removed from your fuel purchases list. Note that once you delete a fuel purchase, you cannot recover it. DriverConnect User Guide © 2016-2017, Rand McNally, Inc.
Complete a DVIR Complete a DVIR When going On Duty (see page 29) or Off Duty (see page 35), you should complete a Driver-Vehicle Inspection Report, or DVIR. You can complete a DVIR at any time, though. A DVIR lets you log and track defects in your tractor, trailer, or both. You can also state if defects are bad enough to make the vehicle unsafe to drive. DriverConnect User Guide © 2016-2017, Rand McNally, Inc.
Complete a DVIR DVIR Home From the Main Menu, tap DVIR to access the DVIR home screen. The DVIR home screen shows a list of previous DVIRs. Each list entry shows: The date and time it was created The tractor and trailer number for the DVIR Colored text to indicate the status of the DVIR: Red marks a vehicle as unsafe to drive (see page 59) Green marks a vehicle as safe to drive, or as no defects present From this screen, you can: 1.
Complete a DVIR Create a New DVIR To create a new DVIR: From the Main Menu, or when going On Duty or Off Duty, tap DVIR, then tap the button. The Create New DVIR screen displays. To complete a DVIR: 1. Tap to enter the Tractor Number and Trailer Number (if applicable) of the vehicle you are inspecting. Enter Defects 2. If there are defects to report, tap the Tractor Defects and/or Trailer Defects down arrows to select the checkboxes for any and all defects. Tap the arrow again to collapse the list.
Complete a DVIR 3. If you record a defect, and the vehicle can be operated safely, check the Vehicle can be operated safely… checkbox. If the vehicle CANNOT be operated safely, do NOT check this box 4. Tap YES to confirm that you can use the vehicle safely. If you do not check the Vehicle can be operated safely… checkbox, then the DVIR will display with a red warning on the DVIR home screen. You will need to certify the defect has been repaired (page 59) before continuing. .
Complete a DVIR Enter Comments and Pictures 5. Tap Enter your comments to type out an explanation of what you are reporting, if needed. 6. Tap Upload to upload or take up to 3 pictures to document the defect. Select Take Picture to take a new picture using your Android™ device’s camera Select Choose From Gallery to select an existing picture Tap the X on the picture to discard it. 7. Tap Driver Name to enter your name. 8. Tap SAVE. Once you tap SAVE, you cannot edit a DVIR.
Complete a DVIR View a DVIR Tap in the row of a DVIR report on the DVIR home screen to view a DVIR. The View DVIR screen shows a read-only entry of a DVIR. If the DVIR has defects that have not been certified as repaired yet, the screen name changes to Certify Defects and the CERTIFY DEFECTS button displays. See page 59. DriverConnect User Guide © 2016-2017, Rand McNally, Inc.
Complete a DVIR Certify Defects DVIRs that mark a vehicle as unsafe show a red warning on the DVIR home screen. These are DVIRs in which the Vehicle can be operated safely… checkbox was NOT checked. DVIRs that mark a vehicle as unsafe must be certified as fixed by your mechanic. 1. On the DVIR home screen, tap the DVIR to view it. 2. Tap CERTIFY DEFECTS. 3. Tap CONFIRM. 4. The mechanic must type his/her name, and tap SUBMIT. The DVIR is then timestamped with the date and time it was fixed.
Complete a DVIR View Alerts The Alerts screen shows a list of daily alerts that have been triggered. View Driving Events You Fleet Manager can set thresholds to trigger alerts for the following driving actions: Hard Braking: A decrease in speed in a sudden deceleration (measured in a decrease in MPH/s). Idling: The number of seconds a vehicle is running (ignition on) before moving. Speeding: Your speed (in miles per hour). Tap the Alerts icon in the upper right corner of the Dashboard.
Complete a DVIR View Vehicle Faults If your ELD records any vehicle faults, they display on the VEHICLE FAULTS page. These are also sent to the DriverConnect portal. Tap the Alerts icon in the upper right corner of the Dashboard. The Alerts page displays. Tap VEHICLE FAULTS to see a listing of your vehicle’s recorded faults. DriverConnect User Guide © 2016-2017, Rand McNally, Inc.
Use Inspection Mode Use Inspection Mode When you need to show your logs to a Law Enforcement Officer (LEO) during a roadside inspection, you can use Inspection Mode. To enter Inspection Mode, select Inspection Mode from the Main Menu. In Inspection Mode, you can show your logs to a LEO during the inspection, and also email a .PDF report of your logs. 1. Tap START INSPECTION to begin an inspection. 2. Tap GENERATE REPORT to create an emailed report to send to a LEO.
Use Inspection Mode Start an Inspection 1. In inspection Mode, tap START INSPECTION to begin. 2. Tap the day icons on the Log Report page to view each day. 3. DVIRs for the current day display in a section on the bottom of the screen. 4. Tap the back button to exit Inspection Mode. You need to enter your password to exit Inspection Mode. 5. On the Password Required page, enter your password and tap CONTINUE. DriverConnect User Guide © 2016-2017, Rand McNally, Inc.
Use Inspection Mode Generate a Report 1. Once you are in Inspection Mode, tap Generate Report to create a report to share with an LEO. 2. Type the email address that will receive the reports, and tap SEND. 3. In the Send mail… pop-up, tap the app you use to send email. The system will now to process and attach the logs to an email. Please allow up to a few minutes for this to complete. DriverConnect User Guide © 2016-2017, Rand McNally, Inc.
Use Inspection Mode 4. In your email program (for example, Gmail), doublecheck that: The LEO’s email address is correct The reports file (called HOS_DVIR_REPORT.pdf) is attached. You can see an example on the next page. The Driver and Company in the subject line are correct 5. Type a message, if needed. 6. Send the email. After the email is sent, the Inspection Mode screen displays again. The report contains 8 days of driving logs and DVIRs. You can see sample reports on the next two pages.
Use Inspection Mode See a Sample Inspection Report, Log Page DriverConnect User Guide © 2016-2017, Rand McNally, Inc.
Use Inspection Mode See a Sample Inspection Report, DVIR Page DriverConnect User Guide © 2016-2017, Rand McNally, Inc.
Send Messages, Forms, and Workflows Send Messages, Forms, and Workflows DriverConnect lets you communicate with your fleet manager and fellow drivers from the Messaging screen. This feature works a lot like texting. Messages in DriverConnect can’t be seen in another messaging app. You can also send and receive forms using the DriverConnect Messaging function. Forms can be sent for you to fill out. You can send completed forms back to your fleet manager.
Send Messages, Forms, and Workflows Send and Receive Messages The Chats tab in the Messaging screen shows active conversations you have with your team. 1. When someone in your organization sends you a message, a blue notification displays by that contact’s name in the Chats tab. 2. Tap the contact’s name to open a chat window. 3. Tap the Write a message… area to open the keyboard and type a message. 4. Tap the icon to send the message. 5. Messages you sent display in blue.
Send Messages, Forms, and Workflows View Contacts Your contacts list is a list of the available people in your organization that you can send and receive messages from. Contacts are managed by your fleet manager. 1. Tap the Contacts tab in the Messaging screen to view your contacts. 2. Tap the name of a contact to open a chat screen. A blue dot by a contact’s name shows if the contact is online.
Send Messages, Forms, and Workflows Set Up and Use a Message Group Group messages work like individual messages, and allow you to communicate with multiple people at one time. To create a new group: 1. In the Chats tab of the Messaging screen, tap New Group. 2. Type a name for the new group, and tap Next. 3. Tap the to add participants to the group. Participants need to be selected from your Contacts list. DriverConnect User Guide © 2016-2017, Rand McNally, Inc.
Send Messages, Forms, and Workflows 4. Check the box by a contact to add them to the group. 5. Tap DONE. The Add Participants screen displays again, with everyone in the group (so far) displayed on the screen. You can repeat this process to add more contacts. 6. When your group list is complete, tap CREATE. 7. To send messages to your group, use the chat functions normally. Messages you send will go to everyone in the group. Anyone in the group can send a message that also goes to the whole group.
Send Messages, Forms, and Workflows Edit a Message Group You can edit a messaging group by adding or deleting group members, changing the group name, or deleting the group entirely. Add or Delete Group Members 1. Tap the group in the Chats screen, then tap the Group Settings icon ( ). 2. In the Group Settings screen, tap to add participants to the group. 3. Tap Remove next to a group member’s name to delete that member. DriverConnect User Guide © 2016-2017, Rand McNally, Inc.
Send Messages, Forms, and Workflows Change the Group Name 1. In the Group Settings screen, tap the 2. Edit the name, and tap icon to edit the group. to save it. The new group name displays. Delete a Group 3. In the Group Settings screen, tap the icon to edit the group. 4. Tap DELETE GROUP. 5. Tap YES to confirm the delete. DriverConnect User Guide © 2016-2017, Rand McNally, Inc.
Send Messages, Forms, and Workflows Use Forms This feature is only available in the DriverConnect Core Plan. Forms are structured means of communication between drivers, or between a fleet manager and a driver. Forms allow for all of the necessary information in certain situations to be communicated all at once, instead of having to go back and forth over several messages. 1. When you receive a form, the message displays “FORM” above it. 2. Tap the arrow to view the form.
Send Messages, Forms, and Workflows To send a form: 4. Tap when you type a message, and select Form. 5. Select a form from the Form Type dropdown. 6. Complete the form. 7. Tap SEND. DriverConnect User Guide © 2016-2017, Rand McNally, Inc.
Send Messages, Forms, and Workflows Use Workflows This feature is only available in the DriverConnect Core Plan. Your fleet manager has the ability to send you workflows. Workflows are a series of forms that can be created by the fleet manager and sent to a driver. This is a sequence of steps that a driver needs to follow. The status of each step is tracked. Workflows appear in the Workflow tab of the Messaging screen. 1.
Send Messages, Forms, and Workflows The first task to complete displays with a blue bar down the left side. 4. Tap anywhere in the first task. 5. Fill out the form, and tap SEND. 6. The first task displays “Completed” with a green bar and an “Actual” time stamp. If there is another task, it is now active and displays the blue bar. Repeat these three steps for each form included in the workflow. If the workflow has one form, you will only need to do this once.
Send Messages, Forms, and Workflows 7. Once all of the tasks are marked “Completed,” tap Finish workflow. When you finish your workflow: 8. The status changes from “Started” to “Finished.” Also: Your fleet manager is notified once the workflow is completed. The finished workflow remains visible in the Workflow tab until you receive another one. You can tap anywhere in each completed task to see a read-only copy of that completed form. DriverConnect User Guide © 2016-2017, Rand McNally, Inc.
Change My Settings Change My Settings You can change your personal information and (in some cases) your rule set and exemptions. To access these sections, tap Settings from the Main Menu. My Account Shows information about your company, yourself, and your subscription. See page 87. Trip Info Allows you to enter information about your trip. See page 86. Help Displays a list of available support channels. See page 90.
Change My Settings Change My Rule Set and Exemptions In some cases, your rule set and exemptions are set by your fleet manager and cannot be changed in DriverConnect. If you are able to change it, you will see the Rule Set option available in the Change Status screen when you go On Duty. To make changes: 1. Tap Rule Set on the Change Status screen. 2. Select a new rule set from the dropdown menu. 3. If you will be using an exemption, tap the Choose Exemptions radio button. 4.
Change My Settings Available Rule Sets and Exemptions New rule sets and exemptions are added to DriverConnect frequently, and will be listed in the dropdown menu when the DriverConnect app is updated. Rule Sets: USA 8/70 and 7/60 Canada Cycle 1 Alaska California (CA) Intrastate Florida 8/80 and 7/70 Intrastate Illinois New York Oregon 8/80 and 7/70 Intrastate Texas (TX) Intrastate Wisconsin 8/80 and 7/70 Intrastate Washington DriverConnect User Guide © 2016-2017, Rand McNally, Inc.
Change My Settings Exemptions: Rule Set Available Exemptions USA 8/70 Passenger carrying USA 7/60 Oilfield and gas operations Construction material & equipment Motion picture Non-Commercial operators Exceptions: Adverse driving condition 100-air mile exception (Short Haul) Alaska 8/80 Passenger Carrying Alaska 7/70 Exceptions: (Intrastate) Adverse conditions 100-air mile exception (Short Haul) California (CA) Intrastate Passenger carrying Oil and Gas Construction Mat
Change My Settings Rule Set Available Exemptions Florida 8/80 Passenger Carrying Florida 7/70 Exceptions: (Intrastate) Adverse conditions 150 Air Mile Radius Illinois 7/70 Passenger Carrying (Intrastate) Agricultural Operations New York Tow Truck Operations (Intrastate) Utility Vehicle Agricultural Operations Oregon 8/80 Passenger Carrying Oregon 7/70 Exceptions: (Intrastate) Adverse conditions Non-commercial operators Texas (TX) Intrastate Passenger carrying
Change My Settings Rule Set Available Exemptions Wisconsin 8/80 Passenger Carrying Wisconsin 7/70 Exceptions: (Intrastate) DriverConnect User Guide © 2016-2017, Rand McNally, Inc.
Change My Settings Change My Trip Information Before you drive, you can set information about your vehicle and your cargo. The Trip Info setting allows you to set your Tractor Number, Trailer Number, and up to 5 Bills of Lading (BOL). You can change this information at any time. 1. Tap Trip Info from the Settings screen. 2. Enter information into the fields, as needed. 3. Tap SAVE. DriverConnect User Guide © 2016-2017, Rand McNally, Inc.
Change My Settings View My Account Information In the Settings screen, tap My Account to view your information: 1. Information about your company displays on the Company Info tab. Only fleet managers can edit this information. 2. Information about you displays on the Driver Info tab. You can edit your profile in the DriverConnect Portal. Tap EDIT to change your Driver’s License information. See below. 3.
Change My Settings Change Driver’s License Information On the Driver Info tab, you can edit your Driver’s License information. 1. Tap EDIT in the Driver’s License Info section. 2. Make changes on the Edit License Info page. 3. Tap SAVE. DriverConnect User Guide © 2016-2017, Rand McNally, Inc.
Change My Settings Manage Subscription Levels There are two subscription levels for DriverConnect: Compliance and Core. The following table lists the features of each plan.
Find Help Find Help Troubleshoot Common Problems DriverConnect App I do not have an ELD yet. Can I still use the DriverConnect app? Yes! In the setup process, you will need to tap Setup Later, and then tap Continue without an ELD device. You can use still use some features of the DriverConnect app. ELD 50 My ELD 50 and the DriverConnect app on my Android™ device do not pair using Bluetooth®. How do I fix this? Please power off and power on the ELD 50 and Android™ device.
Find Help Please power off and power on the DC 200 and Android™ device. If you’re still unable to pair, uninstall the Rand McNally DriverConnect app from the application manager (available by tapping settings icon), and then reinstall it. (Uninstalling the app will result in loss of data.) The DC 200 is unable to establish an internet connection during setup. The DC 200 establishes a cellular connection. Make sure that the DC 200 is not obstructed, and that you are within range of a cell tower.
Find Help Tell Rand Contact Rand McNally Support: From the DriverConnect App: Tap the Main Menu button, and then tap Settings. Tap the Tell Rand link Type your message and tap SEND. By phone: Call 1-877-446-4863 By email: Send a message to DriverConnectSupport@randmcnally.com On the web: Visit www.randmcnally.com/eld-50-support DriverConnect User Guide © 2016-2017, Rand McNally, Inc.
Index Account Information, 88 Hour of Service, 24, 40 Alerts, 61 Inspection Mode, 63 Driving Events, 61 Vehicle Faults, 62 Sample Report, 67, 68 LEO, 63 Bill of Lading, 31, 87 Log In, 15 Buffered Data, 28 Log Out, 26 Dashboard, 22, 23, 24, 25 Logbook, 24, 40 DC 200, 14, 91 Driving, 33, 34 Driving Events, 61 Duty Status, 25, 29 Driving, 33 Line 5, 39 Off Duty, 36 On Duty, 30 Personal Conveyance, 39 Sleeper Berth, 35 Yard Move, 37 DVIR, 24, 54, 55 Certify Defects, 60 New, 56 Post-Trip, 36 Pre-Tr
FCC Compliance Statement This device complies with part 15 of the FCC rules. Operation is subject to the following two conditions: (1) this device may not cause harmful interference, and (2) this device must accept any interference received, including interference that may cause undesired operation. This equipment has been tested and found to comply with the limits for a Class B digital device, pursuant to part 15 of the FCC rules.
This product and the software incorporated in it and related documentation are furnished under license and may be used only in accordance with this license agreement. Except as permitted by such license, the contents of this product and software may not be disclosed to third parties, copied or duplicated in any form, in whole or in part, without the prior written permission of Rand McNally. This product and software contain proprietary and confidential information of Rand McNally and its licensors.
DriverConnect and the DriverConnect Logo ©2017 Rand McNally. All rights reserved. Rand McNally and the Rand McNally globe logo are registered trademarks of RM Acquisition, LLC d/b/a Rand McNally. DriverConnect User Guide © 2016-2017, Rand McNally, Inc.
DriverConnect DriverConnect User Guide v0.1 © 2016 Rand McNally, Inc.