
User`s guide

User's Guide HDSP MADI © RME
43
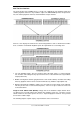
As shown it is very easy to set up a specific submix for whatever output: select output channel,
set up fader and pans of inputs and playbacks – ready!
For advanced users sometimes it makes sense to work without Submix View.
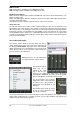
Example: you want to see and set up some channels of different submixes
simultaneously, without the need to change between them all the time. Switch
off the Submix View by a click on the green button. Now the black routing
fields below the faders no longer show the same entry (1+2), but completely
different ones. The fader and pan position is the one of the individually shown
routing destination.
In playback channel 1 (middle row), labelled Out 1, click onto the routing field
below the label. A list pops up, showing a checkmark in front of '1+2' and
'63+64'. So currently playback channel 1 is sent to these two routing destina-
tions. Click onto '7+8'. The list disappears, the routing field no longer shows
'1+2', but '7+8'. Now move the fader with the mouse. As soon as the fader
value is unequal m.a., the present state is being stored and routing is
activated. Move the fader button to around 0 dB. The present gain value is
displayed below the fader in green letters.
In the lower row, on channel 7, you can see the level of what you are hearing
from output 7. The level meter of the hardware output shows the outgoing
level. Click into the area above the fader and drag the mouse in order to set
the panorama, in this case the routing between channels 7 and 8. The present
pan value is also being displayed below the fader.
Please carry out the same steps for Out 2 now, in order to route it to output 8
as well.
In short: While editing the Submix 7+8 you have direct access to other
submixes on other channels, because their routing fields are set to different
destinations. And you get a direct view of how their faders and panoramas are
set up.
This kind of visual presentation is very powerful, but for many users hard
to understand, and requires a deep understanding of complex routing
visualizations. Therefore we usually recommend to work in Submix View.
Often signals are stereo, i. e. a pair of two channels. It is therefore helpful to
be able to make the routing settings for two channels at once. Hold down the
Ctrl-key and click into the routing field of Out 3. The routing list pops up with a
checkmark at '3+4'. Select '7+8'. Now, Out 4 has already been set to '7+8' as
well.
When you want to set the fader to exactly 0 dB, this can be difficult, depending
on the mouse configuration. Move the fader close to the 0 position and now
press the Shift-key. This activates the fine mode, which stretches the mouse
movements by a factor of 8. In this mode, a gain setting accurate to 0.1 dB is
no problem at all.
Please set Out 4 to a gain of around -20 dB and the pan close to center. Now
click onto the routing field. You'll now see three checkmarks, at '3+4', '7+8' and
'63+64'. Click onto '61+62'. The window disappears, fader and pan jump to
their initial values, the signal can now be routed to the outputs 61 and 62. You
can continue like this until all entries have got a checkmark, i. e. you can send
the signal to all outputs simultaneously.