
User Manual


OWNER S MANUAL
,
OBD2 Car Scanner
7
CHECK
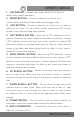
1. LCD DISPLAY
-- Indicates test results. Backlit, 128 x 64 pixel
display with contrast adjustment.
2.
ENTER BUTTON
-- Confirms a selection (or action) from
a menu. Starts recording live data under manual trigger mode.
3.
ESC BUTTON
-- Cancels a selection (or action) from a menu or
returns to the menu. It is also used to setup system, exit DTC Lookup
screen, or stop data recording when pressed.
4.
LEFT SCROLL BUTTON
-- When look up DTC definitions, moves to
previous character and views additional information on previous screens
if DTC definition covers more than one screen; deselect all marked PID
data when viewing or recording customized live data list; views previous
frames of recorded data when playing back live data. It is also used to
update DTC library when pressed.
5.
RIGHT SCROLL BUTTON
-- When look up DTC definitions, moves
to next character and view additional information on next screens if DTC
definition covers more than one screen; selects/deselects PID data when
viewing or recording customized live data list, and views next frames of
data when playing back live data.
6.
UP SCROLL BUTTON
-- Moves up throug h menu and submenu
items in menu mode. When more than one screen of data is retrieved,
moves up throug h the current screen to the previous screens for additional
data.
7. DOWN SCROLL BUTTON
-- Moves down throug h menu and
submenu items in menu mode. When more than one screen of data
is retrieved, moves down throug h the current screen to next screens
for additional data. It is also used as the language setup hotkey when
pressed.
8.
POWER SWITCH
-- Turns on/off the scan tool when powered by
cell battery; resets the scanner when powered by vehicle battery.
9. OBD II CONNECTOR
-- Connects the scan tool to the vehicle’s
Data Link Connector (DLC).