USER MANUAL 1
CONTENT 1. Safety Precautions and Warnings------------------------------------------------1 2. Using the Auto Computer----------------------------------------------------------2 2.1 Tool Descri ptions------------------------------------------------------------------- 2 2.2 Specifications-------------------------------------------------------------------------2 2.3 Accessories Included--------------------------------------------------------------3 2.
1. Safety Precautions and Warnings To prevent personal injury or damage to vehicles and/or the auto computer, read this instruction manual first and observe the following safety precautions at a minimum whenever working on a vehicle: ● Always keep attentive while driving. ● DO NOT try to make any adjustments while driving. ● DO NOT mount the auto computer in a position which can obstruct the view of the driver.
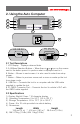
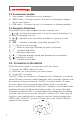
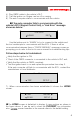
2. Using the Auto Computer 4 5 7 2 3 6 1 9 8 10 2.1 Tool Descriptions 1. LCD Display – Displays retrieved data. 2.3.4.5Menu Selection Buttons -- When there is or icon on the screen next to the button,press it to perform what is displayed next to it. 6. Button -- Moves to next screen; it is also used to enter time setup screen. 7. Button -- Return to previous screen,exit a menu or wake up the tool from sleep mode. 8.
2.3 Accessories Included 1). User manual -- Instructions on tool operations 2). OBD2 cable -- Provides power to tool and communicates between the tool and vehicle. 3). USB cable -- Connects the tool to a computer for software updates. 2.4 Navigation Characters Characters used to help navigate the auto computer are: 1). or” -- Indicates the button next to it can be used and presses it to do what is displayed next to it. 2). or -- Indicates more information available on previous or next screens. 3).
4). Plug OBD2 cable to the vehicle's DLC. 5). Turn the ignition on. Engine can be off or running. 6). The auto computer starts to communicate with the vehicle. ●If the auto computer fails to communicate with the vehicle’s ECU (Engine Control Unit), a “Link Error” message shows as below: Link Error! AGAIN EXIT Use the button next to "AGAIN" to try to connect to the vehicle,and the tool re-attempts to communicate with the ECU.
3.Trip Computer The auto computer records information about CURRENT, TODAY,TOTAL and TANK tri ps. 3.1 Current Trip:(Home>Tri p>current) ">" means to press the button next to " " or" ". Displayed data are as follows: 1. Maximum Speed (Unit: KHM) 2. Average Speed (Unit: KH ) 3. Current speed (Unit: KPH) 4. Driving Time (Unit: __:__) 5. Driving Distance (Unit: KM) 6. Fuel Used (Unit:L) 7. Tri p Fuel Economy (Unit: LK ) 8. Current fuel economy (Unit: LPH) 9.
3.2 Today Trip:(Home>Tri p>Today) The Today trip shows the following items: 1. Maximum Speed (Unit: KHM) 2. Average Speed (Unit: KH ) 3. Driving Time (Unit: __:__) 4. Driving Distance (Unit: KM ) 5. Tri p Fuel Economy (Unit: LK ) 6. Time fuel economy (Unit: LH ) 7. Fule Used (Unit: L) 1).Press the upper left button next to TRIP from home screen. TRIP SCAN GAUGE SETUP 2).Press the button next to "TODAY" to enter today tri p screen CURRENT TANK TODAY TOTAL 3).
2).Press the button next to "TANK" to enter tank tri p screen CURRENT TANK TODAY TOTAL 3).View detailed tri p information on the screen. 0.0 LH 1.8L 25 LK 400 KM ●Use the upper four buttons next to any of the items or use lower-left button to view additional data on next screen(s). if you want to return or got to the previous page. please press the lower-rig ht button. 3.4 Total Trip:(Home>Tri p>Total) The Total trip shows the following items: 1. Maximum Speed (Unit: KHM) 2.
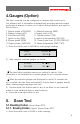
4.Gauges (Option) The auto computer can be configured to measure and monitor up to four different sets of information simultaneously,providing real-time engine performance analysis to allow you to adjust driving behavior and improve fuel economy. 1. Vehicle speed (KPH/MPH) 2. Manifold pressure (MAP) 3. Battery voltage (VLT) 4. Engine load (LOD) 5. Fuel Pressure (FPR) 6. Throttle position (TPS) 7. Ignition timing (IGN) 8. Intake air temperature (FIA/CIA) 9. Engine speed (RPM) 10.
TRIP SCAN GAUGE SETUP 2). Press the button next to DTC to view codes. DTC FRZD I/M VIN If no codes are found,the screen will show "No Codes Found!"” 3). If more than one code is detected,use the button next to and to view previous or next codes. P1430 ERASE 1/6 If a pending code is detected,a "Pd" icon appears. P2033 Pd ERASE 3/5 4). To erase codes,use the button next to ERASE. P0335 Pd 3/5 ERASE 5). A warning message comes up asking for your confirmation. Erase Codes ? YES NO 6).
CAUTION: Erasing the Diagnostic Trouble Codes may allow the tri p computer to delete not only the codes from the vehicle's on-board computer,but also "Freeze Frame" data and manufacturer enhanced data. Further,I/M Readiness Monitor Status for all vehicle monitors are reset to Not- Ready or Not-Complete status. Do not erase the codes before the system has been checked completely by a technician. 9).Press the lower-rig ht button return preivous menu. 5.2.
3). Use the upper four buttons next to any of the items or use lower-left button to view additional data on next screen(s). 4). Press lower-rig ht button to exit. 5.3 Reading Freeze Frame Data (Home>Scan>FRZD) 1). To view freeze frame data,press the button next FRZD. DTC FRZD 2). Use the button next to and I/M VIN to view previous or next PID data. FUELSYS1 OL-Drive If there is no freeze frame data available,a "No FRZD" message shows on the screen. Press BACK or wait a few seconds to return. 3).
6. CBB-Car Black Box(Home>>CBB) (">>" means to press the lower-left button) The tool is able to save up to 300 hours of driving data.
00:00 Over Limitied Speed Number of times of hard brake, Number of times of extreme deleration during tri p Hard Brakes: 0 Ext. Brakes: 0 Number of times of hard acceleration Number of times of extreme acceleration during tri p Hard Acl: Ext. Acl: 0 0 Average Fuel Consumption and Average Speed AVG LHK AVG KPH: 12 50 5). Press the lower-rig ht button,it returns to the previous screen. 7. Setup (Home> Setup) The auto computer allows you to make following adjustments and settings: 1).
another vehicle and return it back to original one, or if the unit is reset to factory settings. 7.1 Fuel (Home>Setup>Fuel) 1). Press the button next to FUEL to enter fuel setup menu. FUEL SIZE ENGINE UNITS 2). Use the button on the upper left or upper rig ht to select the fuel type your vehicle uses. GAS Fuel Type SAVE •There are DIESELa, DIESELb, HYBRID, GAS, LPG fules types to choose as different cars.DIESELa and DIESELb do not refer to different types of diesel fuel.
FUEL ENGINE SIZE UNITS 2). Use the button next to“" -”" or "“+”" to change engine size,and press SAVE button.,then it returns the "Setup" Menu 2.4 LITRES ENGINE + SAVE 7.4 Units of Measure (Home> Setup> Units) Press the button next to UNITS to change units of measure. FUEL ENGINE SIZE UNITS 7.4.1. System Units. 1). Use the left button to choose the "SYSTEM" Menu after entering the Units Menu. SYSTEM POWER 2).
8. Tool Information Tool information includes the follows, 1). Record: The Tri p Recorder.(please see the previous item 6.) 2). Time: Changes time displayed by the auto computer. 3). FILLUP: Used to refuel the vehicle every time 4). Rate: Sets sampling and recording rate. 5). Speed: Adjust and limit the speed 6). Display: Sets contrast,display mode and home screen of the tool. 7). About: The version and conversion. 8).
time when your vehicle is refueled. Make sure the tank size and the fuel type are properly set before use this function. 1). Fill the tank in gas station and let the pump shut off automatically. 2). Press the button next to FILLUP,and press SAVE without adjusting the indicated fuel on the first after connecting the trip computer to the vehicle. CBB FILLUP TIME RATE 3). Drive your vehicle normally with the auto computer connected. 4).
2). Press the button next to RATE. SMP RATE REC RATE 3). To change system management processor rate, press the button next to SMP RATE. NORMAL SMP Rate SAV 4). Use the upper-left and upper-rig ht button to select a sampling rate between NORMAL and SLOW,and press SAVE button to save the setup. it returns to RATE Menu. NORMAL is the factory default rate. If this causes some updates to be ski pped or irregular operation,SLOW should be used. 5). To change recording rate,press the button next to REC RATE.
3). Use the button next to "“-”" or “"+"” to adjust in 1% step till the adjustment factor reaches the computed percentage,and press SAVE button. 80 10% 89 + SAVE The lower-left number is the speed reported by the vehicle. The lower right number is the speed which is displayed by the auto computer by applying this correction. A. To set the speed accurately,you need a handheld GPS.
5). Use upper left or rig ht button to adjust the speed in 1% step till the lower rig ht figure agrees with the indicated distance and press SAVE. 60 5% 63 + SAVE The adjustment does not affect the vehicle speedometer or odometer readings,but the auto computer indicated speed and distance only. To Set Speed Limit(Home>> >> speed>Limited) To make the TIME OVER SPEED data in RECORD valid,you need to set a speed limit for the vehicle being tested. 1). Use the button next to LIMITED. ADJUST LIMITED 2).
2 ITEMS Tri p Mode SAVE 2). Use the upper left or upper rig ht button to change between "2 ITEMS" and "4 ITEMS",and press SAVE. and return to Display menu. ●X ITEMS indicates how many items are displayed in one screen when viewing tri p information. B. Enter Home Menu 1). To change the display of home screen,press the button next to HOME. MENU Home Page Save 2).
SPEED ABOUT DISPLAY DEFAULT 2).Use the button next to ABOUT. VERSION CONVERSION 3). Press the button next to VERSION to view software version on screen. Version 1.0 2008 TurboGauge 4). Press the lower-rig ht button to exit. 5).To look up unit conversions,press the button next to CONVERSION. VERSION CONVERSION 6). View the conversion results on screen. 1 Mile=1.61Km 1Km=0.621Mile 8.8 Default (Home>> >> Default) 1).
GAUGE ABBREVIATIONS CLSD LP Fuel system loop status OPEN LP (loop closed or open) SCAN ABBREVIATIONS MIL Malfunction Indicator Lamp Status MIS Misfire Monitoring FIA CIA Intake-Air-Temperature FWT CWT Water Temperature FUEL Fuel System Monitoring FPR Fuel-Pressure CCM Comprehensive Component Monitoring GPH Gallons-per-Hour CAT Catalyst Monitoring LPH Liters-per-Hour HCAT Heated Catalyst Monitoring IGN Ignition Timing EVAP Evaporative System Monitoring LOD Engine Loading AIR Sec
No Item Current Trip 1 Maximum Speed 2 Average Speed 3 Current speed 4 Driving Time 5 Driving Distance 6 Fuel Used 7 Trip Fuel Economy 8 Current fuel economy 9 Distance to Empty Today Trip 1 Maximum Speed 2 Average Speed 3 Driving Time 4 Driving Distance 5 Trip Fuel Economy 6 Time fuel economy 7 Fuel Used Tank Trip 1 Fuel used since last fill-up 2 Distance driven since last fill-up 3 Distance remaining before tank is empty 4 Time Driven since last fill-up 5 Time remaining before tank is empty 6 Trip fuel
10.Warranty and Service 10.1 Limited One Year Warranty TurboGauge warrants to its customers that this product will be free from all defects in materials and workmanshi p for a period of one (1) year from the date of the original purchase,subject to the following terms and conditions: 1). The sole responsibility of TurboGauge under the Warranty is limited to either the repair or,at the option of TurboGauge,replacement of the auto computer at no charge with Proof of Purchase.