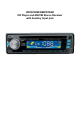
VRCD100M/RMCD100M CD Player and AM/FM Stereo Receiver with Auxilary Input jack
Welcome! Dear Customer, CONGRATULATIONS. The VRCD100M/RMCD100M Compact Disc Player and AM/FM Stereo Receiver with AUX Input Jack, when used as described, will give you years of dependable service in your car, truck, RV, or mini-van. We have taken numerous measures in quality control to ensure that your product arrives in top condition and will perform to your satisfaction.
Precautions This unit will only play the following discs. Type of disc Label on the disc CD • Do not attempt to modify the unit. Recorded material Size of disc Audio only 12 cm • Do not operate in extremely high or low temperatures. The temperature inside the vehicle should be between 32º F (0º C) and 100º F (37º C) before turning on your unit. • Modifying the unit will void the warranty. • Stop the vehicle before carrying out any operation that could interfere with your driving.
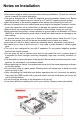
Notes on Installation • Disconnect negative battery terminal before starting installation. Consult the vehicle’s owner’s manual for proper instruction. • The unit is designed for a 12 Volt DC negative ground operation system only. Before installing the unit, make sure your vehicle is a 12 Volt DC negative ground system. • Mark the polarity of the existing speaker wires before disconnecting the old unit. • Be sure to connect the color coded leads according to the diagram.
Before You Install Automotive audio equipment installations can be troublesome at times, even to the most experienced of installation technicians. If you are not confident working with electrical wiring, removing and reinstalling interior panels, carpeting, dashboards or other components of your vehicle, please call our toll-free help line 1-800-445-1797 and our in-house technical service team will answer your installation questions.
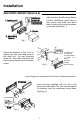
Installation DIN FRONT-MOUNT (Method A) After inserting the Mounting Sleeve into the dashboard, select tabs on top, bottom, and sides, then bend them to secure the mounting sleeve in the dash board.(Fig. 1) Fig. 1 Follow the diagram in Fig. 2 for installing the rear mounting strap to the head unit. The rear mounting strap will help keep the head unit from moving around inside the dashboard. Fig. 2 1. Dashboard 2. Nut (5mm) 3. Spring washer 4. Screw (5 x 25mm) 5. Screw 6. Strap 7.
Installation DIN REAR-MOUNT (Method B) Installation using the screw holes on both sides of the unit. 1. Screw holes on the side of the unit. 2. Screws. Use either truss screws (5 x 8mm) or flush surface screws (4 x 8mm), depending on the shape of the screw holes in the bracket. 3. Vehicle’s Factory Mounting Bracket 4. Dashboard or Console 5 Hook (Remove this part) Note: The mounting sleeve, outer trim ring, and the mounting strap are not used for this method of installation.
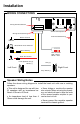
Installation WIRING CONNECTIONS Wiring Harness Socket Antenna Receptacle Wiring Harness & Plug Antenna Cable & Plug Black: Ground Blue/White: Auto-Antenna 5A 1A Yellow: Battery RCA Line Out Red = Right White = Left Red: ACC Power Front Speaker Out (L) Grey (+) White (+) Left Front Right Front Grey / Black (-) White / Black (-) Speaker Wiring Notes Follow the above wiring diagram to install the head unit with new or existing speakers.
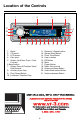
Location of the Controls 2 1 21 VOL+ 20 SEL 19 3 CD PLAYER / AM/FM STEREO RECEIVER 4 VRCD100M / RMCD100M 5 6 7 VOL- 18 17 16 15 14 1. 2. 3. 4. 5. Reset CD portal LCD screen Disc eject Station Up & Next Track / Fast Forward 6. Band button 7. Station Down & Previous Track / Fast Reverse 8. Auxiliary Input Jack 9. Play/ Pause Button 10. Loudness / Random Play 13 12 11 10 11. 12. 13. 14. 15. 16. 17. 18. 19. 20. 21.
Basic Operation 1. Turning the Unit On / Off Press the power button to turn the unit on, press the POWER button again to turn the unit off. 4. Balance Press SEL Button until the display shows “BAL”, then use the VOL +/- Buttons to adjust the volume balance between the left & right speakers. 2. Mode Selection Press the BAND Button to select Radio Mode. Press the Play / Pause Button to when there is a CD in the unit to start playing the CD.
Radio Operation 1. Choose A Radio Band Press the BAND Button anytime to access the radio function. The unit has one FM Band and one AM Band. Each press of the Band Button will change the radio from one Band to the other. 4. Intro Press the MO / INT Button to play the first 10 seconds of each track. Press this button again to when you find the track you wish to play. 5. Repeat Press the LOC / RPT Button to repeat the same track continuously. “RPT” will appear on the display.
Simple Troubleshooting Guide PROBLEM CAUSE/SOLUTION No Power Check wiring connections. Check and make sure the fuse is not blown. Replace with the proper rating/size fuse. Some errors occur in the LCD or nothing functions when buttons are pressed. Press the RESET Button. Unable to receive stations Check and make sure the antenna is connected properly. Poor radio reception Check and make sure the antenna is the correct length. Make sure the antenna is not broken.
Specifications GENERAL Operating Power................................................................ 12 Volts DC, Negative Ground Output Wiring........................................................ Designed for using two speakers only RCA line out............................................................................ low-level outputs - 250 MV Output Impedance....................................................... Compatible 4 to 8 Ohm Speakers Fuses.................................................
Limited Warranty VIRTUAL REALITY SOUND LABS® products are designed and manufactured to provide a high level of troublefree performance. VIRTUAL REALITY SOUND LABS® warrants, to the original purchaser, that its products are free from defects in material and workmanship for 30 days from the date of original purchase. As part of our commitment to product excellence. VIRTUAL REALITY SOUND LABS® and/or it’s affiliates routinely improve the designs, materials or production methods of its existing products.
©2007 Virtual Reality Sound Labs® All designs, logos and images are the exclusive property of Virtual Reality Sound Labs® and/or its affiliates. All rights reserved.