S E R I E S SATELLITE SERIES 9505 PORTABLE TELEPHONE USER’S GUIDE
Options Menu Quick Reference M Phone Book Call Meters Personal Numbers Show Call Timers1 Show Services1 Set Audible Call Timers1 Last Ten Calls Set In-Call Display1 My Phone Number(s) Lifetime Timer1,4 Fixed Dialing1 One-Touch Dial Setting Mode Selection Satellite Always Cellular Preferred Call Related Features Cellular Always Show Battery Meter1 Show Signal Strength1 Pending Call Drop1 Call Forwarding1,3,5 Satellite Preferred Network Selection Register Now1 Call Waiting1,3,5 Available Ne
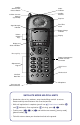
Satellite Antenna Lock Release Button Status Indicator Satellite Antenna Cellular Cassette Antenna (if provided) Earpiece Real-Time Clock Signal Strength Indicator Battery Charge Indicator Volume Control Keys Display Display and Status Indicators Message Key Battery Compartment/ Cellular Cassette Connector Alphanumeric Keypad Quick Access Key Headset Jack Infra-Red Data Port Microphone Accessory and Power Connector SATELLITE MODE HELPFUL HINTS • Need clear view of sky, outdoors, away from build
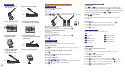
9505 PORTABLE QUICK REFERENCE Getting Started 1. Rotate and extend the antenna. 2. Remove battery door. (Top) 3. Insert the SIM card. 5. Remove battery’s protective cover. Basic Operation Turn the phone's power on/off: Press and hold S. Place a call: Rotate and extend the antenna in a vertical position. To dial, press: [0 0] or [0 and hold for two seconds], [country code], [phone number], O.
Welcome The future of global telecommunications is here—a satellite telephone, providing you with communication in many remote areas around the world. Motorola proudly introduces its next generation Satellite Series™ 9505 portable phone for the Iridium® satellite system. All Motorola wireless phones are designed and manufactured to meet Motorola’s exacting specifications and world-class quality standards.
ii
Contents Safety Information . . . . . . . . . . . . . . . . . . . . . . . . .7 Overview . . . . . . . . . . . . . . . . . . . . . . . . . . . . . . .11 Guide Overview. . . . . . . . . . . . . . . . . . . . . . . . .12 Phone Overview . . . . . . . . . . . . . . . . . . . . . . . .13 Indicators. . . . . . . . . . . . . . . . . . . . . . . . . . . . . .16 Satellite Series™ Accessories. . . . . . . . . . . . . .19 Getting Started . . . . . . . . . . . . . . . . . . . . . . . . . .
Entering Names . . . . . . . . . . . . . . . . . . . . . . . . 82 Using Pauses in Numbers . . . . . . . . . . . . . . . . 84 Using Phone Number Prefixes . . . . . . . . . . . . . 86 Locating Entries . . . . . . . . . . . . . . . . . . . . . . . . 87 Calling, Modifying, or Erasing an Entry . . . . . . 89 Checking Phone Book Capacity. . . . . . . . . . . . 90 Preventing Access to the Phone Book . . . . . . . 91 Restricting Phone Use . . . . . . . . . . . . . . . . . . .
Activating Extended Menus . . . . . . . . . . . . . .161 Managing Time and Date Settings . . . . . . . . .162 Selecting the Display Language . . . . . . . . . . .165 Turning Lights On and Off . . . . . . . . . . . . . . . .166 Setting Keypad Tones . . . . . . . . . . . . . . . . . . .167 Managing Phone Settings . . . . . . . . . . . . . . . .168 Cellular Mode Settings . . . . . . . . . . . . . . . . . .171 Accessing the Network. . . . . . . . . . . . . . . . . . .177 Network Selection Menu . . . . . . . . .
vi
Safety Information Important: Read this information before using your wireless mobile phone. Exposure to Radio Frequency Signals Your wireless mobile telephone is a low power radio transmitter and receiver. When it is ON, it receives and also sends out radio frequency (RF) signals. International agencies have set standards and recommendations for the protection of public exposure to RF electromagnetic energy.
Phone Operation Normal Operation: Hold the phone as you would any other telephone. Rotate the antenna so that it points straight up. The antenna will click into place in one of two positions designed for left- or right-handed use. Make sure the antenna is fully extended. The antenna should be vertical to the ground and have a clear unobstructed view of the sky. Tips on Efficient Operation: For your phone to operate most efficiently: • Rotate and extend your antenna fully.
Electronic Devices Most modern electronic equipment is shielded from RF signals. However, certain equipment may not be shielded against the RF signals from your wireless phone. Pacemakers The Health Industry Manufacturers Association recommends that a minimum separation of six inches (6") be maintained between a handheld wireless phone and a pacemaker to avoid potential interference with the pacemaker.
Posted Facilities Turn your phone OFF in any facility where posted notices so require. Aircraft Airline regulations prohibit using your phone while in the air. Check and comply with the policy of your airline regarding the use of your phone while the aircraft is on the ground. Switch OFF your phone before boarding an aircraft. Blasting Areas To avoid interfering with blasting operations, turn your phone OFF when in a “blasting area” or in areas posted: “Turn off two-way radio.
Overview This chapter provides an overview of this user’s guide, your new satellite phone, and available Satellite Series™ accessories.
Guide Overview Modes Some phone features described in this user’s guide apply only to satellite mode. Other features apply only to cellular mode (when you have an optional Cellular Cassette installed). The following conventions alert you to these features: + r This symbol next to a feature name indicates that your phone must be in satellite mode to access the feature. This symbol next to a feature name indicates that your phone must be in cellular mode to access the feature.
Phone Overview Status Indicator 16 Antenna Lock Release Button 15, 26 Cellular Cassette Antenna 23 Signal Strength Indicator 17, 123 Volume Control Keys 14, 54, 55, 152 Display Status Indicators 17-18 Message Key 14, 129-147 Alphanumeric Keypad Satellite Antenna (stowed) 14, 44-45 Earpiece Real Time Clock 17, 163-164 Battery Charge Indicator 17, 37 Display 15 Battery Compartment/ Cellular Cassette Connector 15, 28-29, 31-34, 39-40 Infrared Data Port 15, 156 Headset Jack 15 Power On/Off Key 14, 42 Q
Special Keys Key Function S Turns the phone’s power on and off O Selects menu settings or options, or initiates and answers calls ? Takes you directly to the Messages menu I Stores numbers in the phone book Q Recalls numbers from the phone book E Enters the Quick Access menu M Enters the Options menu and scrolls forward through menu features C Clears characters from the screen or exits the Options menu < Scrolls backward or forward through menu features, and moves the cursor backward or f
Satellite Antenna Lock Release Button This button releases the satellite antenna so you can attach the auxiliary antenna. You may also want to remove the satellite antenna if you spend a lot of time in cellular mode. Cellular Cassette Connector Insert an optional Cellular Cassette onto the back of the phone. The Cellular Cassette connector is located underneath the battery compartment cover next to the battery.
Indicators Status Indicator The status indicator is located at the top of your phone. This LED indicator provides information on your phone’s current state of service depending on your mode. If the LED is... Then in satellite mode... Then in cellular mode... Alternating red and green A call is incoming. A call is incoming. Flashing green You are receiving a signal from the Iridium satellite network. You can make and receive calls. You are receiving a signal from the cellular network.
Display Status Indicators and Icons Indicator Description rx Signal Strength Indicator indicates the strength of the signal from the network. The signal strength indicator appears continuously in the top left hand corner of the display. The more segments displayed in the bar graph, the stronger the signal. Five bars indicate full signal strength. No bars indicate a weak signal. q Battery Charge Indicator indicates the strength of the battery charge.
Indicator n Home System Indicator appears in satellite mode when the phone has successfully registered with the Iridium satellite system. In cellular mode (when you have the appropriate Cellular Cassette inserted), this indicator appears when the phone is registered with your home cellular system. l Roam Indicator appears when you are roaming on a cellular system (when you have the appropriate Cellular Cassette inserted). This indicator does not appear when the phone is in satellite mode.
Satellite Series™ Accessories Product appearance and specifications are subject to change without notice. Note: For maximum performance use only Motorola Original™ accessories. Batteries Standard Capacity Lithium Ion Battery • • Provides up to 2.4 hours of talk time or 24 hours of standby time* Weighs 2.3 ounces/66 grams High Capacity Lithium Ion Battery • • Provides up to 3.6 hours of talk time or 38 hours of standby time* Weighs 3.
AC Travel Charger with International Plug Kit The AC travel charger with international plug kit provides rapid charge for optimal performance and can be used to power the phone when the battery is depleted.
Auto Accessory Adapter Restores full battery power for portable phone operation or desktop charger functions from any operating vehicle (using standard 12-volt accessory connector port).
Portable Auxiliary Antenna From one car to another, this compact pocket-sized antenna with convenient magnetic mount goes in every vehicle you do to provide improved reception. • For use with the portable phone • Reliable magnetic mount, ceramic patch antenna • Attached 1.5-meter (4.9 feet) cable Note: The use of wireless devices and their accessories may be prohibited or restricted in certain areas. Always obey the laws and regulations on the use of these devices.
Lanyard Wrist Strap The lanyard wrist strap is made of nylon. It provides a convenient way to carry your phone. Cellular Cassettes Cellular Cassettes are modules that attach to the 9505 portable phone and provide support for various terrestrial or land-based cellular systems. With an attached Cellular Cassette, you can make and receive calls in various cellular modes, assuming service subscription and coverage are available.
24 Overview
Getting Started Getting started with your new satellite phone is easy. Just insert your phone’s SIM (Subscriber Identity Module) card and charge the battery. This chapter shows you how.
Attaching the Satellite Antenna Attach the Antenna 1. Attach the antenna in the down position. 2. Press and hold the lock release button at the top of the phone. 3 2 3. Push the antenna until it clicks into place and release the button. Remove the Antenna You may want to remove the satellite antenna to attach an auxiliary antenna, or if you spend the majority of your time in cellular mode. 1. Place the antenna in the down position. 2. Press the button at the top of the phone. 3.
What Is a SIM Card? Your SIM (Subscriber Identity Module) card is a small smart card that contains your phone number, service details, and memory for storing phone book entries and messages. This means you can use your SIM card with any phone for the GSM system or any Motorola product for the Iridium satellite system, and all calls go on your account. Note: Your phone has limited functionality without the SIM card.
Installing/Removing the SIM Card The SIM card is stored in a recess in the battery compartment. It is normally covered by the battery when you use your phone. Caution: Make sure your phone is powered off before inserting or removing the SIM card. If you don’t, you may damage the memory on your SIM card. 1. Turn your phone off by pressing and holding the S key. 2. Remove the battery cover and battery. (See “Remove the Battery” on page 33.) 3.
4. Insert the SIM card into the tray with the notch up and the gold plate facing out. or Remove the SIM card from the tray. 4 5. Push the SIM card tray down and slide the tray to the right to lock it in place. 5 6. Replace the battery and battery cover. (See “Insert the Battery” on page 31.
Removing the Battery Cover Your new batteries are shipped uncharged and fitted with protective covers. Save the covers for storing and carrying unused batteries. The covers prevent metal objects from contacting both battery terminals, which can reduce the risk of injury, or damage from a battery short circuit. Remove the Battery Safety Cover 1. Press in the release latch. 2. Continue pushing in and upwards until the battery slips free from its cover. Attach the Battery Safety Cover 1.
Installing the Battery Insert the Battery Note: Insert only Motorola-approved batteries in your phone. If you insert an unapproved battery you will see an Invalid Batt. message. You are able to discharge the battery, but you cannot recharge it. 1. Remove or rotate the satellite antenna before installing the battery. (See “Attaching the Satellite Antenna” on page 26.) 2. Press and hold the release latch at the top of the battery compartment cover.
5. Insert the bottom end of the battery compartment cover into the slots at the end of the compartment. 6 5 6. Snap the cover down into place. If you have an optional Cellular Cassette, see “Installing the Cellular Cassette” on page 39.
Remove the Battery 1. Remove or rotate the satellite antenna before removing the battery. (See “Attaching the Satellite Antenna” on page 26.) 2. Press and hold the release latch at the top of the battery compartment cover. Tip: The battery compartment is located on the back of the phone. 2 3 3. Pull the cover upward, and then remove it from the phone. 4. Press and hold the release latch at the base of the battery. 4 5. Pull the battery upward and out of the phone.
6. Insert the bottom end of the battery compartment cover into the slots at the end of the compartment. 7 6 7. Snap the cover down into place. 8. Replace the battery safety cover. See “Attach the Battery Safety Cover” on page 30 for more information.
Charging the Battery Any battery that hasn’t been used for a month or more—including new batteries—should be charged for about 3–4 hours before use. Using the Internal Charger A battery charger is built right into your phone. Using either the travel charger or auto accessory adapter, you can plug the handset directly into a power source to charge the installed battery. 1. Connect the travel charger or auto accessory adapter to the power connector at the base of the phone. 2.
Note: You can still place and answer calls while using the internal charger. If you wish to place or answer a call: Press S to exit charge-only mode and return to normal operation. Remember that talking on the phone uses power, so charging takes more time. Using the Desktop Charger You can use the front compartment of the desktop charger to charge the battery in your phone. You can also charge a spare battery in the rear compartment.
+ Checking Battery Charge Level Low Battery Warning When the battery level is low and only a few minutes of talk-time remains, your phone signals you in two ways: • Low Battery appears on the display. • A warning tone (two double beeps) sounds. Note: To help maintain the best battery and phone performance, recharge your battery as soon as possible after you receive the low battery warning.
Battery Information Maximizing Battery Life Caution: To prevent injuries or burns, do not allow metal objects to contact or short circuit the battery terminals. To ensure maximum battery life and use your battery to its fullest capacity, observe the following guidelines. • Always use Motorola-approved battery chargers. • Always use Motorola-approved batteries (Standard, High Capacity, Ultra High Capacity battery). • Maintain the battery at or near room temperature when charging.
Installing the Cellular Cassette You can attach an optional Cellular Cassette to your satellite phone to allow it to work with land-based cellular systems. Insert the Cellular Cassette 1. Remove or rotate the satellite antenna before installing the Cellular Cassette. (See “Remove the Antenna” on page 26.) 2. Press and hold the release latch at the top of the battery compartment cover. 2 3 Tip: The phone switches between satellite mode and cellular mode based on your preferences.
Remove the Cellular Cassette 1. Remove or rotate the satellite antenna before removing the Cellular Cassette. (See “Remove the Antenna” on page 26.) 2. Press and hold the release latch at the top of the Cellular Cassette. 2 3 3. Pull the Cellular Cassette upward, and then remove it from the phone. 4. Insert the bottom end of the battery compartment cover into the slots at the end of the compartment. 5 4 5. Snap the cover down into place.
Using Your Phone Read this chapter to learn how to get up and running with your new satellite phone. The phone features available to you vary depending on whether your phone is operating in satellite mode or cellular mode. The table below shows the features available in each mode. See “Selecting a Mode” on page 185 for more information on changing modes.
Startup Procedures Turn the Power On and Off 1. Insert your SIM card if necessary. (See “Installing/Removing the SIM Card” on page 28.) 2. Press and hold S to turn the phone on and off. 3. If your SIM card is PIN-code protected, enter the SIM card PIN code (a four- to eight-digit number given to you by your service provider), and then press O to continue. Caution: If you enter an incorrect SIM card PIN code three times in a row, your SIM card will be disabled.
Power-On Messages Once your phone is powered on, you may see: Message Description Searching... The phone is attempting to establish communications with the satellite or cellular network. See “Accessing the Network” on page 177. Rotate and Extend Antenna You also hear a tone when you see this message. Make sure the antenna is rotated upward and fully extended and has a clear unobstructed view of the sky. Rotate Antenna Registering... or Registering... Your phone is registering with the network.
Message Description Blocked If the SIM card PIN code is incorrectly entered three times in a row, your SIM card becomes blocked. See “Unblock the PIN Code” on page 158 for instructions on how to unblock it. ! Blocked If the SIM card PIN2 code is incorrectly entered three times in a row, your SIM card becomes blocked. See “Unblock the PIN2 Code” on page 160 for instructions on how to unblock it. Bad Card See Supplier Your SIM card has been damaged or incorrectly issued.
2. Extend the antenna by pulling out on the end of it. 2 1 The antenna should be vertical to the ground when you talk on the phone (as shown in the following illustration from the wakeup screen animated sequence). H 3. Make sure the antenna has a clear unobstructed view of the sky. Standby Mode To conserve energy, your phone may turn off its display backlight when you have not pressed a key for several seconds. The light reappears the next time you press a key.
Placing a Call To place a call, your phone must be powered on, have a SIM card inserted, be unlocked, and be in contact with the satellite or cellular network (depending on your mode). See “Accessing the Network” on page 177 for network information. You can enter a phone number up to a maximum of 20 digits. The digits are displayed in two rows, 16 digits in the top line and four digits in the next line. Dial a Number 1. Rotate and fully extend the satellite antenna if you are in satellite mode.
If the call does not connect, you may see one of the following messages: Message Description Rotate and Extend Antenna Make sure the antenna is rotated upward and fully extended and has a clear unobstructed view of the sky. Busy Try Later or Please Try Later The phone is unable to access the network. Try again in a few minutes. Restricted Area The phone is unable to access the network. Move to an area where calls are allowed. Redial? Press O to redial the number automatically.
+ Automatic Redial Satellite Mode If the number or your network is busy, you will see Redial? for five seconds. Press O to redial the number automatically. Note: Your phone makes a maximum of ten redial attempts. If the call cannot be connected within this maximum, you will see the message Redial Failed. Cellular Mode This feature is not available in cellular mode. Redial Last Number Called Whenever your phone is on standby, you can redial the last number called: 1.
Dial a Number from the Phone Book Your phone contains a phone book that you can use to store names and telephone numbers.
+ Call a Number in a Message Satellite Mode For details on how to call a phone number embedded in a message, see “Return a Call” on page 135. Cellular Mode This feature is not available in cellular mode. End a Call Use one of the following procedures to end a call: 50 • Press O when you see the End Call? prompt in the display. • Press C.
Receiving a Call Receive a Phone Call To receive a call, your phone must be powered on, have a SIM card inserted, be unlocked, and be in contact with the satellite or cellular network (depending on your mode). See “Accessing the Network” on page 177 for network information. There are two scenarios for receiving calls in satellite mode, depending on the antenna position: (1) antenna raised and fully extended, or (2) antenna stowed or in the down position.
Antenna Stowed or in the Down Position When you receive a call: • The phone chirps up to three times to alert you of an incoming call. • The phone displays Rotate Antenna, followed by Call Attempt on the next line. You must rotate and extend the antenna as quickly as possible to receive the call. Rotate and fully extend the antenna as described in “Placing a Call” on page 46. You will see Iridium Call Attempt. Do not attempt to answer until the phone rings or vibrates.
End a Call Use one of the following procedures to end a call: • Press O when you see the End Call? prompt in the display. • Press C. + Unanswered Calls If you are away from your phone or choose not to answer a call, your phone displays the message Unanswered Call. Satellite Mode This feature is not available in cellular mode. Cellular Mode Personal Mailbox Callers who are unable to reach you can leave numeric, text, and voice messages.
Additional Phone Features Lock and Unlock the Keypad To prevent accidental usage of the phone, press the # and * keys simultaneously to lock the keypad. All keys with the exception of the S key are disabled. You can still answer an incoming call by pressing O when the keypad is locked. To remove the keypad lock, press # and * simultaneously. Adjust Earpiece Volume To adjust earpiece volume: Tip: The volume control keys are located on the side of the phone.
Adjust Ringer Volume To adjust the ringer volume: Press E and then the up or down volume control key. The phone sounds the new volume level as you adjust it. Note: You can also use the Phone Setup menu to adjust ringer volume. See page 152 for more information. Tip: The volume control keys are located on the left side of the phone. View Your SIM Card Phone Number To retrieve and view your phone number from your SIM card: Press Q #.
56 Using Your Phone
Using In-Call Features Read this chapter to learn how to use In-Call menu features. The In-Call menu is displayed when you press M during a call. See “Using the In-Call Menu” on page 72 for more information. The feature selection on the In-Call menu varies depending on your mode setting. The table below shows the features available in each mode. See “Selecting a Mode” on page 185 for more information on changing modes.
Muting a Call Satellite Mode Cellular Mode (GSM 900/1800) For privacy during a call, try muting the phone. You hear the party on the other end, but the other party does not hear you. To mute a call in progress: Tip: You can also mute the phone from the Quick Access menu. See “Using the Quick Access Menu” on page 70. 1. Press M until you see Turn Mute on or off. 2. Press O to select. You will see Mute followed by End Call? on the next line. Caution: You cannot press O a second time to unmute the phone.
Using Call Waiting Note: You must subscribe to this network feature through your service provider. Contact your service provider for additional information. If you have subscribed to Call Waiting, you must first activate it through the Options menu. (See “Activating Call Waiting” on page 116.) After you activate it, you are notified of incoming calls while you are on the line in two ways. When a call comes in, you hear a beep and see the message Call Waiting followed by Answer?. If you want to... Then...
Cellular Mode (TDMA 800/1900) (CDMA 1900) (CDMA/AMPS) TDMA and CDMA cellular users who have subscribed to this feature are notified of an incoming call by two beeps. You may see a message in your display, depending on your service provider. To handle the waiting call, you must send a phone flash along with the appropriate feature code provided by your service provider. The current call is put on hold. To return to your initial call you must send another phone flash.
Placing a Call on Hold Note: You must subscribe to this network feature through your service provider. Contact your service provider for additional information. You can place a call on hold to receive a new call or while making a new call. You can only place one call on hold at a time, so some options may not be accessible if you have already placed a call on hold. Satellite Mode Cellular Mode (GSM 900/1800) To place a call on hold: 1. Press M until you see Hold Call. 2. Press O.
If you want to... Then... end call that is on hold Press M until you see End Held Call, and then press O to select. The held call is disconnected, the current call remains connected, and you see End Call?. You may see one of the following messages: Cellular Mode (GSM 900) Cellular Mode (TDMA 800/1900) (CDMA 1900) (CDMA/AMPS) 62 Message Description Trying Your phone is attempting to switch between the current and held call. Hold Failed The attempt to hold a call was unsuccessful.
+ Making a Conference Call Note: You must subscribe to this network feature through your service provider. Contact your service provider for additional information. This feature lets you participate in a conference call of up to five parties. Satellite Mode To make a conference call, you must be engaged in an active call and have another call on hold. You can do this by accepting a waiting incoming call during an active call, or by placing an active call on hold and making a second call.
If you want to... Then... hold a private conversation with one of the conference call participants 1. Press M until you see Split Call, and then press O to select. You will see the name of the first party added to the conference call. 2. Press M to scroll through the list of call participants until you find the party you want to talk to, then press O to select. The selected party becomes the active call, with the other parties placed on hold.
Keypad Controls Many conference call features are directly accessible by entering specific key sequences on the keypad during a call: If you want to... Then... begin a conference call Press 3 O. add a single call to a conference call Press 3 O. hold a private conversation with one participant Press 2 [call number] O (Where [call number] is the sequential order in which the call was placed or received.) place active call on hold, accept held or waiting call Press 2 O.
r Sending a Phone Flash Satellite Mode Cellular Mode This feature only applies to TDMA or CDMA cellular mode. (GSM 900/1800) (GSM 900) Cellular Mode (TDMA 800/1900) (CDMA 1900) (CDMA/AMPS) Many TDMA and CDMA cellular network features (for example, call waiting, call holding, call forwarding) require you to send a “phone flash” over the air during a call to access them. This is similar to when you press the switch hook on your conventional phone in your home or office to switch between calls.
Using the Menus Many of your phone’s features are organized into lists of options called menus. There are three menus: • The main Options menu lets you select and/or adjust phone features. • The Quick Access menu gives you instant access to the menu features you use most frequently. • The In-Call menu gives you access to call-related features when you are in a call. Some options give you access to additional lists of options called submenus.
Using the Options Menu The Options menu gives you access to your phone’s features and options. You can not access this menu during a call. The submenus that appear under the Options Menu vary depending on your mode setting. See “Selecting a Mode” on page 185 for more information on changing modes. Navigate the Options Menu Learning how to use just a few keys enables you to move freely through the entire menu system. If you want to... Then... enter the Options menu Press M.
How the Phone Responds As you scroll through the Options menu, you will see one of three questions on the bottom line of the display. If your phone asks... Then... View Options? Press O to enter the submenu. Select? Press O to select the displayed feature. Quit? Press O to exit the feature. Display Messages and Indicators If you see... Then... y Completed This indicates a feature has been activated. ! Failed The display returns to the menu in a few seconds.
Using the Quick Access Menu The Quick Access menu is a way to keep your favorite menu options readily accessible. Each digit key, 1 to 9, is matched to a Quick Access feature. See the table on page 71 for the default setup. If you know the number of the feature, activating that option takes only two button presses! If you do not know the number or want to review your options, just scroll through the icon menu and read the tag attached to each option.
Default Quick Access Settings The following features (and associated icons) are the default settings for the Quick Access menu. Key Icon Quick Access Feature 1 B Find Name searches your phone book by the full name. 2 J Mute mutes and unmutes a call in progress. 3 R Call Voicemail1 calls your voicemail number to check your voicemail. 4 G Battery Meter displays a fuel gauge indicating charge. The more bars, the greater the charge. 5 b Lock Now locks your phone immediately.
Using the In-Call Menu This menu lets you access specific features while you are in a call. The In-Call menu is only available when you are in a call. You cannot review it off-line. Entering the In-Call Menu While you are in a call: Press M to view the In-Call menu features. In-Call Menu Features The In-Call menu dynamically changes depending on the type of call you are in and the mode you have selected. Satellite Mode 72 The following options appear on the In-Call menu in satellite mode.
Type of call Options active call, held call, and a call waiting End Active Call 2 Calls Switch Turn Mute on or off End Held Call End Active & Held Call Conference Call single active conference call Hold Call Make New Call Turn Mute on or off Split Call active conference call and a call waiting End Active Call Reject Call Waiting Turn Mute on or off Split Call (conference call) active call and a held call End Active Call Turn Mute on or off End Held Call End Active & Held Call Conference Call (conf
Cellular Mode (GSM 900/1800) The following options appear on the In-Call menu in GSM 900/1800 cellular mode.
Managing the Phone Book Your satellite phone can store up to 100 names and numbers, and your SIM card expands memory capacity even more. You can use the dedicated keys or the Phone Book menu to add and retrieve numbers from the phone book. With the Phone Book menu you can also access phone book maintenance and security features. The feature selection on the Phone Book menu varies depending on your mode setting. The table below shows the features available in each mode.
Phone Book Menu Satellite Mode Phone Book Personal Numbers Find Entry By Name Enter Name: Call Number Modify Name Or Number Erase Name And Number Find Entry By Location Enter Location: Call Number Modify Name Or Number Erase Name And Number Add Entry Add To Phone Memory Add To SIM Card Memory Check Capacity Check Phone Capacity Check SIM Capacity Prevent Access No Memory Restrictions To Phone Memory To SIM Card Memory To Phone & SIM Memory Show Services Last Ten Calls Last Calls Made Erase All Numbers My P
Cellular Mode Phone Book Personal Numbers Find Entry By Name Enter Name: Call Number Modify Name Or Number Erase Name And Number Find Entry By Location Enter Location: Call Number Modify Name Or Number Erase Name And Number Add Entry Add To Phone Memory Add To SIM Card Memory Last Ten Calls Last Calls Received Last Calls Made Erase All Numbers My Phone Number(s) One-Touch Dial Setting To Phone Memory To SIM Card Memory Managing the Phone Book 77
Organizing Your Phone Book Each name and phone number in your phone book is stored in a numbered memory location. The satellite phone has two types of memory—phone memory and SIM card memory. Phone Memory SIM Card Memory1 Personal Numbers 100 entries 155 entries Fixed Dial Numbers No entries 40 entries Phone Number Digits 32 20 Name Characters 16 16 1-100 101-255 Location Numbers 1 SIM card capacity varies depending upon the card issued by your service provider.
When do I use these numbers? Group the numbers on the list according to when you use them. Most people call a different set of numbers during the day than they do in the evening and on weekends. You can switch one-touch dialing to your phone’s memory (locations 1–9), your SIM card’s memory (locations 101–109), or to your fixed dial list (locations 1–9). Store your evening and weekend numbers on one type of memory and your daytime numbers on another.
Getting to Personal Numbers... 1. Press M until you see Phone Book, and then press O. 2. Press M to scroll to Personal Numbers, and then press O. 3. Press M to scroll to one of the features described below. Storing Names and Numbers Add an Entry Use the Options Menu 1. Follow the steps in “Getting to Personal Numbers...” to get to Add Entry, and then press O. 2. Press M to scroll to Add To Phone Memory or Add To SIM Card Memory. 3. Press O to select. You will see Enter Number. 4.
Use the Dedicated Keys 1. Enter the phone number you want to store. 2. Press I to begin storing. 3. Press M to scroll to Add To Phone Memory or Add To SIM Card Memory, and then press O. You will see Enter Number, followed by the number you entered. 4. Press O to accept the number. You will see Enter Name. Tip: If you have more than one number for the same person, try attaching a descriptive tag to the name, like Home, Office, or Mobile. 5.
Entering Names You can use the keypad to produce any letter in the alphabet. For example, press 2 to enter the letters A, B, or C, as shown: press 1 time to insert an A press 2 times to insert a B press 3 times to insert a C press 4 times to insert a 2 Enter Characters Tip: Press and hold any numeric key to toggle between uppercase and lowercase characters. 1. Enter a letter by pressing a key as many times as necessary. 2. Press < to advance the cursor. 3.
Available Characters Use this chart as a guide for producing characters: 1 Space . 1 ? ! , @ _ & : “ ( ) ‘ ¿ ¡ % £ $ Space .
Using Pauses in Numbers When you call automated systems, a recorded message prompts you for numbers such as PIN numbers and account numbers. You can store these numbers in the same memory location as the automated system’s access number. Separate the numbers with “pauses”—special characters that tell your phone to wait a few seconds before sending additional numbers—and store the string in the same way you would other numbers.
Dial Numbers With Pauses To dial a number with pauses in satellite mode or GSM cellular mode: 1. Recall the entry. (See “Locating Entries” on page 87.) 2. Press O to place the call. The first pause in the number waits until the call is answered. When the automated system answers, your phone waits a few seconds and then automatically sends the next set of numbers, then the next, until all numbers are sent. To dial a number with pauses in TDMA or CDMA cellular mode: 1. Recall the entry.
+ Using Phone Number Prefixes Satellite Mode You can save time when you dial by storing the prefixes that you often use. This is sometimes called “postscripting.” Your satellite phone allows you to change or add to phone book entries without overwriting them. Store a prefix in your phone book just as you would any other number. See “Storing Names and Numbers” on page 80. Use a Stored Prefix Tip: Try naming the prefix by area, like Downtown, Suburbs, or Germany. To use a stored prefix: 1.
Getting to Personal Numbers... 1. Press M until you see Phone Book, and then press O. 2. Press M to scroll to Personal Numbers, and then press O. 3. Press M to scroll to one of the features described below. Locating Entries Find an Entry by Name Search your phone book by the first few letters of the entry. Note: If you have restricted access to either SIM card or phone memory and you are in satellite mode, those entries will not be available.
Getting to Personal Numbers... 1. Press M until you see Phone Book, and then press O. 2. Press M to scroll to Personal Numbers, and then press O. 3. Press M to scroll to one of the features described below. Find an Entry by Location Find an entry by its location number. Use the Options Menu 1. Follow the steps in “Getting to Personal Numbers...” to get to Find Entry By Location, and then press O to select. You will see Enter Location. 2.
Calling, Modifying, or Erasing an Entry Once you have selected a phone book entry, you can call, change, or erase that entry. Call a Selected Entry 1. Find an entry, and then press O. (See “Locating Entries” on page 87.) 2. Press M until you see Call Number, and then press O. You will see Calling followed by the number you dialed. Modify a Name or Number 1. Find an entry, and then press O. (See “Locating Entries” on page 87.) 2. Press M until you see Modify Name Or Number, and then press O.
Getting to Personal Numbers... 1. Press M until you see Phone Book, and then press O. 2. Press M to scroll to Personal Numbers, and then press O. 3. Press M to scroll to one of the features described below. + Checking Phone Book Capacity Satellite Mode Use this feature to see how many available memory locations you have in either SIM card memory or phone memory. 1. Follow the steps in “Getting to Personal Numbers...” to get to Check Capacity, and then press O to select. 2.
+ Preventing Access to the Phone Book You may want to restrict memory access when loaning your phone to others. You can choose to prevent access to the phone memory, SIM memory, or both. Satellite Mode Caution: If you switch to cellular mode these restrictions will not apply. 1. Follow the steps in “Getting to Personal Numbers...” to get to Prevent Access, and then press O to select. 2.
Getting to Fixed Dialing... 1. Press M until you see Phone Book, and then press O. 2. Press M to scroll to Fixed Dialing, and then press O. 3. Press M to scroll to one of the features described below. + Restricting Phone Use You can restrict calling on your phone to a list of numbers that you create. When the fixed dialing feature is active, you can only call numbers or use prefixes (for example, country codes or area codes) that exactly match those stored in your fixed dial list.
+ Add an Entry Satellite Mode To add an entry to the fixed dial list: 1. Follow the steps in “Getting to Fixed Dialing...” to get to Setup Fixed Dialing, and then press O to select. You will see Enter PIN2. 2. Enter code. Enter your SIM card PIN2 code, and then press O. 3. Press M until you see Add Entry, and then press O. You will see Enter Number. 4. Enter the number, and then press O. You will see Enter Name. 5. Enter the name, and then press O. You will see Enter Location. 6.
Getting to Fixed Dialing... 1. Press M until you see Phone Book, and then press O. 2. Press M to scroll to Fixed Dialing, and then press O. 3. Press M to scroll to one of the features described below. + Erase an Entry Satellite Mode To erase an entry in the fixed dial list: 1. Follow the steps in “Getting to Fixed Dialing...” to get to Setup Fixed Dialing, and then press O to select. You will see Enter PIN2. Tip: You should have received your SIM card PIN2 code from your service provider. 2. Enter code.
+ Edit an Entry Satellite Mode To edit an entry in the fixed dial list: 1. Follow the steps in “Getting to Fixed Dialing...” to get to Setup Fixed Dialing, and then press O to select. You will see Enter PIN2. 2. Enter code. Enter your SIM card PIN2 code, and then press O. 3. Press M until you see Edit Entry, and then press O to select. You will see the first entry in your fixed dial list. 4. Press M to scroll to the entry you want to change, and then press O.
Getting to Fixed Dialing... 1. Press M until you see Phone Book, and then press O. 2. Press M to scroll to Fixed Dialing, and then press O. 3. Press M to scroll to one of the features described below. + View Your Fixed Dialing List Satellite Mode This feature enables you to review, but not change, your fixed dial list. 1. Follow the steps in “Getting to Fixed Dialing...” to get to View Fixed Dial List, and then press O to select. You will see the first number on your fixed dial list. 2.
Getting to Phone Book Features... 1. Press M until you see Phone Book, and then press O. 2. Press M to scroll to one of the features described below. You will see the feature name, followed by Select?. Viewing the Last Ten Calls Made or Received Your phone saves the last ten phone numbers you have dialed. In cellular mode, your phone also saves the numbers of the last ten calls you have received. To view the phone numbers of the last ten calls you have made: Satellite Mode 1.
Getting to Phone Book Features... 1. Press M until you see Phone Book, and then press O. 2. Press M to scroll to one of the features described below. Cellular Mode To view the phone numbers of the last ten calls you have made or received: 1. Follow the steps in “Getting to Phone Book Features...” to get to Last Ten Calls, and then press O to select.
Viewing and Modifying Your Phone Numbers View Your SIM Card Phone Number(s) You can program up to three phone numbers (such as your voice and data phone numbers) onto your SIM card. Use this feature to view your phone number(s). 1. Follow the steps in “Getting to Phone Book Features...” to get to My Phone Number(s). 2. Press O to select. You will see your phone’s voice phone number followed by Modify?. Tip: Pressing Q # also brings up your phone number. 3. Press M to scroll through your numbers. 4.
Getting to Phone Book Features... 1. Press M until you see Phone Book, and then press O. 2. Press M to scroll to one of the features described below. You will see the feature name, followed by Select?. Modify Your Phone Number(s) Use this feature to modify or program your voice phone number onto your SIM card. You can also program other phone numbers (for example, a data phone number) onto your SIM card. You can have up to three phone numbers. 1. Follow the steps in “Getting to Phone Book Features...
Using One-Touch Dialing One-touch dialing enables you to place calls instantly. You can choose to dial the phone numbers in the first nine memory locations in either your SIM memory, phone memory, or your fixed dial list. You choose which type of memory you want to be active with this feature. Note: You must be in satellite mode to use one-touch dialing. However, while the phone is in cellular mode, you can set the memory type that will be active with one-touch dialing.
Getting to Phone Book Features... 1. Press M until you see Phone Book, and then press O. 2. Press M to scroll to one of the features described below. You will see the feature name, followed by Select?. + Use One-Touch Dialing Satellite Mode To use one-touch dialing: Press and hold the appropriate digit key. Tip: You do not need to press O to call the number when you use one-touch dialing.
+ Viewing Service Phone Numbers This feature provides a read-only list of service phone numbers that are pre-programmed by your service provider. The list resides on the SIM card and allows for call placement only. Satellite Mode 1. Follow the steps in “Getting to Phone Book Features...” to get to Show Services. 2. Press O to select. You will see a list of service phone numbers. 3. Press M to scroll to the number you are looking for. 4. Press O to place a call to that number.
104 Managing the Phone Book
Using Calling Features This chapter describes call-related features. Many of these features are network features that you must subscribe to in order to access. The feature selection on the Call Related Features menu varies depending on your mode setting. The table below shows the features available in each mode. See “Selecting a Mode” on page 185 for more information on changing modes.
Call Related Features Menu Satellite Mode Call Related Features Show Battery Meter Show Signal Strength Pending Call Drop On/Off Call Forwarding1 Forward When Unavailable On/Off Forward All Calls On/Off Detailed Forwarding2 Forward Voice Calls Forward All Voice Calls On/Off If Busy On/Off If No Answer On/Off If Not Reachable On/Off Cancel All Forwarding Call Waiting1 On/Off Call Barring2 Bar Outgoing Calls Intl Calls Intl Calls Except Home All Calls On/Off Bar Incoming Calls When Roaming All Calls On/Off C
Cellular Mode Call Related Features (GSM 900/1800) GSM 900) Restrict My Phone Number1,2 Show ID On Next Call Restrict ID On Next Call Call Forwarding2 Forward When Unavailable On/Off Forward All Calls On/Off Detailed Forwarding3 Forward Voice Calls Forward All Voice Calls On/Off If Busy On/Off If No Answer On/Off If Not Reachable On/Off Cancel All Forwarding Call Waiting2 On/Off Call Barring3 Bar Outgoing Calls Intl Calls Intl Calls Except Home All Calls On/Off Bar Incoming Calls When Roaming All Calls O
Getting to Call Forwarding... 1. Press M until you see Call Related Features, and then press O. 2. Press M to scroll to Call Forwarding, and then press O. 3. Press M to scroll to one of the features described below. Forwarding Calls When Unavailable Use this feature when you are unable to answer your phone calls. Note: You must subscribe to this network feature through your service provider. Contact your service provider for additional information.
To activate this feature in GSM cellular mode: 1. Follow the steps in “Getting to Call Forwarding...” to get to Forward When Unavailable, and then press O to select. Your phone takes a moment to request the current setting from the network. Cellular Mode (GSM 900/1800) (GSM 900) 2. Press M to scroll to On or Off, and then press O to select. • If you select On, you will see Enter Number. Continue with step 3. • If you select Off continue with step 4. 3.
Getting to Call Forwarding... 1. Press M until you see Call Related Features, and then press O. 2. Press M to scroll to Call Forwarding, and then press O. 3. Press M to scroll to one of the features described below. Forwarding All Your Calls This feature forwards all of your calls to the number you choose. Your phone does not ring. Note: You must subscribe to this network feature through your service provider. Contact your service provider for additional information.
4. Enter the number you want calls forwarded to, and then press O. 5. Press and hold C to exit the menu. To activate this feature in GSM cellular mode: 1. Follow the steps in “Getting to Call Forwarding...” to get to Forward All Calls, and then press O to select. Your phone takes a moment to request the current setting from the network. Cellular Mode (GSM 900/1800) (GSM 900) 2. Press M to scroll to either On or Off, and then press O to select.
Getting to Call Forwarding... 1. Press M until you see Call Related Features, and then press O. 2. Press M to scroll to Call Forwarding, and then press O. 3. Press M to scroll to one of the features described below. Using Detailed Call Forwarding This feature lets you select the specific situations when you want your calls forwarded. The Forward When Unavailable and Forward All Calls features override the settings you select here.
4. Press O to select the displayed option. Your phone takes a moment to contact the network and update the setting. You will see Call Forward On. 5. Press M to scroll to either Voicemail or Other Number, and then press O. • If you select Voicemail, continue with step 7. • If you select Other Number, then you will see Enter Number. Continue with step 6. 6. Enter the number you want calls forwarded to, and then press O. Tip: If you have not yet stored a voicemail number, go to page 144 to learn how. 7.
5. Enter the number you want calls forwarded to, and then press O. 6. Press and hold C to exit the menu. Cellular Mode (TDMA 800/1900) (CDMA 1900) (CDMA/AMPS) 114 To activate call forwarding features in TDMA or CDMA cellular mode, you must send a phone flash along with the appropriate feature code provided by your service provider. For instructions on how to send a phone flash, see “Sending a Phone Flash” on page 66.
Getting to Call Forwarding... 1. Press M until you see Call Related Features, and then press O. 2. Press M to scroll to Call Forwarding, and then press O. 3. Press M to scroll to one of the features described below. Canceling All Forwarding This feature cancels all call forwarding settings in satellite mode or GSM cellular mode. Note: You must subscribe to this network feature through your service provider. Contact your service provider for additional information.
Getting to Call Related Features... 1. Press M until you see Call Related Features, and then press O. 2. Press M to scroll to one of the features described below. Activating Call Waiting Satellite Mode Cellular Mode (GSM 900/1800) (GSM 900) If you subscribe to call waiting, use this feature to specify whether or not you want to be notified of incoming calls while you in a call. Note: You must subscribe to this network feature through your service provider.
Restricting Calls with Call Barring You can use call barring to restrict both incoming and outgoing calls. Call barring is useful if you are loaning your phone to others or when you wish to control incoming calls. When you change one of your call barring settings, your phone takes a few seconds to request the setting from the network. Notes: • You must subscribe to this network feature through your service provider. Contact your service provider for additional information.
Getting to Call Barring... 1. Press M until you see Call Related Features, and then press O. 2. Press M to scroll to Call Barring, and then press O. 3. Press M to scroll to one of the features described below. Bar Outgoing Calls This feature enables you to receive incoming calls but prevents outgoing calls. Satellite Mode Cellular Mode (GSM 900/1800) (GSM 900) To bar outgoing calls in satellite mode or GSM cellular mode: 1. Follow the steps in “Getting to Call Barring...
Bar Incoming Calls This feature allows you to place calls, but refuses incoming calls. Callers hear a recording telling them that you are unavailable. To be sure not to miss a call, see “Using Detailed Call Forwarding” on page 112. To bar incoming calls in satellite mode or GSM cellular mode: 1. Follow the steps in “Getting to Call Barring...” to get to Bar Incoming Calls, and then press O to select. Satellite Mode Cellular Mode (GSM 900/1800) (GSM 900) 2.
Getting to Call Barring... 1. Press M until you see Call Related Features, and then press O. 2. Press M to scroll to Call Barring, and then press O. 3. Press M to scroll to one of the features described below. Cancel All Barring Satellite Mode Cellular Mode (GSM 900/1800) (GSM 900) To cancel all call barring settings in satellite mode or GSM cellular mode: 1. Follow the steps in “Getting to Call Barring...” to get to Cancel All Barring, and then press O to select. You will see Enter Password. 2.
Change Bar Password When you subscribe to call barring, your service provider gives you a four-digit bar password. Use this feature to change it to something easy to remember. Satellite Mode Cellular Mode (GSM 900/1800) (GSM 900) 1. Follow the steps in “Getting to Call Barring...” to get to Change Bar Password, and then press O to select. You will see Enter Password. 2. Enter your bar password, and then press O. You will see Enter New Password. 3. Enter the new bar password, and then press O. 4.
Getting to Call Related Features... 1. Press M until you see Call Related Features, and then press O. 2. Press M to scroll to one of the features described below. + Viewing the Battery Meter Satellite Mode Use this feature to check the charge level on your battery. 1. Follow the steps in “Getting to Call Related Features...” to scroll to Show Battery Meter, and the press O to select.
+ Viewing Signal Strength Use this feature to check the strength of the signal that your phone is receiving from the Iridium satellite network. Satellite Mode 1. Follow the steps in “Getting to Call Related Features...” to get to Show Signal Strength. 2. Press O to select. You will see Checking Signal.... If the antenna is not rotated, you will see Rotate and Extend Antenna. Rotate and extend the antenna to continue.
Getting to Call Related Features... 1. Press M until you see Call Related Features, and then press O. 2. Press M to scroll to one of the features described below. + Deactivating Pending Call Drop Signal Satellite Mode Under rare circumstances, due to system overcapacity or a satellite outage, a satellite may not be available to take your call. When this happens, your phone notifies you with a series of three consecutive tones and displays Pending Call Drop.
r Restricting Your Phone Number ID This feature is not available in satellite mode. Satellite Mode Note: You must subscribe to this network feature through your service provider. Contact your service provider for additional information. Cellular Mode (GSM 900/1800) If your phone number is normally sent with each call (so that a recipient with calling line identification can see your number), select Restrict ID On Next Call to prevent your number from being sent with the next attempted call.
126 Using Calling Features
Using Message Services You can receive voicemail notification messages, and send and receive numeric and text messages through your Personal Mailbox service— around the world. Wherever you are, you can have instant reference to all your communication. The feature selection on the Messages menu varies depending on your mode setting. The table below shows the features available in each mode. See “Selecting a Mode” on page 185 for more information on changing modes.
Messages Menu Satellite Mode Messages Call Voicemail Received Messages (first message) Delete Message Return Call1 Edit Message2 Send Message Store Message Go to Next Message Outgoing Messages2 (first message) Send Message Edit Message Send Message Store Message Delete Message Go to Next Message Message Editor2 Send Message Store Message Message Settings Voicemail Number Service Center2 Expiry Period2 Outgoing Message Type2 Text 1 2 Cellular Mode This feature is network and subscription dependent.
Getting to Message Features... 1. Press ? to go directly to the Messages menu. or Press M until you see Messages, and then press O. 2. Press M to scroll to one of the features described below. Checking Your Voicemail This feature makes checking your voicemail simple. 1. Follow the steps in “Getting to Message Features...” to get to Call Voicemail. 2. Press O to select. You will see your voicemail number followed by Calling.
Managing Your Received Messages How Your Phone Notifies You of Messages If your phone is powered on, it notifies you of received messages in the following ways: • An alert sounds and/or the phone vibrates. Your phone beeps and/or vibrates three times to inform you of an incoming message. (See page 153 for instructions on how to set your phone’s alert.) • The o (message) indicator is displayed. • The message is displayed immediately and remains on the display for several seconds.
What Messages Contain You can receive short text or numeric messages in your Personal Mailbox. Text messages may contain up to 160 characters. Numeric messages— typically phone numbers—may contain up to 20 digits. Your personal mailbox works along with call forwarding. For more information see “Personal Mailbox” on page 53, and the call forwarding feature descriptions on pages 108-115.
Accessing Received Messages Read a New Message Satellite Mode Cellular Mode (GSM 900/1800) (GSM 900) Notification Messages An incoming voicemail notification message automatically scrolls across your screen. You can: • Press O to store it on your SIM card. • Press C to delete it. Text Messages When you receive a new alphanumeric message, you will see Message Read Now? To read it: 1. Press O and continue with step 2. or Press C to read the message later. See “Read a Stored Message” on page 133. 2.
Getting to Received Messages... 1. Press ? to go directly to the Messages menu. or Press M until you see Messages, and then press O. 2. Press M to scroll to Received Messages, and then press O. 3. Press M to scroll to one of the features described below. Read a Stored Message To read a stored message that you have received: 1. Follow the steps in “Getting to Received Messages...” to enter the message center. You will see the number of messages stored, followed by the first message.
Go to the Next Message Satellite Mode Cellular Mode (GSM 900/1800) (GSM 900) To go to the next message: 1. Follow the steps in “Read a Stored Message” on page 133. 2. Press M until you see Go To Next Message and then press O. You will see the next message. If you are at the end of your message list you will see the first message again. 3. Press M to scroll through the message one screen at a time. 4. Repeat steps 2 to 3 to read all of your messages. 5. Press and hold C to exit the menu.
+ Return a Call A callback number appears in quotes within the received message. If one is enclosed, you can instantly place a call to that number. If a callback number is not included, your phone selects the first number in the message. Satellite Mode Note: You must subscribe to this network feature through your service provider. Contact your service provider for additional information. 1. Follow the steps in “Go to the Next Message” on page 134 to display the desired message, and then press O. 2.
Getting to Message Features... 1. Press ? to go directly to the Messages menu. or Press M until you see Messages, and then press O. 2. Press M to scroll to one of the features described below. + Managing Outgoing Messages You can create a new message and send it immediately, or store it in an outgoing messages list for later use. You can also edit a message that you have received, then send and/or save the modified message. Messages are created and edited in the message editor.
Create a New Message To create a new message in the message editor: 1. Follow the steps in “Getting to Message Features...” to get to Message Editor, and then press O to select. The message editor displays the contents of the last message entered. If there are no previous messages, the cursor is placed in the upper left corner of the editing area. 2. Press and hold C to clear the entire message editor contents, if necessary. 3. Begin composing your message.
Edit a Message You can edit a new message at any time while you are creating it. You can also edit received messages or messages stored in the outgoing messages list. See “Edit a Stored Message” on page 135 for instructions on how to copy a received message into the message editor. See “Edit a Stored Message” on page 142 for instructions on how to copy an outgoing message into the message editor. To delete text in a message: 1. Press < to scroll the cursor to the right of the text you want to delete. 2.
The message is sent to your message service center, which forwards the message to its final destination. You will see Message Sent when the message arrives at the service center. If the message cannot be delivered to the service center, you will see Message Failed, followed by Resend? on the next line. You can: Press O to resend the message. or Press C to abandon the attempt to send the message at this time. See “Store a Message” on page 139 for instructions on how to store the message for later mailing.
Getting to Outgoing Messages... 1. Press ? to go directly to the Messages menu. or Press M until you see Messages, and then press O. 2. Press M to scroll to Outgoing Messages, and then press O. 3. Press M to scroll to one of the features described below. + Read a Stored Message This feature displays the first message stored in the outgoing messages list. Note: This feature must be activated by your service provider. Contact your service provider for additional information.
+ Go to the Next Message This feature takes you to the next message in the outgoing messages list. Note: This feature must be activated by your service provider. Contact your service provider for additional information. To go to the next message in satellite mode: Satellite Mode 1. Follow the steps in “Read a Stored Message” on page 140. 2. Press M until you see Go To Next Message and then press O. You will see the next message. 3. Press M to scroll through the message one screen at a time. 4.
3. Enter the destination address and then press O to send the message. The message is sent to your message service center, which forwards the message to its final destination. You will see Message Sent when the message arrives at the service center. If the message cannot be delivered to the service center, you will see Message Failed, followed by Resend? on the next line. You can: Press O to resend the message. or Press C to abandon the attempt to send the message at this time.
The message is copied to the message editor. You will see the final portion of the message displayed in the editing area. The cursor is placed at the end of the message. For instructions on how to edit a message, see “Message Editor” on page 136. This feature is not available in cellular mode. Cellular Mode + Delete a Stored Message Use this feature to make room for new messages on your SIM card. Note: This feature must be activated by your service provider.
Getting to Message Settings... 1. Press ? to go directly to the Messages menu. or Press M until you see Messages, and then press O. 2. Press M to scroll to Message Settings, and then press O. 3. Press M to scroll to one of the features described below. Managing Other Message Settings Store Your Voicemail Number To store a voicemail number: Tip: Use pause dialing to store your voicemail access and PIN numbers together. See “Using Pauses in Numbers” on page 84. 1.
+ Enter Service Center Number Use this feature to enter the number for the service center that forwards your outgoing messages. You must specify a service number before you can send any messages. Note: This feature must be activated by your service provider. Contact your service provider for additional information. To enter the service center number in satellite mode: 1. Follow the steps in “Getting to Message Settings...” to get to Service Centre, and then press O to select.
Getting to Message Settings... 1. Press ? to go directly to the Messages menu. or Press M until you see Messages, and then press O. 2. Press M to scroll to Message Settings, and then press O. 3. Press M to scroll to one of the features described below. + Set Expiry period This feature specifies the maximum amount of time, in hours, that an unforwarded outgoing message will remain at the service center before it is deleted. Note: This feature must be activated by your service provider.
+ Specify Outgoing Message Type You can send messages to a device which interprets them in a format other than text. Your service center converts the messages before forwarding them to the destination address. Note: This feature must be activated by your service provider. Contact your service provider for additional information. To specify the outgoing message type in satellite mode: Satellite Mode 1. Follow the steps in “Getting to Message Settings...
148 Using Message Services
Customizing Phone Features Once you are comfortable with the basic features of your new phone, use the Phone Setup menu to configure your phone the way you like it. The feature selection on the Phone Setup menu varies depending on your mode setting. The table below shows the features available in each mode. See “Selecting a Mode” on page 185 for more information on changing modes.
Phone Setup Menu Satellite Mode Phone Setup Adjust Ring Volume Ring or Vibrate Ring Only Vibrate Only Vibrate Then Ring No Ring or Vibrate Set Ringer Tone Standard Tone High Tone Phone Lock Automatic Lock On/Off Lock Now Change Unlock Code Activate IR Port Require SIM Card PIN On/Off Change SIM PIN Code Change SIM PIN2 Code New Security Code Extended Menus On/Off The following Phone Setup menu items are available only when the extended menus are activated.
Cellular Mode Phone Setup Emergency Mapping1 Intl Dialing Prefix1 Change Number1 System Scan2 Std A/B Scan B/A Std B/A Scan A/B Scan A Scan B Home Only Preferred SIDs System Options1 Display SID Roam List Version3 Adjust Ring Volume Ring or Vibrate Ring Only Vibrate Only Vibrate Then Ring No Ring or Vibrate Set Ringer Tone Standard Tone High Tone Phone Lock Automatic Lock On/Off Lock Now Change Unlock Code The following Phone Setup menu items are available only when the extended menus are activated.
Getting to Phone Setup... 1. Press M until you see Phone Setup, and then press O. 2. Press M to scroll to one of the features described below. Managing Phone Ringer Settings You can adjust your phone’s ringer volume and tone, and set the phone to ring or vibrate to notify you of incoming calls. Adjust the Ringer Volume Use this feature to adjust the volume of the ringer. The phone sounds the new volume level as you adjust it. 1. Follow the steps in “Getting to Phone Setup...
Set the Phone to Ring or Vibrate This feature is ideal for situations where a ringing phone is inappropriate or in noisy places where you might not hear the ringer. The VibraCall® alert function notifies you of incoming calls by discreet vibrations. 1. Follow the steps in “Getting to Phone Setup...” to get to Ring or Vibrate, and then press O to select. 2. Press M to scroll to Ring Only, Vibrate Only, Vibrate then Ring, or No Ring or Vibrate, and then press O to select the displayed option.
Getting to Phone Lock... 1. Press M until you see Phone Setup, and then press O. 2. Press M to scroll to Phone Lock, and then press O. 3. Press M to scroll to one of the features described below. Locking and Unlocking Your Phone These features can help you prevent unwanted use of your phone. Lock the Phone Automatically Use this feature to set your phone to lock itself every time it is powered on. 1. Follow the steps in “Getting to Phone Lock...” to get to Automatic Lock, and then press O to select. 2.
Change the Unlock Code The unlock code is originally set to 1234. You should change it as soon as possible. 1. Follow the steps in “Getting to Phone Lock...” to get to Change Unlock Code, and then press O to select. You will see Enter Security Code. 2. Enter security code. Enter your six-digit security code. You will see your current lock code and Enter Phone Unlock Code. 3. Press C to clear one digit at a time, or press and hold C to clear all the digits. Tip: The factory default security code is 000000.
Getting to Phone Setup... 1. Press M until you see Phone Setup, and then press O. 2. Press M to scroll to one of the features described below. Activating the Infrared Data Port Use this feature to activate the infrared data port on your phone when you want to establish a wireless infrared connection with an external device. 1. Follow the steps in “Getting to Phone Setup...” to get to Activate IR Port, and then press O to select. You will see Activating Cancel?. 2.
Getting to Require SIM Card PIN... 1. Press M until you see Phone Setup, and then press O. 2. Press M to scroll to Require SIM Card PIN, and then press O. 3. Press M to scroll to one of the features described below. Protecting the SIM Card You can use a Personal Identification Number (PIN) code to protect the information stored on your SIM card even when it is inserted into someone else’s phone.
Getting to Require SIM Card PIN... 1. Press M until you see Phone Setup, and then press O. 2. Press M to scroll to Require SIM Card PIN, and then press O. 3. Press M to scroll to one of the features described below. Change the SIM Card PIN Code To choose your own PIN code: 1. Follow the steps in “Getting to Require SIM Card PIN...” to get to Change SIM Card PIN, and then press O to select. You will see Enter Old PIN. 2. Enter the current PIN code, and then press O. You will see Enter New PIN. 3.
Getting to Phone Setup... 1. Press M until you see Phone Setup, and then press O. 2. Press M to scroll to one of the features described below. Managing Other Security Settings Your phone includes other security features: • a SIM card PIN2 code for accessing fixed dialing settings and other subscription-dependent features • a security code controls access to security and other menu options Change the SIM Card PIN2 Code Your SIM card PIN2 code is used to access fixed dialing settings.
Getting to Phone Setup... 1. Press M until you see Phone Setup, and then press O. 2. Press M to scroll to one of the features described below. Unblock the PIN2 Code If your PIN2 code is entered incorrectly three times in a row, ! Blocked appears in the display. You need to enter a PIN2 unblocking key (PUK2), which you can obtain from your service provider. 1. Press * * 0 5 2 *. 2. Enter unblocking key. Enter the eight-digit PUK2 unblocking key, and then press O. Your service provider supplies this code. 3.
Activating Extended Menus This feature activates and deactivates the extended menus. See “Personalizing the Options Menu” on page 200 to learn how extended menus can make your phone even simpler to use. 1. Follow the steps in “Getting to Phone Setup...” to get to Extended Menus, and then press O to select. 2. Press M to choose On or Off, and then press O. 3. Press and hold C to exit the menu. When extended menus are deactivated, you can activate them temporarily to access hidden features.
Getting to Phone Setup... 1. Press M until you see Phone Setup, and then press O. 2. Press M to scroll to one of the features described below. Managing Time and Date Settings View the Time and Date Use this feature to view the current time and date in one of two time zones. Note: This feature is available only when the extended menus are activated. See “Activating Extended Menus” on page 161. 1. Follow the steps in “Getting to Phone Setup...” to get to Show Time and Date, and then press O to select. 2.
Change the Time Displayed Use this feature to determine which time is displayed on your real time clock indicator. Note: This feature is available only when the extended menus are activated. See “Activating Extended Menus” on page 161. 1. Follow the steps in “Getting to Phone Setup...” to get to Show Time and Date, and then press O to select. 2. Press M to scroll to Change Clock, and then press O. 3. Press M to scroll to either Home Time or Away Time, and then press O to select. 4.
Getting to Phone Setup... 1. Press M until you see Phone Setup, and then press O. 2. Press M to scroll to one of the features described below. Set the Time and Date To make it easy to check the local time when you travel, your phone can save the current time and date for two different time zones. Note: This feature is available only when the extended menus are activated. See “Activating Extended Menus” on page 161.
Selecting the Display Language Your phone contains 21 languages. Use this feature to select the language in which your phone displays menus and messages. Note: This feature is available only when the extended menus are activated. See “Activating Extended Menus” on page 161. 1. Follow the steps in “Getting to Phone Setup...” to get to Language Selection, and then press O to select. 2. Press M to scroll through the choices, and then press O to select the displayed option. 3. Press and hold C to exit the menu.
Getting to Phone Setup... 1. Press M until you see Phone Setup, and then press O. 2. Press M to scroll to one of the features described below. Turning Lights On and Off You can activate or deactivate all phone lighting, including the phone status indicator, display backlighting, and keypad backlighting. Note: This feature is available only when the extended menus are activated. See “Activating Extended Menus” on page 161. 1. Follow the steps in “Getting to Phone Setup...
Setting Keypad Tones Choose the sounds your phone makes when its keys are pressed. Note: This feature is available only when the extended menus are activated. See “Activating Extended Menus” on page 161. 1. Follow the steps in “Getting to Phone Setup...” to get to Select Keypad Tones, and then press O to select. 2. Press M to choose Normal Tones, Single Tone, or No Tones, and then press O. 3. Press and hold C to exit the menu.
Getting to Phone Status... 1. Press M until you see Phone Setup, and then press O. 2. Press M to scroll to Phone Status, and then press O. 3. Press M to scroll to one of the features described below. + Managing Phone Settings Review Your Phone’s Settings Use this feature to review all of your phone’s settings that have changed from their original default settings. Satellite Mode To review all settings: 1. Follow the steps in “Getting to Phone Status...
Reset Phone Options to Factory Defaults Use the master reset feature to reset all settings to their original default settings.
Getting to Phone Status... 1. Press M until you see Phone Setup, and then press O. 2. Press M to scroll to Phone Status, and then press O. 3. Press M to scroll to one of the features described below.
Getting to Phone Setup... 1. Press M until you see Phone Setup, and then press O. 2. Press M to scroll to one of the features described below. r Cellular Mode Settings These phone setup features are available in TDMA and CDMA cellular modes only. For information on switching to cellular mode, see “Selecting a Mode” on page 185. r Set Up the Emergency Number This feature is not available in satellite mode or GSM cellular mode.
Getting to Phone Setup... 1. Press M until you see Phone Setup, and then press O. 2. Press M to scroll to one of the features described below. r Set Up an International Prefix Satellite Mode Cellular Mode This feature is not available in satellite mode or GSM cellular mode.
r Set System Scan Preference This feature is not available in satellite mode, GSM cellular mode, TDMA cellular mode, or CDMA 1900 cellular mode. Satellite Mode Cellular Mode The system scan feature lets you select the type of cellular system your phone accesses. This feature typically is configured by your cellular service provider.
System Scan Settings 174 Setting Description Standard Mode Your phone first seeks a home type system, then a non-home type system. • If home system is non-wireline (type A), you will see Std A/B. • If home system is wireline (type B), you will see Std B/A. Reversed Preference Mode Your phone first seeks a non-home type system, then a home type system. (This mode may be useful in fringe areas or certain roaming situations.) • If home system is non-wireline (type A), you will see Scan B/A.
Getting to Phone Setup... 1. Press M until you see Phone Setup, and then press O. 2. Press M to scroll to one of the features described below. r Switch Phone Numbers This feature is not available in satellite mode or GSM cellular mode. Satellite Mode Cellular Mode (GSM 900/1800) (GSM 900) Your phone can operate on two to four different home systems depending on your Cellular Cassette. This feature lets you change your active number to the one appropriate for your current area.
176 Customizing Phone Features
Accessing the Network This chapter shows you how to register with the Iridium® satellite network in satellite mode, or how to locate and register with an available local network in GSM cellular mode. The feature selection on the Network Selection menu varies depending on your mode setting. The table below shows the features available in each mode. See “Selecting a Mode” on page 185 for more information on changing modes.
Network Selection Menu Satellite Mode Network Selection Register Now Cellular Mode (GSM 900/1800) (GSM 900) Network Selection Available Networks Register Now Network Search Registration Preferences Automatic Search Manual Search Find New Network Cellular Mode (TDMA 800/1900) (CDMA 1900) (CDMA/AMPS) 178 This menu is not available in TDMA or CDMA cellular mode.
Getting to Network Selection... 1. Press M until you see Network Selection, and then press O. 2. Press M to scroll to one of the features described below. + Registering With the Satellite Network Use this feature to access Iridium satellite service. Your phone searches for the Iridium satellite network. Satellite Mode 1. Rotate and extend the antenna upward. See “Holding the Phone” on page 44. 2. Follow the steps in “Getting to Network Selection...” to get to Register Now. 3. Press O to select.
Getting to Network Selection... 1. Press M until you see Network Selection, and then press O. 2. Press M to scroll to one of the features described below. You will see the feature name, followed by Select?. r Cellular Mode Settings These network selection features are available in GSM cellular mode only. For information on switching to cellular mode, see “Selecting a Mode” on page 185. r Scanning for Available Networks Satellite Mode This feature is not available in satellite mode.
r Setting Network Search Method This feature is not available in satellite mode. Satellite Mode When your phone needs to register with a network, it generates a sorted list of networks.
You can select one of the following search methods: Cellular Mode (TDMA 800/1900) (CDMA 1900) (CDMA/AMPS) 182 Method Description Automatic Search The phone tries to register with the first network in the sorted list that satisfies the GSM network search rules described on page 181. If this is successful your phone displays the network name. Manual Search The phone shows a sorted list of networks within range. You select the network with which you want to register.
Getting to Network Selection... 1. Press M until you see Network Selection, and then press O. 2. Press M to scroll to one of the features described below. You will see the feature name, followed by Select?. r Finding a New Network This feature is not available in satellite mode. Satellite Mode When your phone tries to register with a network, it excludes your current network from the search. If the attempt fails, your phone then attempts to re-register with the previous network.
184 Accessing the Network
Selecting a Mode If you have an optional Cellular Cassette installed in your satellite phone, you can access the cellular network as well as the satellite network. This chapter shows you how to select the type of service you want to use, and how to set your mode selection preferences on the Mode Selection menu. The table below shows the features available on the Mode Selection menu.
Mode Selection Menu All Modes Mode Selection Cellular Preferred Cellular Always Satellite Preferred Satellite Always 186 Selecting a Mode
Phone Behavior by Mode Preferred (Automatic) Modes When you select a preferred mode, your phone looks for that type of service first. If it cannot find your preferred service, after about five minutes, it switches automatically to your non-preferred service. If the phone switches to a non-preferred service, it checks at regular intervals (every 30 minutes) to see if your preferred service has become available.
Getting to Mode Selection... 1. Press M until you see Mode Selection, and then press O. 2. Press M to scroll to one of the features described below. You will see the feature name, followed by Select?. Selecting Satellite Mode Select Satellite Preferred Mode When you select this feature, your phone uses your Iridium satellite service if possible. When you are in satellite mode, you will see the + (satellite mode) indicator in the lower left corner of your display.
Select Satellite Always Mode When you select this feature, your system always accesses the Iridium satellite network. When you are in satellite mode, you will see the + (satellite mode) indicator in the lower left corner of your display. 1. Follow the steps in “Getting to Mode Selection...” to get to Satellite Always. 2. Press O to select.
Getting to Mode Selection... 1. Press M until you see Mode Selection, and then press O. 2. Press M to scroll to one of the features described below. You will see the feature name, followed by Select?. Selecting Cellular Mode Select Cellular Preferred Mode When this mode is active, your phone uses your cellular service if possible. If you are out of range, your phone switches to satellite mode. If this happens, you will see the + (satellite mode) indicator in the lower left corner of your display.
Timing Your Calls Your phone’s call meters give you a variety of options for tracking the time you spend on the phone. You can monitor the length of individual calls, set a timer to track monthly usage, or have the phone alert you with tones at specific intervals. Note: The features described in this chapter are only available in satellite mode. The table below shows the features available on the Call Meters menu. The Call Meters menu is only available in satellite mode.
Call Meters Menu Satellite Mode Call Meters Show Call Timers Show Last Call Total For All Calls Reset All Timers Set Audible Call Timers Single Alert Timer On/Off Repetitive Timer On/Off Set In-Call Display Show Time Per Call No In-Call Display Lifetime Timer1 1 This feature is available only when the extended menus are activated. Cellular Mode 192 This menu is not available in cellular mode.
Getting to Show Call Timers... 1. Press M until you see Call Meters, and then press O. 2. Press M to scroll to Show Call Timers, and then press O. 3. Press M to scroll to one of the features described below. + Showing Call Timers Call timers help you track your airtime. Keep a running tab of your monthly usage or view the airtime of your most recent call. Show the Time of the Last Call Use this feature to display the elapsed time of your most recent call. Satellite Mode 1.
Getting to Show Call Timers... 1. Press M until you see Call Meters, and then press O. 2. Press M to scroll to Show Call Timers, and then press O. 3. Press M to scroll to one of the features described below. Show Total Time for All Calls Satellite Mode Use this feature to display your total airtime since you last reset the Call Timer. 1. Follow the steps in “Getting to Show Call Timers...” to get to Total For All Calls, and then press O to select.
Getting to Audible Call Timers... 1. Press M until you see Call Meters, and then press O. 2. Press M to scroll to Set Audible Call Timers, and then press O. 3. Press M to scroll to one of the features described below. + Setting Audible Call Timers Let your phone watch the clock for you. The call timers signal at a set time or interval with beeps only you can hear. Set the Single Alert Timer Use this feature to set your phone to alert you after an elapsed time. Satellite Mode 1.
Getting to Audible Call Timers... 1. Press M until you see Call Meters, and then press O. 2. Press M to scroll to Set Audible Call Timers, and then press O. 3. Press M to scroll to one of the features described below. Set the Repetitive Timer Satellite Mode Use this feature to set your phone to alert you at specific intervals, for example every 45 seconds. 1. Follow the steps in “Getting to Audible Call Timers...” to get to Repetitive Timer, and then press O to select. 2.
Getting to Call Meters... 1. Press M until you see Call Meters, and then press O. 2. Press M to scroll to one of the features described below. + Showing the In-Call Timer Use this feature to display a running clock of the airtime elapsed while on a call. Satellite Mode 1. Follow the steps in “Getting to Call Meters...” to get to Set In-Call Display, and then press O to select. 2. Press M to scroll to Show Time Per Call or No In-Call Display, and then press O to select. 3.
Getting to Call Meters... 1. Press M until you see Call Meters, and then press O. 2. Press M to scroll to one of the features described below. + Showing the Lifetime Timer Satellite Mode Use this feature to show the total time of all calls for the life of your phone. Note: This feature is available only when the extended menus are activated. See “Activating Extended Menus” on page 161. Tip: The lifetime timer can not be reset. The Reset All Timers feature has no effect on this timer.
Customizing the Menu System This chapter shows you several ways to customize the menu system to suit your personal needs. You can hide the menu features you don’t use regularly, and you can add your favorite features to the Quick Access menu for instant recall.
Personalizing the Options Menu You can customize the Options menu by moving features in and out of the extended menus. Features that you place on the extended menu are hidden when extended menus are turned off, and become visible when you activate the extended menus. Note: The default factory setting for your phone is extended menus activated. Move Menu Features To move menu features: 1. Find the feature you want to move. 2. Press and hold O.
Activate/Deactivate Extended Menus Use the Options menu to activate and deactivate extended menus. Activate them when you need access to every feature. Deactivate them for everyday use. 1. Press M until you see Phone Setup, and then press O to select. 2. Press M to scroll to Extended Menus, and then press O to select. 3. Press M to scroll to either On or Off, and then press O to select. All hidden features are accessible when you activate the extended menus.
Personalizing the Quick Access Menu You can replace the default Quick Access menu features described on page 71 with any of the following features. Icon Quick Access Feature D Find by Location recalls a phone book entry by its memory location number. F Add Entry to Phone stores entered numbers in the next available phone memory location. T Add Entry to SIM stores entered numbers in the next available SIM card location. N Ring Volume displays and sets the incoming call ring tone volume.
Troubleshooting This chapter tells you what to do if you experience one of the following problems: Problem You can’t turn the phone’s power on. Solution Did you press and hold the S key for three seconds to turn the phone’s power on? • Check the battery. Is it charged, properly fitted, and are the contacts clean and dry? • • You can’t make calls. Check the antenna.
Problem Solution • • • You can’t receive calls. • • • • You can’t make international calls. • • • Your phone will not unlock. • • Check to see that your phone is powered on. Check the antenna. Is it fully extended and rotated? Do you have a clear unobstructed view of the sky? Check the signal strength indicator. If the signal is weak, move to an open space or, if you are in a building, move closer to a window. Check the call forwarding and call barring settings. Check the ringer setting.
Problem Solution • You can’t access your messages. • Are you in the correct mode? If you do not have a GSM cellular cassette installed, you must be in satellite mode to access your messages. Is your GSM Cellular Cassette inserted? In order to access messages from cellular mode, you must have a GSM Cellular Cassette inserted. You can’t cancel call forwarding or call barring. Wait until you are in an area with good network coverage and try again. The o (message) indicator is flashing.
Problem Solution Your SIM card is inserted in the phone but the display says: Check Card or Insert Card. Check that the SIM card has been inserted correctly. The contacts of the SIM card may be dirty. Turn the phone off, remove the SIM card and rub the contacts with a clean cloth. Replace the card in the phone. • Blocked or ! Blocked Enter the PIN unblocking key (PUK1) or the PIN2 unblocking key (PUK2) respectively, or contact your service provider.
Index Symbols * character 48 + character 47, 48 ® character 48, 84 A AC travel charger 20 accessories 19–23 accessory connector defined 15 illustration 13 Activated message 156 Activating Cancel? 156 adapter antenna 22 auto accessory 21 Add To Short Menus message 200 airbag 10 alert, incoming call 52 alphanumeric keypad 13 antenna adapter 22 attaching 26 care 7 Cellular Cassette antenna 13 clear-line-of-sight 14 detents 14, 44 extending 44 illustration 44 lock release button 13, 15, 26 removing 26 rotating
! Blocked message 44, 160, 206 Busy Try Later message 47, 59, 62, 69, 179 C call answering 51–52 automatic redial 48 barring 117–121 conference call 63–65 dialing special characters 48 emergency call 49 ending 50, 53 forwarding 108–115 holding 61–65 incoming call alert 52 international call 47 last ten calls 97–98 muting 58 placing 46–50 receiving 51–53 redialing last number 48 returning a call 135 unable to make call 203 unable to make international call 204 unable to receive call 204 Call Answer? 51, 5
Call Related Features menu (continued) Restrict My Phone Number feature 125 Show Battery Meter feature 122 Show Signal Strength feature 123 call timers all calls 194 elapsed airtime 197 in-call timer 197 lifetime timer 198 most recent call 193, 202 repetitive 196 resetting all 170, 194 single alert 195 total airtime 194 call waiting accepting waiting call 59 activating 116 CDMA cellular mode 60 ending current call 59 messages 59 rejecting waiting call 59 TDMA cellular mode 60 Call Waiting Answer? 59 Call? 4
code phone unlock 154–155 security 91, 155, 160, 169, 170 SIM card PIN 43, 157–158 SIM card PIN2 92–95, 159–160 Completed message 69 conference call adding single call 63, 65 beginning 63, 65 CDMA cellular mode 65 ending 64 ending all active calls 65 ending all held calls 65 holding a private conversation 64, 65 keypad controls 65 making new call 63 messages 64 placing call on hold 63, 65 releasing single call 65 TDMA cellular mode 65 Conference Full message 64 Conference Unsuccessful message 64 Connected m
extended menus (continued) Set Time and Date 164 Set Time Format 163 Show Time and Date 162, 163 external devices, communicating with 156 F Failed message 69 Fast Charge Completed message 122 fixed dial list defined 92 entry adding 93 editing 95 erasing 94 one-touch dialing 101 viewing 96 fixed dialing activating 92 PIN2 code 159 viewing fixed dial list 96 Flash Options message 66, 74 forwarding calls all calls 110–111 cancelling 115 from Quick Access menu 71 voice calls 112–114 when unavailable 108 G GSM
indicators (continued) no service 18, 42 real time clock 17 roam 18, 180 satellite mode 17, 188, 189, 190 scroll bar 18, 69 signal strength 13, 17, 123, 179 status 13, 16 infrared data port activating 156 deactivating 156 defined 15 illustration 13 Insert Card message 43, 206 Insert Cassette message 188, 190, 206 international call dialing + character 48 placing 47 unable to make 204 international dialing prefix default 172 dialing 47 resetting default setting 169 setting 172 Invalid Account message 43 Inva
M making a call 46–50 master clear 170 master reset 169 memory phone 78, 80, 81 SIM card 78, 80, 81 memory recall key 14, 55, 88, 99 memory store key 14, 81, 97, 98 menu Add To Short Menus message 200 Call Meters 191–198 Call Related Features 105–125 Cannot Move Menu Item message 200 customizing 199–202 defined 67 exiting 68 feature selection messages 69 indicators 69 Leave in Long Menus message 200 Leave in Short Menus message 200 Menu Item Moved message 200 Messages 127–147 Mode Selection 185–190 Move Can
Messages menu (continued) Received Messages feature 133–135 Voicemail Number feature 144 microphone 13 Mode Selection menu cellular always mode 190 cellular preferred mode 190 diagram 186 satellite always mode 189 satellite preferred mode 188 mode, selecting 188–190, 202 Move Cancelled message 200 multiple-key answer 51, 52 Mute End Call? 58 muting a call 58, 71 N network GSM cellular find new network 183 registering 180 scanning 180 search method 181–182 satellite, registering 71, 179 network features cal
phone (continued) security code, default 155 service phone numbers 103, 202 settings clearing 170 resetting default 169 viewing 168 turning on and off 42 unable to make call 203 unable to make international call 204 unable to receive call 204 unable to turn on 203 unable to unlock 204 unblocking the PIN code 158 unblocking the PIN2 code 160 unlock code changing 155 default 154 entering 154 unlocking 154 use while driving 8 use with other electronic devices 9–10 phone book adding an entry 80–83 capacity, che
Phone Book menu (continued) Modify Name Or Number feature 89 My Phone Number(s) feature 99–100 One-Touch Dial Setting feature 101–102 Prevent Access feature 91 Setup Fixed Dialing feature activating 92 Add Entry 93 Edit Entry 95 Erase Entry 94 Last Ten Calls 97–98 View Fixed Dial List 96 Show Services feature 103 phone flash 66 phone memory checking capacity 90 entries, clearing all 170 one-touch dialing 101 storage capacities 78 phone number active number, changing 175 dialing 46 modifying on SIM card 100
PIN code (continued) defined 157 Enter PIN message 43, 157 entering 43, 157–158 incorrect entry 158 unblocking 158 PIN unblocking key (PUK1) defined 158 entering 158 PIN2 code ! Blocked message 44, 160, 206 changing 159 defined 159 Enter PIN2 message 92–95 entering 92–95 incorrect entry 160 unblocking 160 PIN2 unblocking key (PUK2) defined 160 entering 160 placing a call 46–50 Please Try Later message 47, 179 postscripting 86 power checking power level 122 power-on messages 43 turning phone on and off 42 un
Remove From Short Menus message 200 repetitive timer defined 196 resetting default setting 169 setting 196 Restricted Area message 47, 179 Restricted message 91 restricting calls 117–121 restricting phone use 92–96 restricting SIM card access 92 ringer activating 153 adjusting volume 55, 152, 202 deactivating 153 resetting default tone 169 setting tone 153 wakeup tone 42 roam indicator defined 18 displayed 180 Rotate and Extend Antenna message 43, 47, 123, 179 Rotate Antenna Call Attempt message 52 Rotat
SIM card (continued) inserting 28 phone number entering 100 modifying 100 security issues 79 viewing your own 55, 99 PIN code activating 157 changing 158 deactivating 157 defined 157 Enter PIN message 43, 157 entering 43, 157–158 incorrect entry 158 unblocking 158 PIN2 code changing 159 defined 159 Enter PIN2 message 92–95 entering 92–95 incorrect entry 160 unblocking 160 precautions 27, 28 protecting 157–158 removing 28 restricting access 92 security features 157–160 storing messages outgoing 139 received
unlock code changing 155 default 154 entering 154 unlocking the keypad 54 unlocking the phone 154 See also locking the phone V VibraCall alert function activating 71, 153 deactivating 153 phone power-on and 42 vibration mode.
Patent Information Manufactured under one or more of the following U.S. patents: 4121218 4138681 4193036 4254382 4302845 4312074 4327319 4329666 4369516 4369522 4378603 4390963 D269873 4398265 4400584 4400585 D270835 D271491 Re.
222
In order to access Iridium LLC Global Customer Care (24 hours a day, 7 days a week), dial one of the following numbers: English: 811* or +8817-629-90051 or +407-659-1331 Spanish: 812* or +8817-629-90052 or +407-659-1332 Portuguese: 813* or +8817-629-90053 or +407-659-1333 Russian: 814* or +8817-629-90054 or +61-2-9215-1514 German: 815* or +8817-629-90055 or +61-2-9215-1515 Italian: 816* or +8817-629-90056 or +612-2-9215-1516 French: 817* or +8817-629-90057 or +61-2-9215-1517 Japanese: 818* o
products for the iridium system In order to contact Motorola (Monday thru Friday 7AM to 7PM [CST]), dial one of the following numbers: US & Canada: 1-888-839-4647 Outside the US & Canada: (Toll-Free Global Number): +1-8000-839-4647 Direct Dial: +1-847-523-1898 TTY Toll-Free Number 1-888-390-6456 TTY (outside the United States): +1-847-523-1841 + designates international dialing access code (00) www.motorolasatellite.com ©1999 Motorola, Inc.