R AUDIO VIDEO AM/FM Radio Alarm Clock with USB Batery Charger CLR-200GSM Instruction manual Bedienungsanleitung Manuel d’instructions Manuale d’istruzioni Manual de instrucciones Manual de instruções R AUDIO VIDEO is a registered Trademark of Roadstar S.A.
INDEX CLR-200GSM English Deutsch Français Italiano Español Português Page Seite Page Pagina Página Pagina Fi g. ig F 1 9 17 25 33 41 . • Your new unit was manufactured and • Ihr neues Gerät wurde unter Beachtung der strengen ROADSTAR-Qualitätsvorschriften gefertigt. assembled under strict ROADSTAR quality Wir danken Ihnen für den Kauf unseres Produktes und control. wünschen Ihnen optimalen Hörgenuss.
English 1 WARNINGS The exclamation point within the triangle is a warning sign alerting the user of important instructions accompanying the product. The lightening flash with arrowhead symbol within the triangle is a warning sign alerting the user of “dangerous voltage” inside the unit. CAUTION RISK OF ELECTRIC SHOCK DO NOT OPEN 230v~ To reduce the risk of electric shock, do not remove the cover. No user serviceable parts inside the unit. Refer all servicing to qualified personnel.
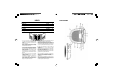
English 3 4 English POWER SUPPLY SETTING THE CORRECT TIME This unit operates from a main supply of 230V ~ 50Hz. Connect the AC power cord to the AC household main outlet. Ensure that the voltage is as indicated on the rating plate on the rear of the unit. 1. 2. 3. 4. Press and hold the TIME Button (7). Press HOUR button (3) to advance hour Press MINUTE button (4) until the correct time is displayed. Release the TIME Button (7).
English 5 6 English WAKE TO THE RADIO SNOOZEFUNCTION 1. Set the alarm time as shown above. 2. Set the Band Selector (10) to the desired radio band, and follow the procedure in LISTENING TO THE RADIO to tune the radio to a station. 3. Set the VOLUME Control (15) to a level you feel will wake you. 4. Set the FUNCTION Selector (12) to the AUTO position. ALARM ON “ ” indicator will light up on the bottom left side of the display. 5. To switch off the alarm either press the AL.
English 7 8 English holes or openings on the clock radio. Note: When setting the Clock or Alarm times remember that this clock radio has a 24 Hour clock mode. SPECIFICATIONS AC POWER AM Band: 530 to 1600 kHz Power Supply: Back-up Battery : 230VAC, 50 Hz 9V DC 006P USB Output: + 5V, 250mA max For your own safety read following instructions carefully before attempting to connect this clock radio to the mains. This unit is designed to operate on a 230V~50Hz supply only.
Deutsch 9 SICHERHEITSHINWEISE Das Ausrufszeichen im Dreieck weist den Benutzer auf wichtige Bedienungsund Wartungsanweisungen (Service) in diesem Handbuch hin, die unbedingt zu befolgen sind. Das Blitzsymbol im Dreieck weist den Benutzer auf “gefährliche Spannungen” an einigen freiliegenden Bauteilen im Innem des Gerätes hin. CAUTION RISK OF ELECTRIC SHOCK DO NOT OPEN 230v~ Um die Gefahr elektrischer Schläge auszuschliessen, Gehäuse auf keinen Fall abnehmen.
Deutsch 11 12 Deutsch SPANNUNGSVERSORGUNG EINSTELLEN DER GENAUEN UHRZEIT Dieses Gerät funktioniert mit Netzstrom von 230V ~ 50Hz. Schließen Sie das AC-Netzkabel an eine AC-Netzsteckdose an. Vergewissern Sie sich, daß die Spannung mit der auf dem Typenschild angegebenen übereinstimmt. Das Typenschild befindet sich auf der Rückseite des Gerätes. 1. Drücken Sie die UHREINSTELL-Taste (7) und halten Sie sie gedrückt. 2. Drücken Sie die STUNDEN-Taste (3), um die Stunden fortschreiten zu lassen. 3.
Deutsch 13 3. Um den Wecker auszuschalten, drücken Sie die WECKER AUS-Taste (2) oder stellen Sie den FUNKTIONS-Wahlschalter (12) auf OFF. 14 Deutsch Das MW-Band verwendet eine eingebaute Richtungsantenne. Sie brauchen das Weckradio nur zu drehen, um den besten Empfang zu erreichen. AUFWACHEN MIT RADIOMUSIK SCHLUMMER-FUNKTION 1. Stellen Sie die Weckzeit wie oben beschrieben ein. 2.
Deutsch 15 ausgesetzt werden. Stellen Sie es nicht in einer staubigen Umgebung auf. Verwenden Sie keine scharfen Reinigungsmittel, Benzin, Verdünner oder andere Lösungsmittel, um das Gehäuse des Weckradios zu reinigen. Um es zu reinigen, wischen Sie es mit einem sauberen und weichen Tuch ab, das mit einer milden Reinigungslösung angefeuchtet ist. Stecken Sie niemals Drähte, Nadeln oder andere Gegenstände in dieBelüftungslöcher oder Öffnungen des Weckradios.
Français 17 ATTENTION Le symbole “point d’exclamation” à l’intérieur d’un triangle avertit l’utilisateur que d’importantes instructions d’utilisation et de maintenance sont contenues dans le mode d’emploi. CAUTION RISK OF ELECTRIC SHOCK DO NOT OPEN 230v~ Le symbole “éclair” à l’intérieur d’un triangle sert à avertir l’utilisateur de la présence du courant à l’intérieur du l’appareil qui pourrait constituer un risque. Afin de minimiser les risques, ne pas ouvrir le boîtier ni ôter le dos de l’appareil.
Français 19 20 Français SOURCES D'ALIMENTATION PROGRAMMATION DE L'HORAIRE JUSTE Cet appareil fonctionne sur secteurs de 230V - 50Hz. Brancher le cordon de raccordement CA à votre prise de secteur CA. Vérifier que la tension électrique corresponde à celle indiquée sur la plaque des caractéristiques techniques placée au dos de l'appareil. 1. Appuyer et tenir enfoncée la Touche de REGLAGE DE L'HORAIRE (7). 2. Appuyer sur la touche de REGLAGE DE L'HEURE (3) pour faire avancer les heures 3.
Français 21 “clic” (Buzzer). 3. Pour éteindre le radio-réveil veuillez appuyer sur la Touche d‘ARRET DE L’ALARME (2) ou bien placer le Sélecteur de FONCTION (12) sur la position d'ARRET (OFF). REVEIL PAR RADIO 1. Programmer l'horaire du réveil comme indiqué ci-dessus. 2. Placer le Sélecteur de Bande (10) sur la bande radio souhaitée, et suivre les indications du paragraphe ECOUTE DE LA RADIO pour intercepter une station émettrice. 3.
Français 23 ENTRETIEN Pour éviter tout risque de décharge électrique, n'exposer ce radioréveil ni à la pluie, ni à l'humidité. L'appareil ne devrait être exposé ni dans un endroit en plein soleil, ni à des températures très élévées ou très basses, ni à l'humidité, ni être sujet à des vibrations, ni être placé dans un endroit poussiérex. Pour nettoyer la surface de ce radio-réveil, n'utiliser ni abrasifs, ni benzine, ni diluants, ni tout autre solvant.
Italiano 25 ATTENZIONE Il punto di esclamazione all’interno di un triangolo avverte l’utente che il libretto d’istruzioni contiene delle importanti istruzioni per l’uso e la manutenzione. 26 Italiano CLR-200GSM RADIOSVEGLIA DIGITALE AM/FM Il simbolo del fulmine all’interno di un triangolo avverte l’utente della presenza di una pericolosa tensione all’interno dell’apparecchio. CAUTION RISK OF ELECTRIC SHOCK DO NOT OPEN 230v~ Per ridurre i rischi di scosse elettriche, non aprire l’apparecchio.
Italiano 27 28 Italiano FONTI ALIMENTAZIONE IMPOSTAZIONE DELL'ORARIO CORRETTO Questo apparecchio funziona con una fonte di alimentazione di 230V ~ 50Hz. Collegare il cavo alimentazione AC alla presa di corrente AC domestica. Assicurarsi che il voltaggio sia uguale a quello riportato sulla targa dei dati caratteristici posizionata sul retro dell'apparecchio. 1. Premere e mantenere premuto il tasto IMPOSTAZIONE ORARIO TIME (7). 2. Premere il tasto ORA (3) per avanzare le ore. 3.
Italiano 29 30 Italiano SVEGLIA CON LA RADIO FUNZIONE SNOOZE 1. Impostare l'orario della sveglia come si mostra sopra. 2. Regolare il Selettore Banda (10) sulla banda radio desiderata e seguire la procedura della sezione ASCOLTO DELLA RADIO per sintonizzare una stazione radio. 3. Regolare il Controllo Volume (15) ad un livello d'ascolto che vi possa svegliare. 4. Regolare il Selettore FUNZIONE (12) sulla posizione AUTO. L’indicatore di ALARM ON “ ” apparirà a sinistra in basso del display. 5.
Italiano 31 32 Italiano Non tentare mai di inserire fili, spine o altri oggetti nei fori di ventilazione o le aperture della radiosveglia. Nota: Quando si imposta l'Orologio o la Sveglia ricordare che questa radiosveglia possiede un orologio a 24 ore. SPECIFICHE TECNICHE Banda AM: da 530 a 1600 kHz ALIMENTAZIONE AC Alimentazione: 230V - 50 Hz Batteria memoria: DC 9V del tipo 006P USB: Uscita +5V 250mA Max.
Español 33 ATTENTIÓN El símbolo de exclamación dentro un triángulo tiene el objeto de advertir al usuario de la presencia de instrucciones importantes de funcionamiento y mantenimiento en la documentación adjunta con el equipo. El símbolo del rayo con punta de flecha dentro de un triángulo adverte al usuario de la presencia de tensiones peligrosas en el equipo. CAUTION RISK OF ELECTRIC SHOCK DO NOT OPEN 230v~ Para reducir los riesgos de descargas eléctricas, no retire la cubierta.
Español 35 FUENTES ALIMENTACIÓN Este aparato funciona con una fuente de alimentación de 230V50Hz. Conectar el cable alimentación CA a la toma de corriente CA doméstica. Asegurarse de que el voltaje sea igual a aquel indicado en la placa de los datos característicos colocada en la parte posterior del aparato. 36 Español Nota: Si la alimentación se interrumpe y no hay alguna batería en el compartimento o la misma está descargada. El horario y los ajustes del despertador se perderán.
Español 37 38 Español DESPERTADOR CON ALARMA FUNCIÓN SNOOZE 1. Ajustar el horario del despertador como se muestra arriba. 2. Colocar el Selector FUNCIÓN (12) en la posición AUTO. El indicador de ALARM ON “ ” se enciende en el display. Girara el control Volumen hasta oír un “clic” (Buzzer). 3. Para apagar el despertador pulsar el botón AL. OFF (2) o colocar el Selector FUNCIÓN (12) en la posición OFF.
Español 39 abrasivo. No introducir nunca hilos, clavijas u otros objetos en los orificios de ventilación o las aberturas del radio despertador. Nota: Cuando se ajusta el Reloj y el Despertador recordar que este radio despertador posee un reloj de 24 horas. ALIMENTACIÓN CA Para su propia seguridad, leer atentamente las siguientes instrucciones antes de conectar este radio despertador a la fuente de alimentación principal. Alimentación Principal: Sólo CA de 230V - 50Hz.
Português 41 ATENÇÕES O ponto de exclamação dentro de um triãngulo adverte que o manual de instruções contém importantes informações de uso e de manutenção. O simbolo do raio dentro de um triãngulo serve para advertir a presença de uma tensão que pode constituir um risco se o aparelho não for utilizado de uma maneira correta. CAUTION RISK OF ELECTRIC SHOCK DO NOT OPEN 230v~ Para reduzir o risco de choque elétrico, não abrir o aparelho. O aparelho não contém partes reparáveis pelo utilitário.
Português 43 44 Português LIGAÇÃO DOS ACESSÓRIOS ACERTAR AS HORAS Este aparelho opera com acessórios de 230V - 50Hz. Ligar o fio AC à tomada de parede AC. Verificar a voltagem como indicada atrás da unidade. 1. 2. 3. 4. BATERIA DE RESERVA PROTETORA Este rádio possui uma bateria de reserva, com um circuito que mantem a hora e o alarme em uma interrupção temporária. Instalar baterias de 9-volt (tipo 6F 22/006P), não incluídas, dentro do compartimento, localizada atrás do aparelho.
Português 45 ACORDAR AO SOM DO RÁDIO 1. Programe a hora para o despertador como indicado anteriormente. 2. Seleccione ON com o seletor FUNCTION (12). 3. Seleccione a banda desejada (FM / AM) (10), and follow the procedure in LISTENING TO THE RADIO to tune the radio to a station. 4. Ajuste o volume ao nível desejado (14). 5. Seleccione AUTO com o seletor FUNCTION (12). O indicador ALARM ON “ ” se encende no display. 6.
Português 47 48 Português CUIDADOS E MANUTENÇÃO ESPECIFICAÇ£ES Para prevenir choques ou fogo, não posicionar o aparelho em lugares úmidos com chuva, com a luz do sól, altas temperaturas e poeira. Não usar produtos químicos, para a limpeza. Somente um pano macio e um produto não abrasivo. Não inserir pinos, fios ou objetos dentro do rolo de ventilação. Onda FM: Nota: Quando ajustar a hora, lembre-se que este relógio vai até as 12 horas. 87.