
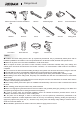
User Manual


36
3
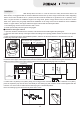
2- /16”
(55mm)
3
2- /16”
(55mm)
5
4- /16”
(110mm)
Hitching leg
stop block
mounting hole
4×60
wood screw
3
2- /8”
(60±2mm)
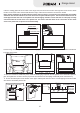
1
7- /8”(181mm)or
1
13- /8”(333mm)
Plane fixing
the decoration
panel inside
the bottom
of the upper
cabinet plate
as the base
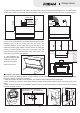
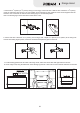
5.
press the expansion pipe into the hole, and reliably fix the hitching leg with 4×60mm wood screws supplied with the
machine. Use a level ruler to make sure the hitching leg is in a horizontal position.
Note: The hitching leg must be fixed to the beam with a screw.
Drill a hole 2- ”(60mm)-2- ”(70mm) deep (not too large) at the mark with a drill bit with a diameter of ”(8mm),
3 3 5
/8 /4 /16
4.
the inside of the upper cabinet plate bottom as the base and mark the drill holes. The relevant size is given as below:
1)The distance from inside the bottom of the upper cabinet plate to the center of the hitching leg hole is 7- ”(181mm) when
6” decoration panel is used.
2)The distance from inside the bottom of the upper cabinet plate to the center of the hitching leg hole is 13- ” (333mm)
when 12” decoration panel is used.
3)The installment pitch of holes between the center of the hitching leg hole and the hitching leg stop block is 2- ”(60±2mm).
1.Determine the installation position of the hitching leg and the hitching leg fixed block: confirm the hitching leg position with
1
/8
1
/8
3
/8
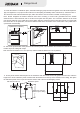
6. Drill a hole with a diameter of ”(10mm) (not too large) and a depth of 2”(50mm)-2- ”(55mm) at the fixing hole
mark of the hitching leg stop block, and insert the M6 metal expansion pipe into the hole.
3 3
/8 /16
12
1
4
1
6
1
0
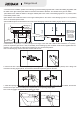
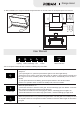
7. Paste the opening sample plate with the text surface downwards on the bottom plate of the upper cabinet, and use the
electric saw to open holes according to the requirements on the opening sample plate.
Note: wear the goggles and gloves when opening the holes.
Range Hood
12
1
4
16
1
0